I buy and collect Speedway minibikes. 06/05/23 Email: cfh@provide.net
Overall Speedway History.
skip to repair info
-
Information on Speedway minbikes and their history is pretty scarce.
But from what I can find, Speedway was started
by two former Rupp minibike employees (both Rupp and Speedway were
located in Mansfield Ohio). I believe the main man was John Morrow
(who was married to the daughter from Taylor Products.) Hence Speedway was a division
of Taylor Metal Products (with their financing).
Speedway did not exist for a long time. It looks like they where
around from 1970 to 1974 only. Their downfall appears to happen
about April 1974, with their sale to the Fox Corporation (Janesville WI).
1972 Speedway Owners Manual pdf.
-
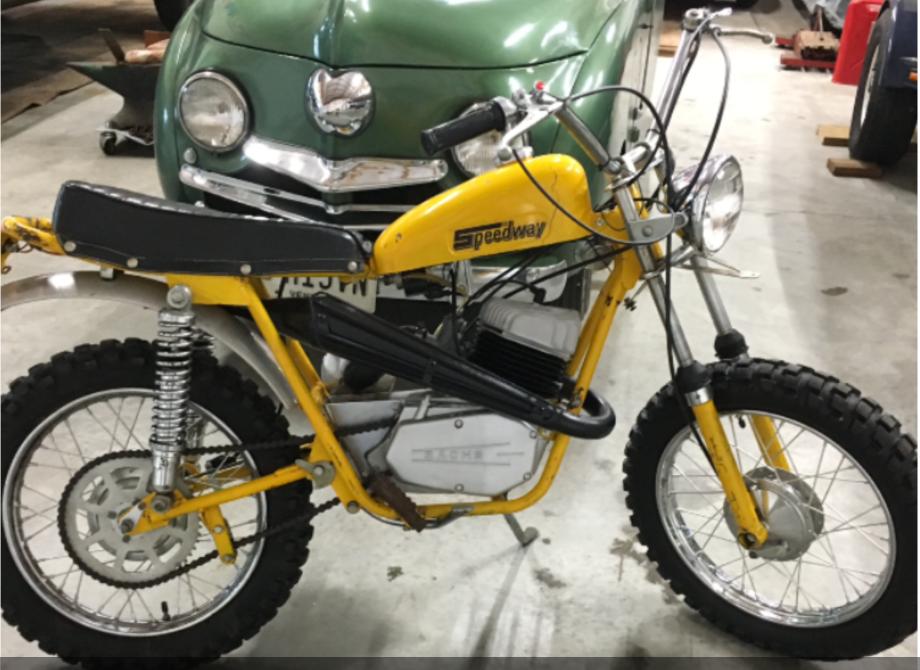
So what made Speedway mini bikes so interesting? Well from the start,
their bikes were high quality. No Speedway had less than a 10" wheels.
They mostly used a #40 motorcycle style chain. Tecumseh engines were stock,
and most bikes had 20 degree mounted motors.
Also nearly all models used an in-house designed "DynaTorque 400" torque converter
powered through a jackshaft.
Speedway was the first to introduce hydraulic telescopic front forks
(something most other manufacturers did in the next year, 1971.)
These features were not totally unique for 1970, but it was all a good thing, and put
them in an upper class of mini bikes. Were Speedways better than say Rupps?
Well they were certainly trying to be that. But personally, I'm not sure
the 10" wheel models achieved that goal. Speedways certainly are much rarer
than a Rupp though, and a bit different. For this reason there some people
that have latched onto the brand.
But what made Speedway really interesting, is a couple models that weren't necessarily in their catalogs, and that were very low production. These included some bikes that used 2-cycle Sachs motors.
1970 Speedway Mini Bikes.
-
The 1970 Speedway catalog
showed their catalog models utilized some standard things.
For example, the Tecumseh engine was standard. And for 1970
the 20 degree mounted Tecumseh motors were white (not black) with flag logo, and used a
diaphragm carb. They utilized a Taylor minibike exhaust (a
standard Tecumseh minibike exhaust), but added a chrome 3" wide extension on the back of the Taylor. It gave
a nice custom look. The gas tank was unique to Speedway. In 1970 the tank is known as
a "peanut" tank. It's two symmetrical halves put together with a center attachment strip.
This tank was also used for the clutch cover! Just look at the pictures, and you can
see that the clutch cover was one half of the gas tank. Speedway used this clutch cover
on all their models (with some minor mods) with Tecumseh engines, and for all years.
Also the rear section behind the seat "kicks up".
And the 1970 Speedway models used disc brakes for all positions and all models
(except the Stinger, which had a foot scrub brake.)
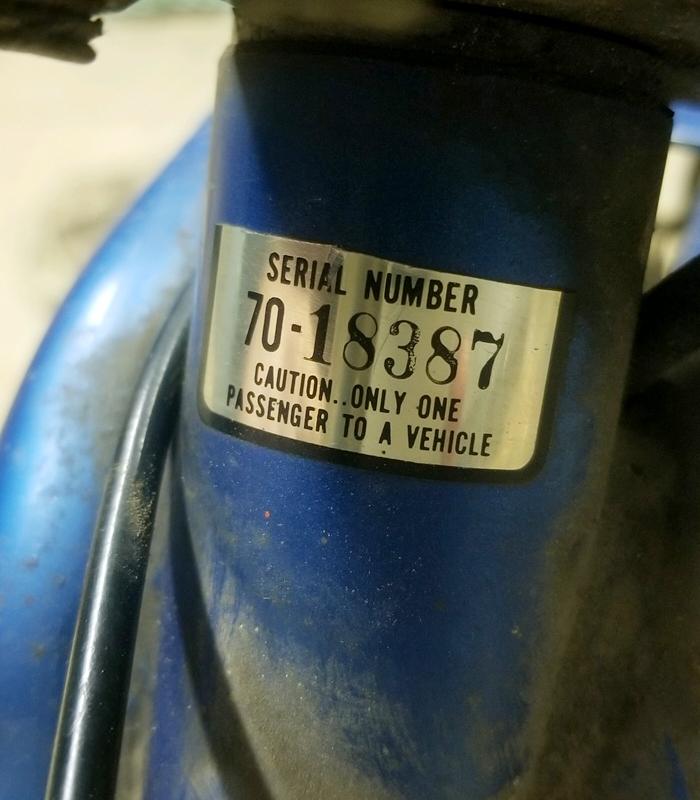
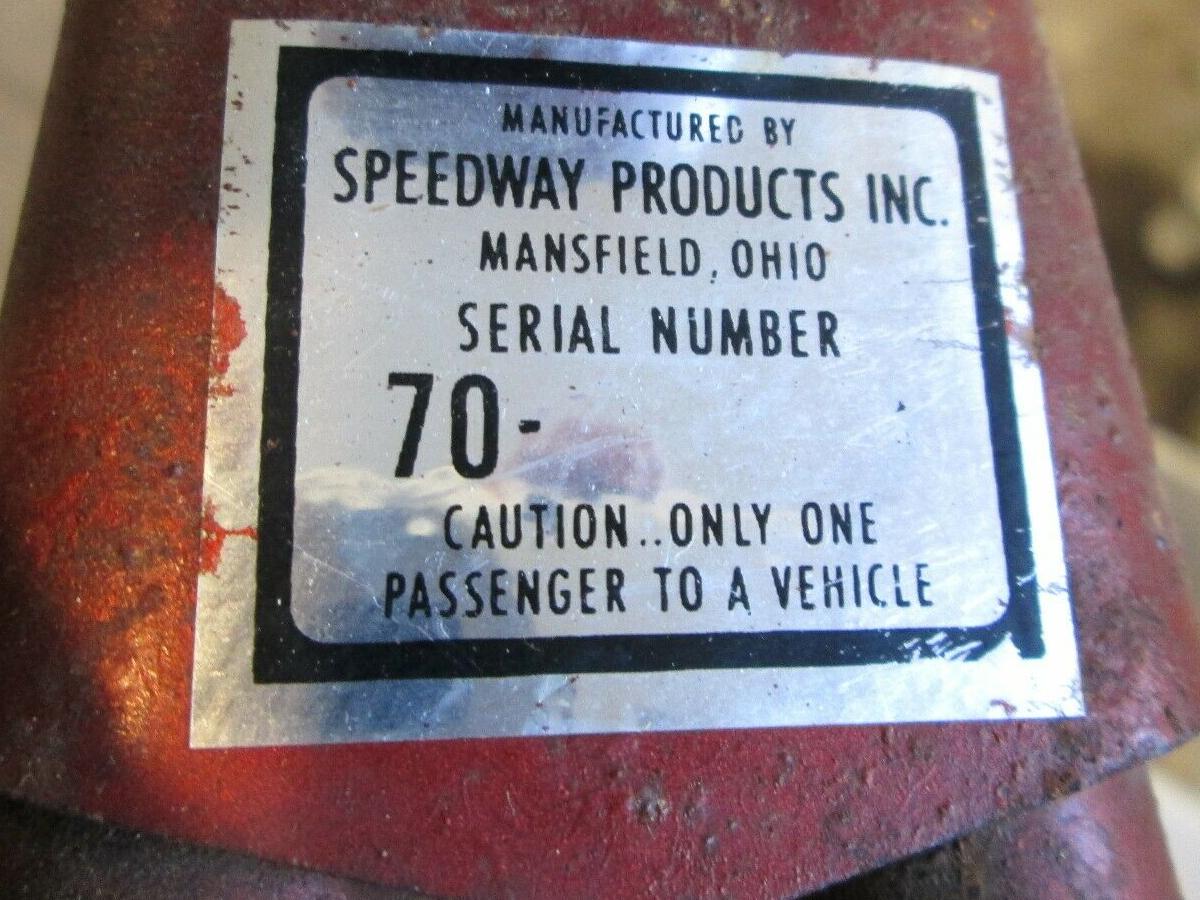
The serial number was on a chrome foil sticker with black lettering,
installed on the metal just behind the fork attachment point.
This serial number position was a standard thing for all Speedways.
But they only used the foil sticker in 1970 (serial numbers mid 10,000 and less.)
-
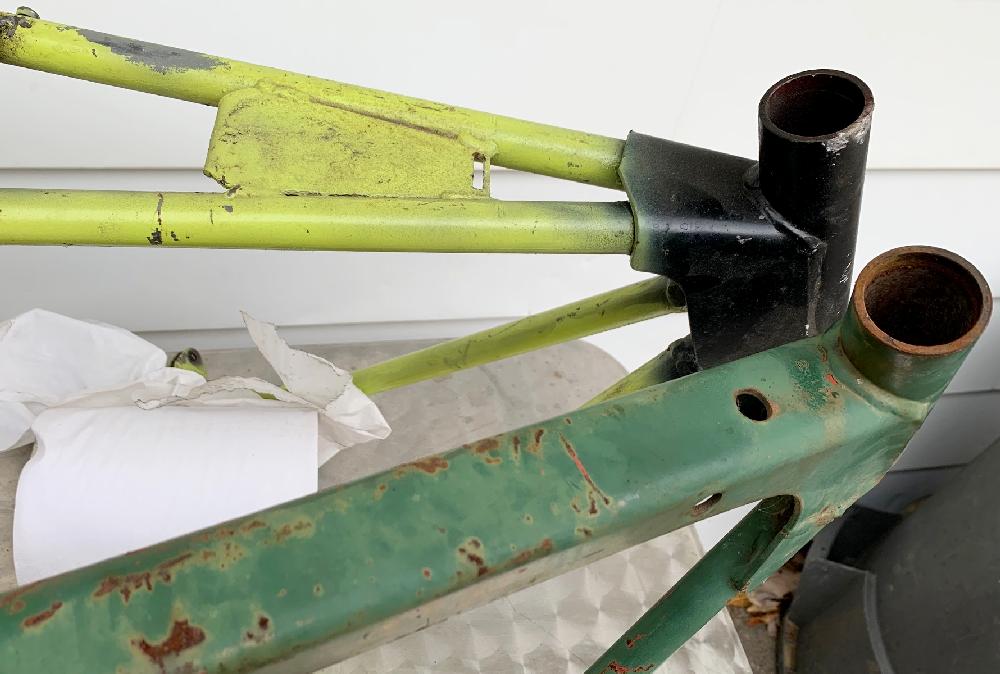
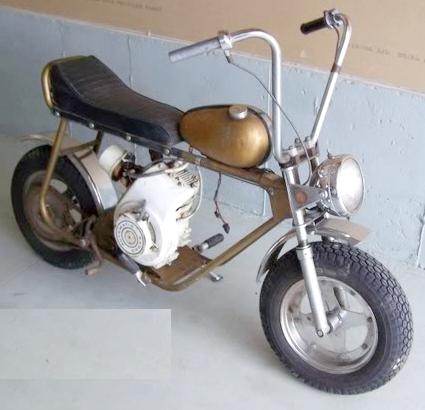
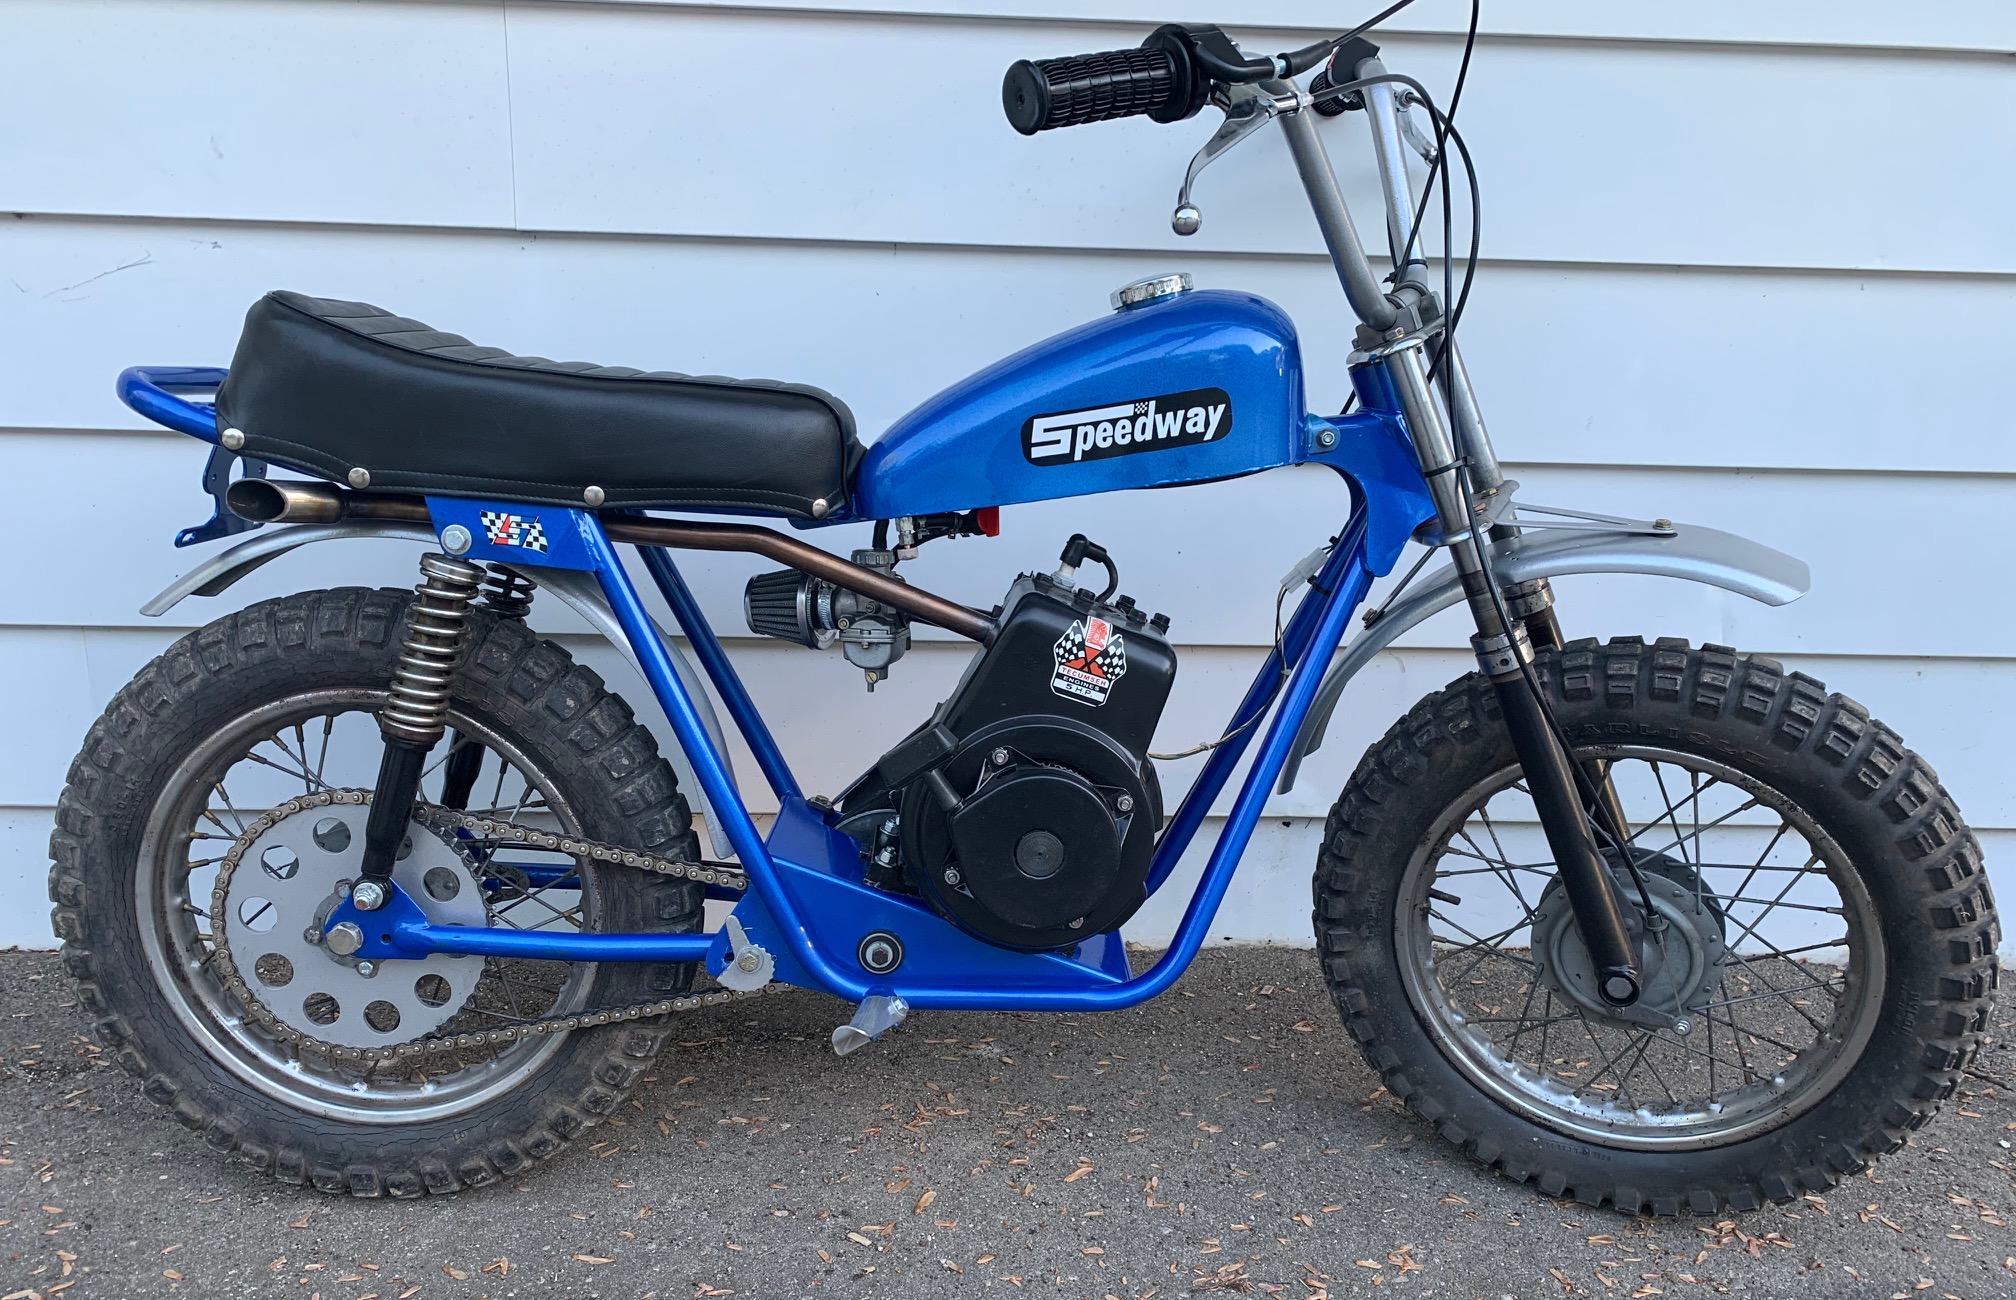
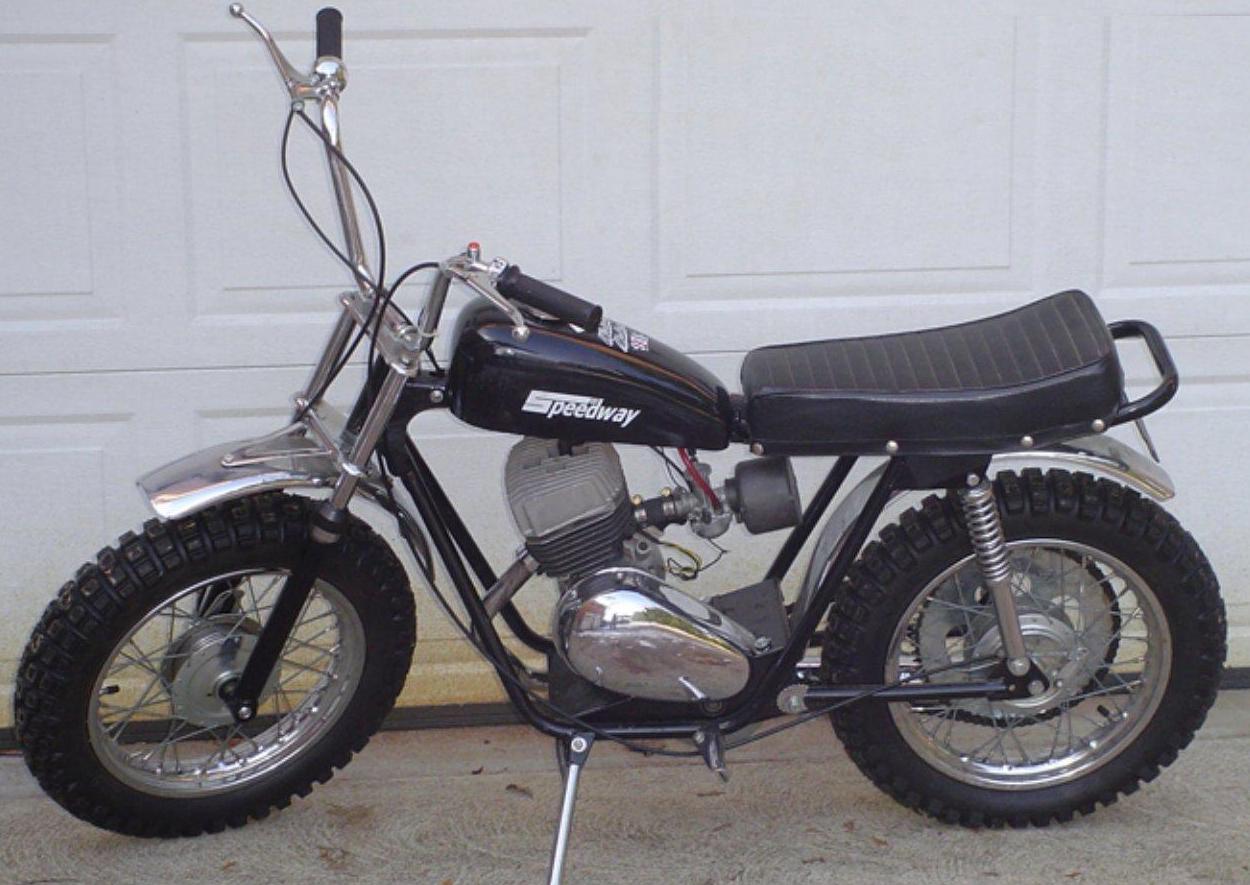
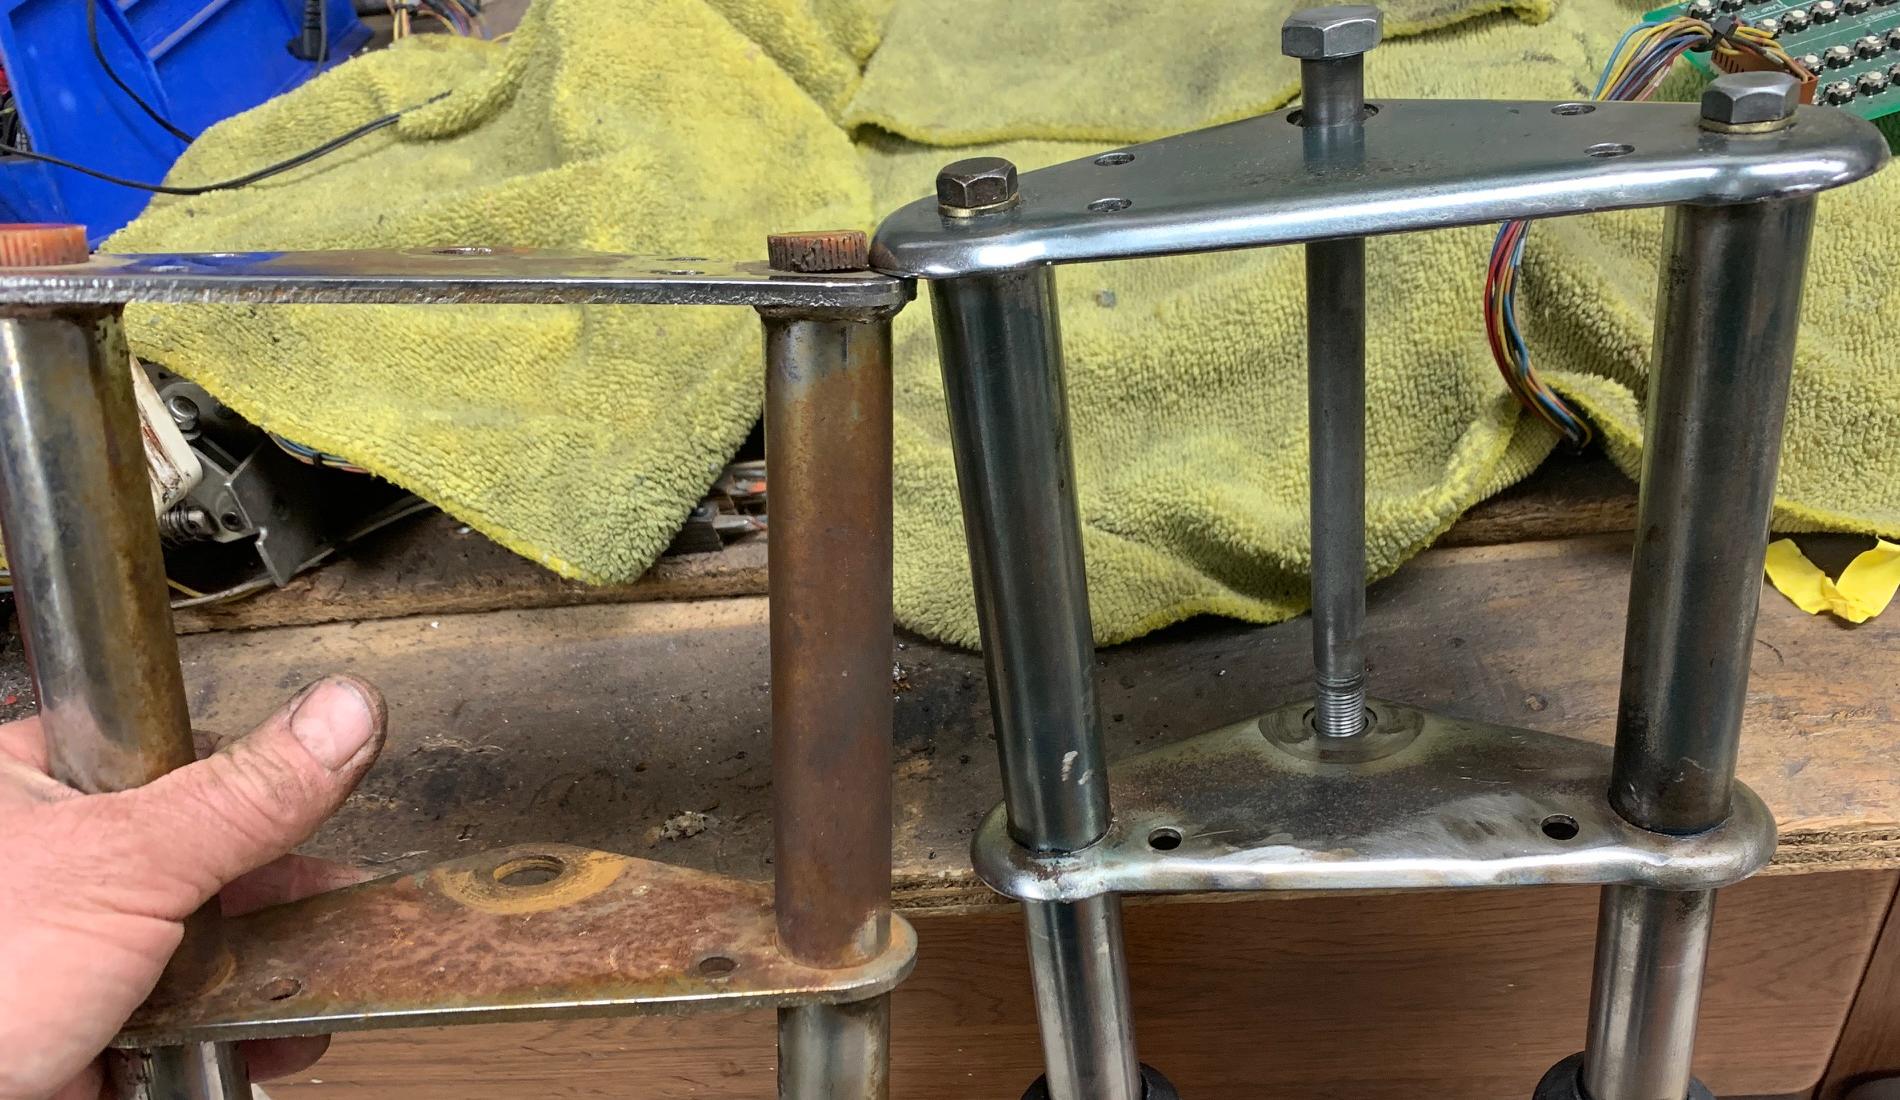
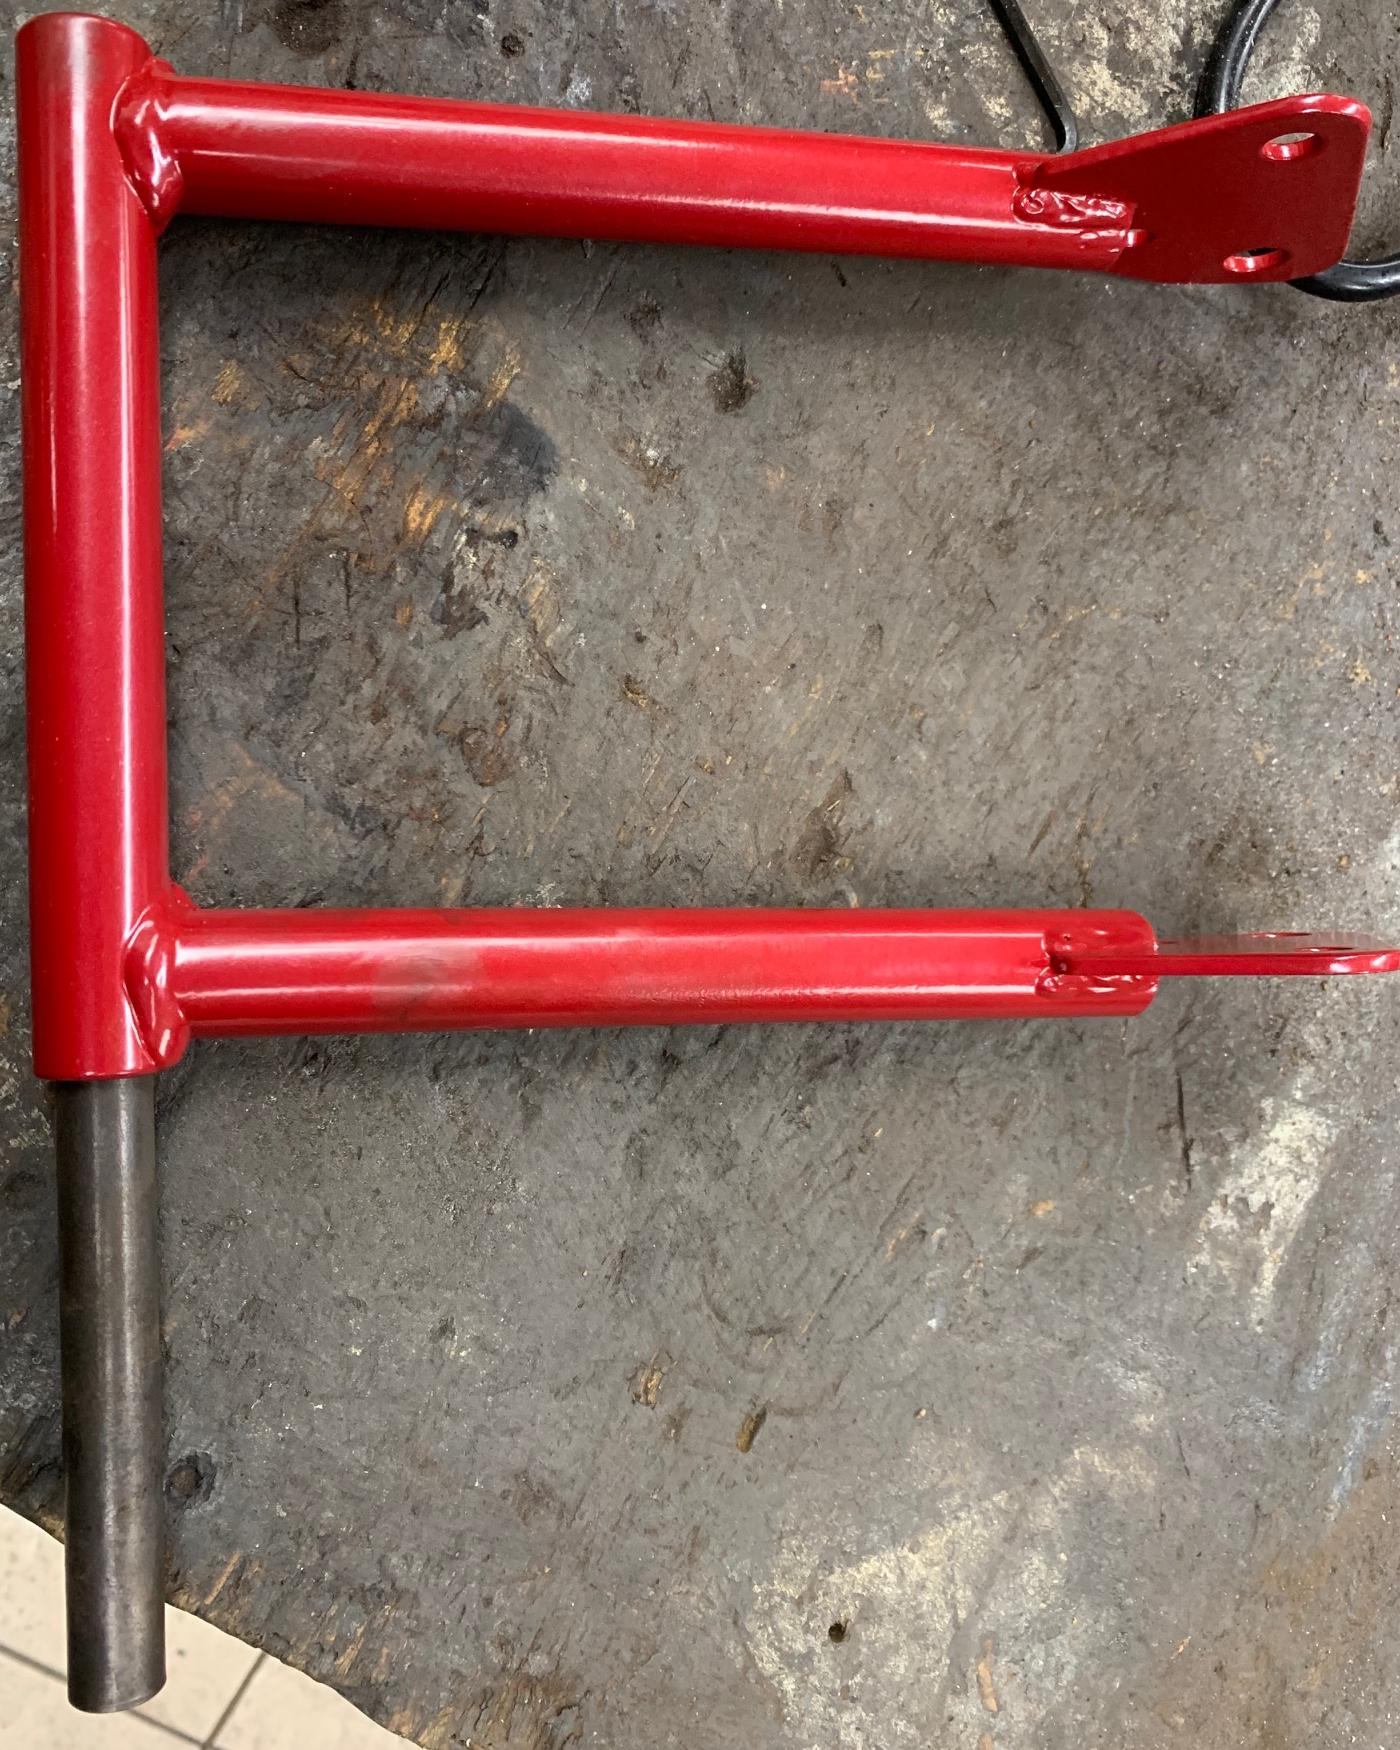
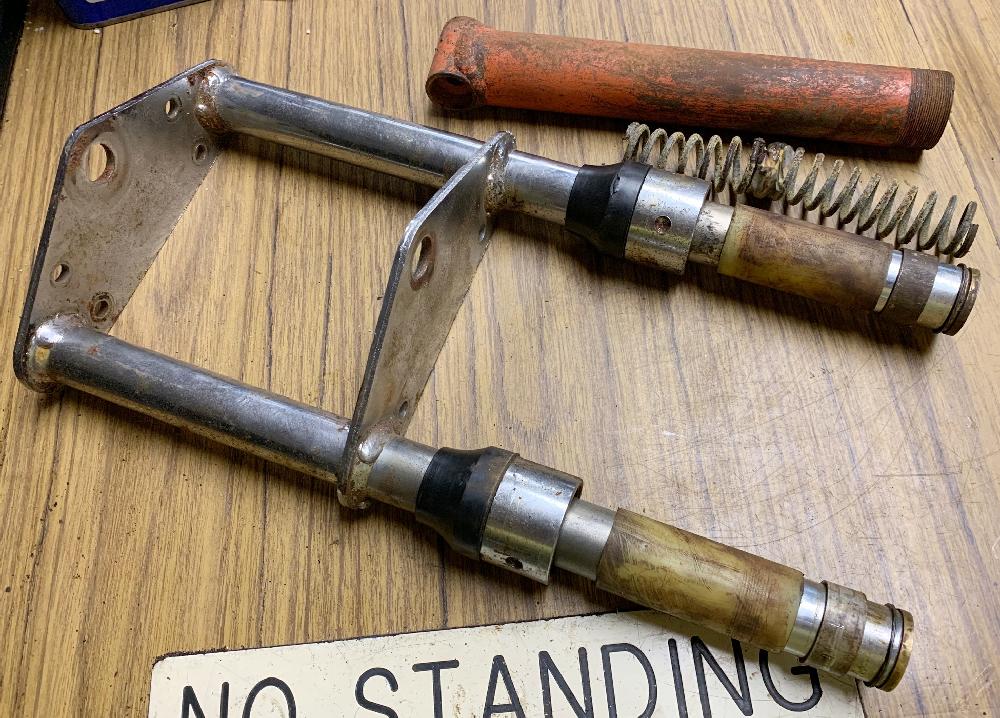
The 10" wheel frame used in 1970 by Speedway was different than their 1971 and later models.
If you look at the picture above, you can see the difference (top frame is 1970,
bottom frame 1971.) Not only did the mount for the gas tank change, but the
top tube is actually two tubes that extend all the way behind the seat
on the 1970 frame. The 1971 and later 10" wheel frames
used a single U-shaped top tube, that welded to the oval seat tube. Also the
head plate is longer on the 1971 frame, because cracks easily formed where the
lower tubes met the head plate on 1970 frames. Lastly the "kick up" behind the seat
was taller on 1970 frames. Because of the
frame changes, a 1970 frame can only hold a 1970 style gas tank. Later 1971 to
1974 frames for 10" wheel bikes are largely interchangeable (within models.)
-
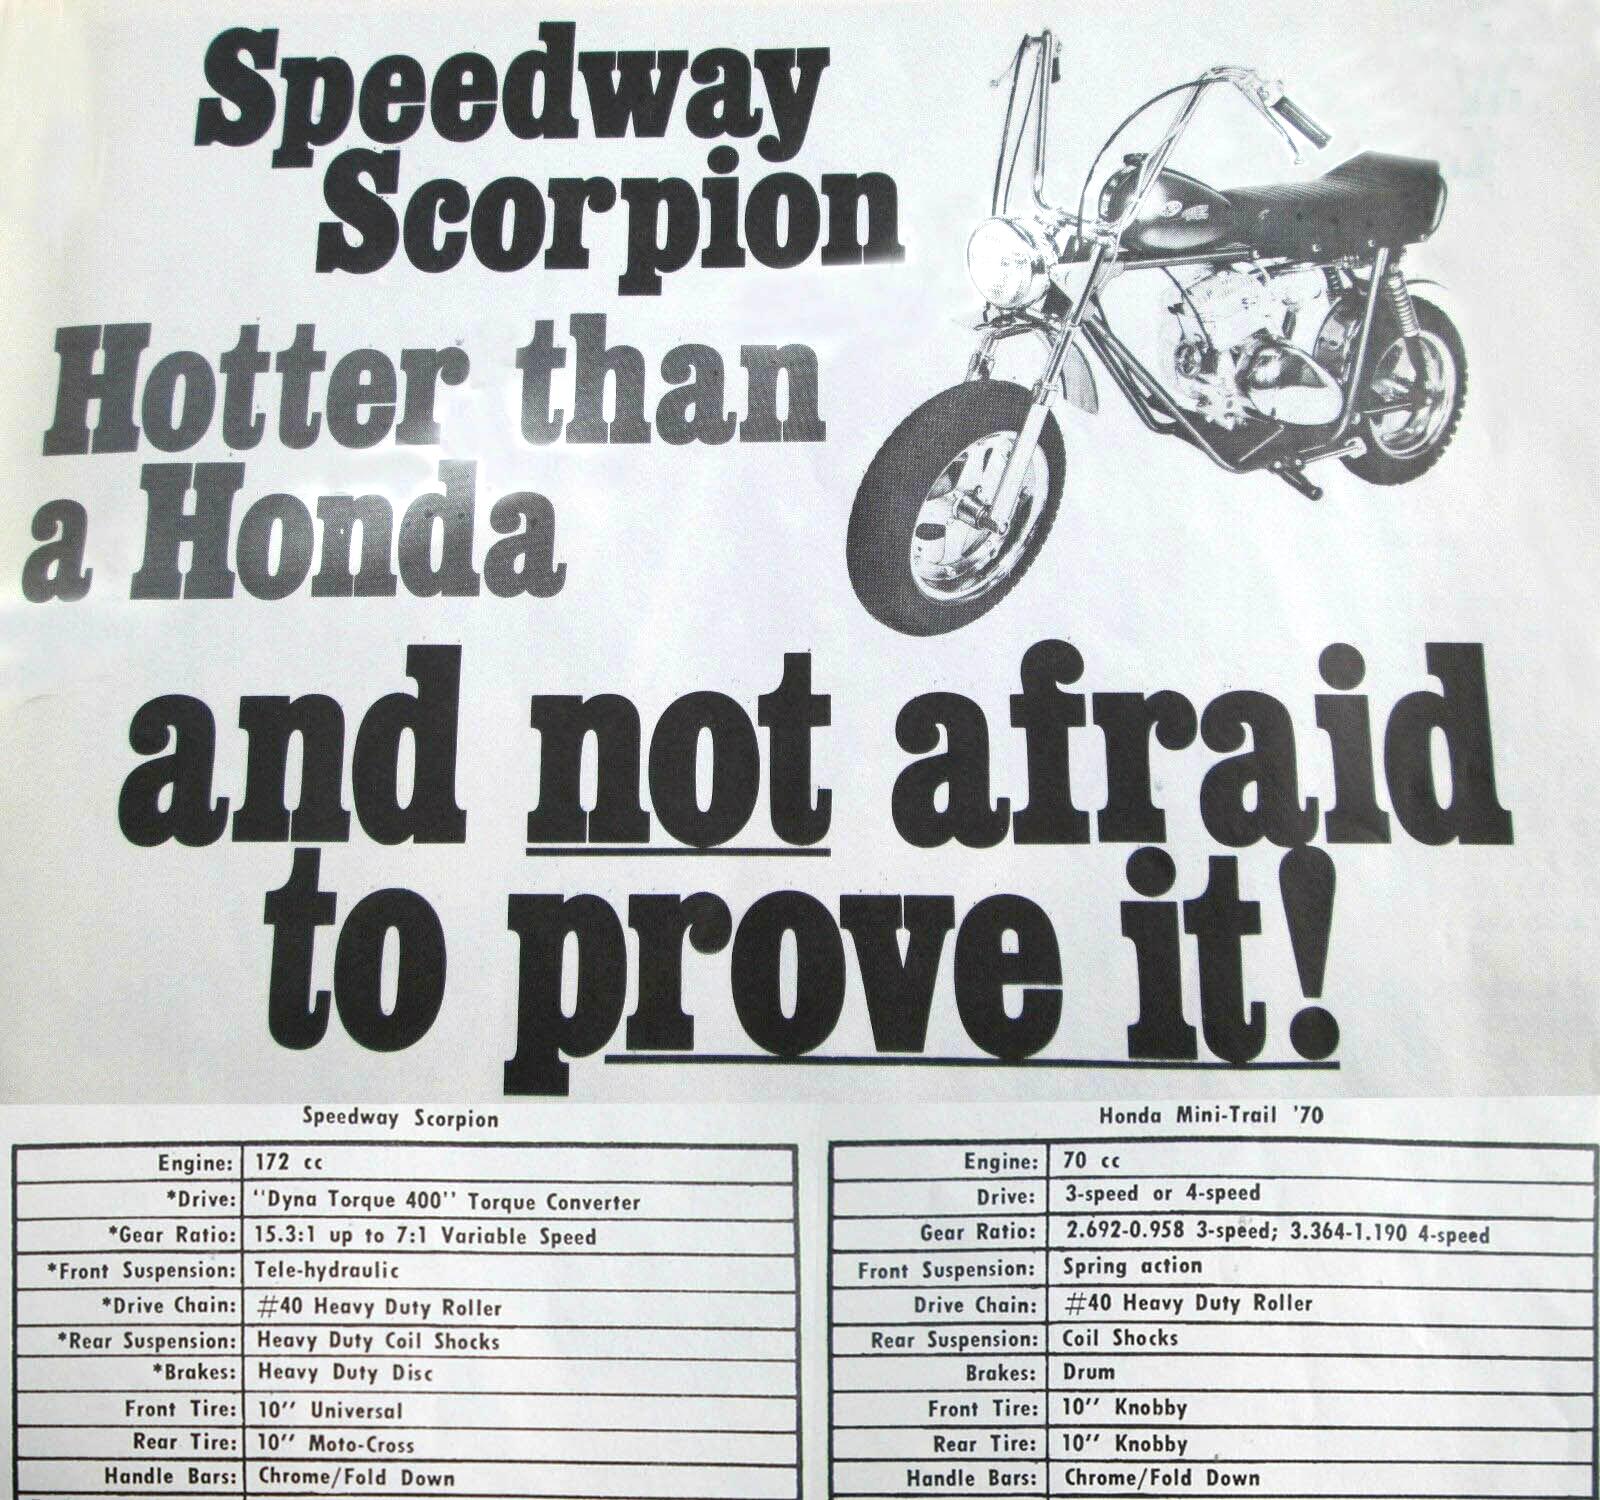
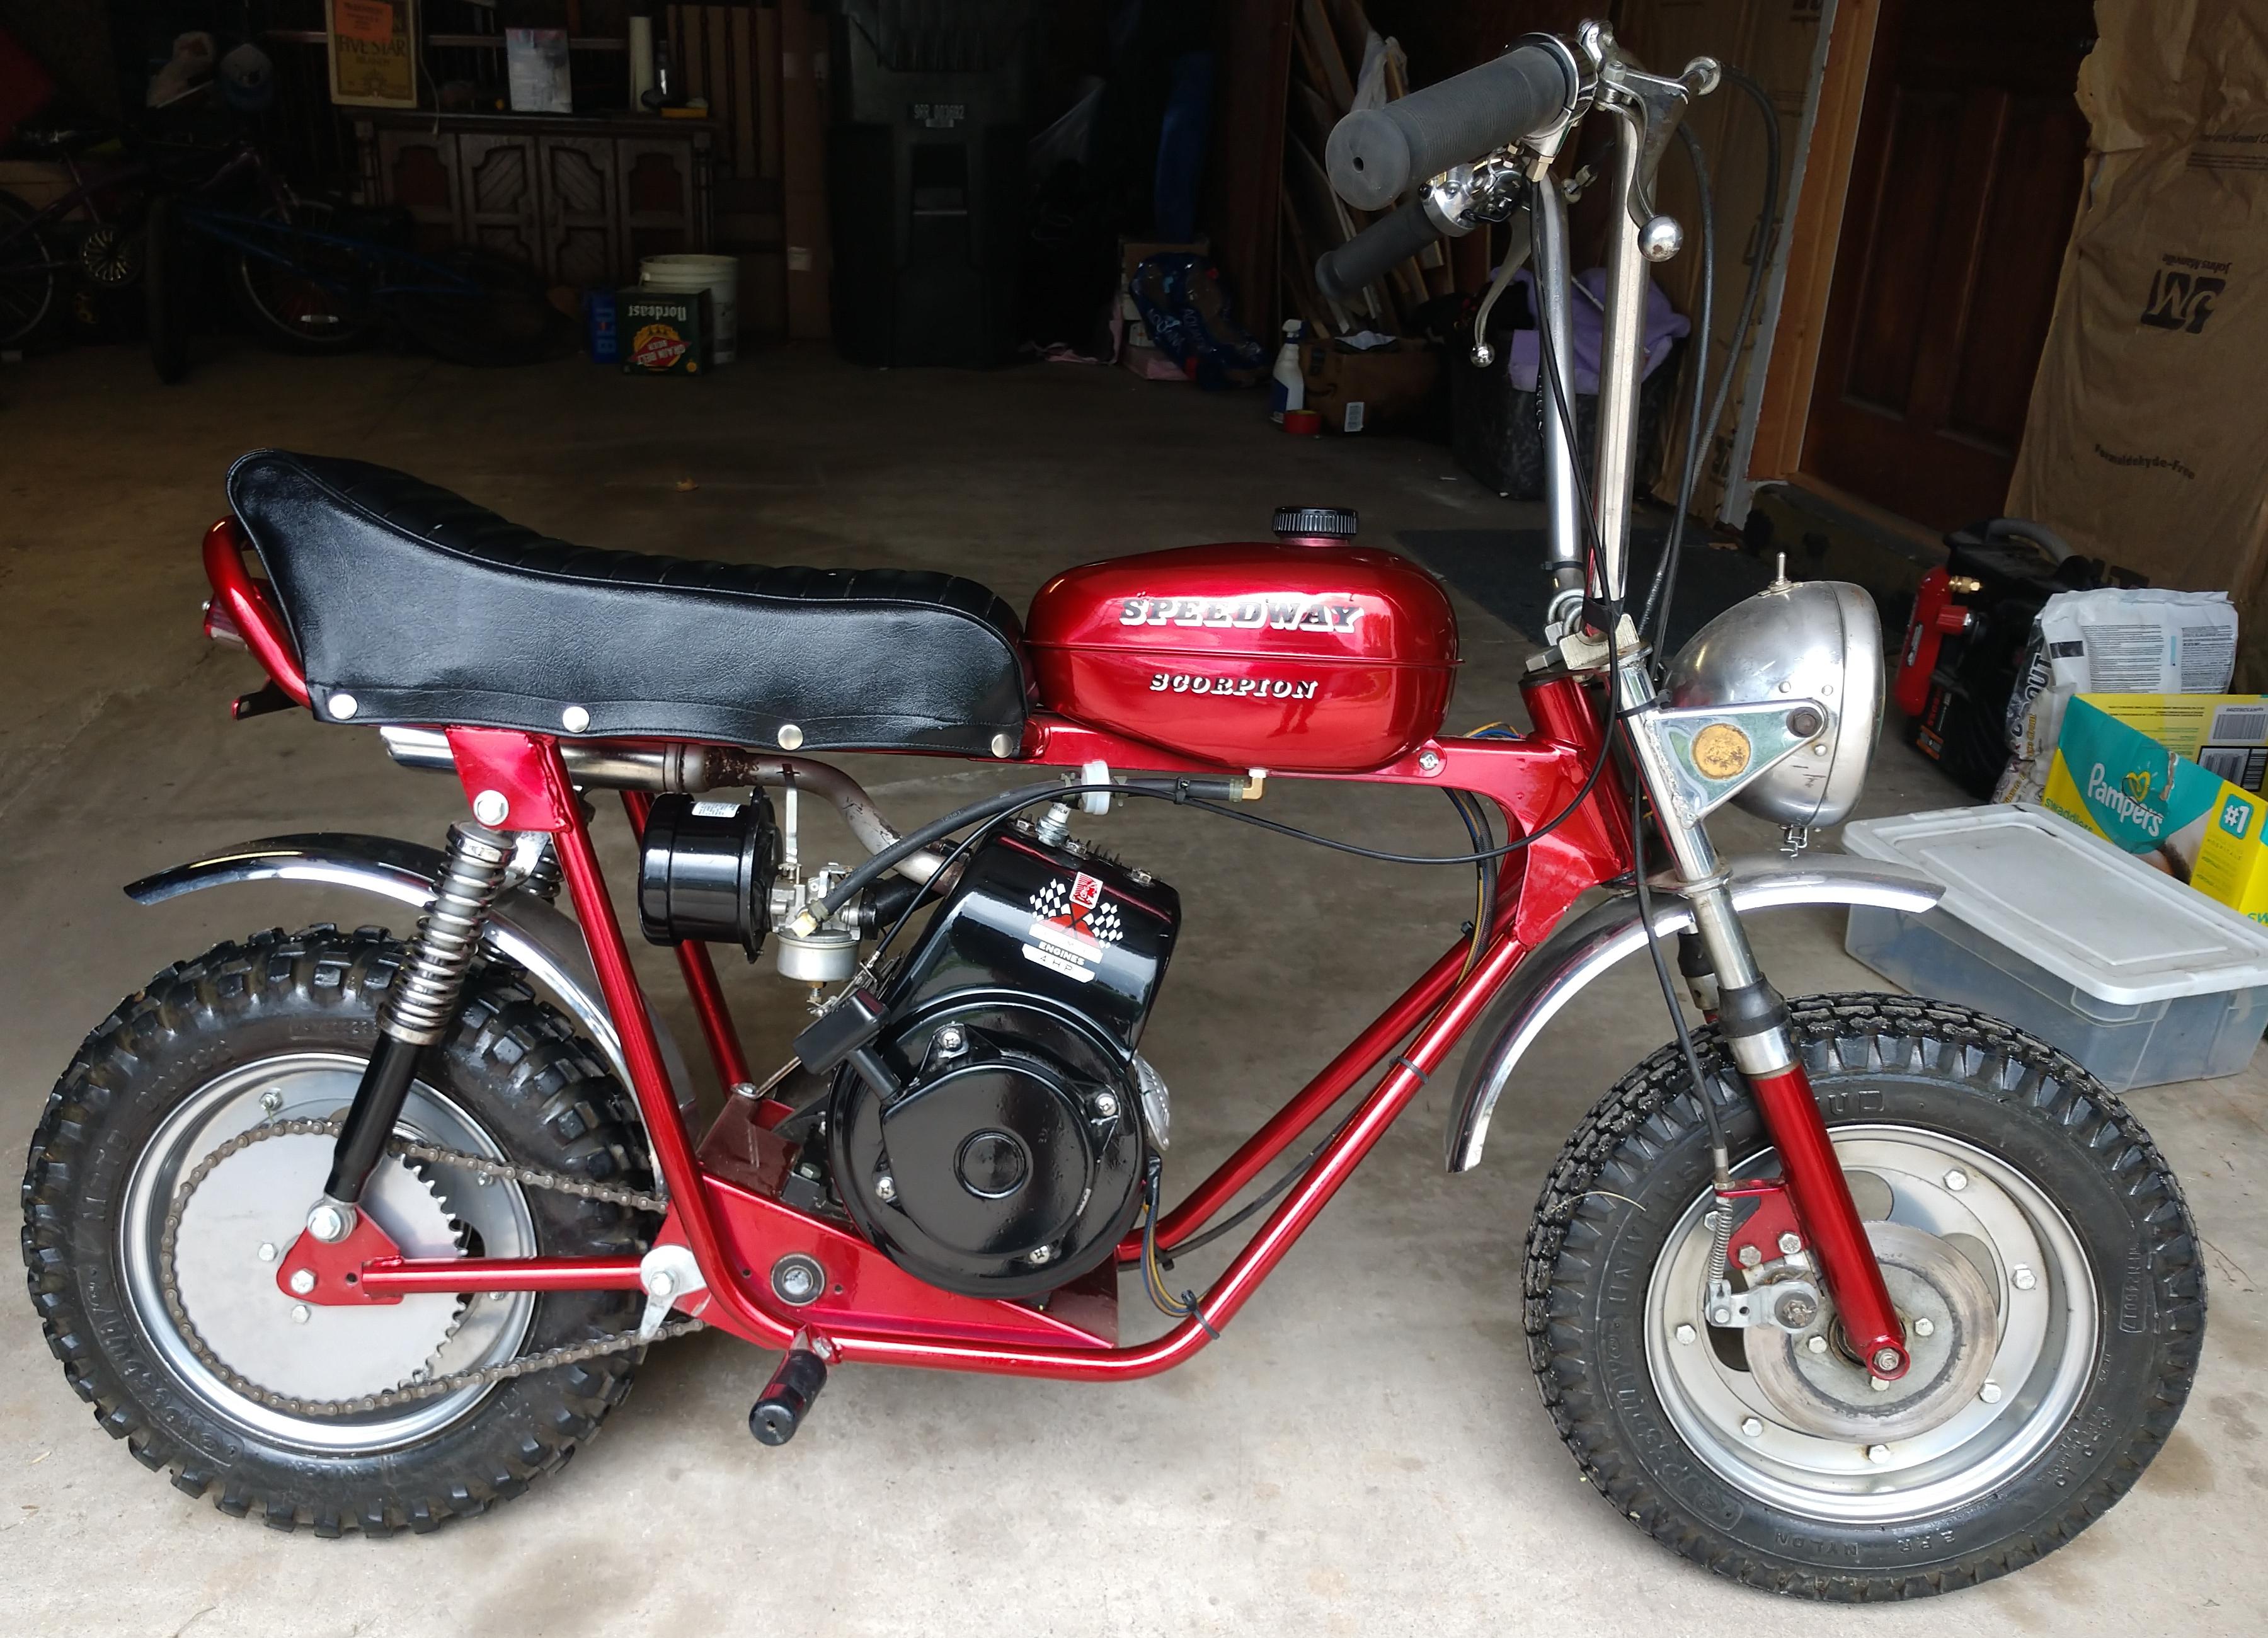
The main two 1970 Speedway models included the Scorpion and the Scarab. Both had a 20 degree mounted
white 4hp HS40 (172cc) Tecumseh engine, DynaTorque 400 Speedway torque converter, front/rear suspension,
and front/rear disc brakes. Rear 3.50x10" motocross tire, front 3.50x10" trials tire (though the front tire is
often motocross style on the Scarab, Speedway was a bit inconsistent on this feature.)
The main difference between the two models was lights (Scorpion), and no lights (Scarab).
The other two main 1970 Speedway models were the Shark and Shrike. The difference between the two is again lights (Shark), versus no lights (Shrike). Also the Shark and Shrike had no rear suspension (hard tail) and no front brake (rear disc brake). Rear motocross tire, front trials tire (though the rear tire is sometimes trail style, Speedway was a bit inconsistent on this feature.) The white Tecumseh engine on these two models was smaller too at 3hp (127cc). The Shrike intially did not use the DynaTorque 400 Speedway torque converter either (the Shark does have a TC) - the Shrike had a standard centrifugal clutch and no jackshaft. This changed quickly though for the Shrike, and it ended up with a torque converter and jackshaft sometime during 1970.

-
Also in the catalog was the Stinger, the low-end model. It had no torque converter (centrifugal clutch)
and no peanut gas tank (though it still used the 10" mag wheels with 3.00x10" trials tires).
Handle bars were not fold down either. Used a flat mount white 2.5hp Tecumseh motor. The clutch
cover was still a gas tank half, but it did not have the cutouts for the torque converter belt
(since there was no torque converter.) It also used a #35 chain and had a rear scrub brake.
-
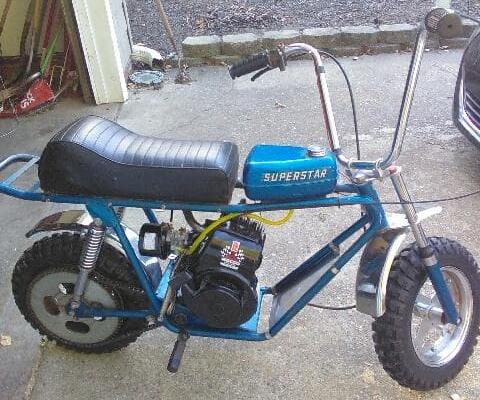
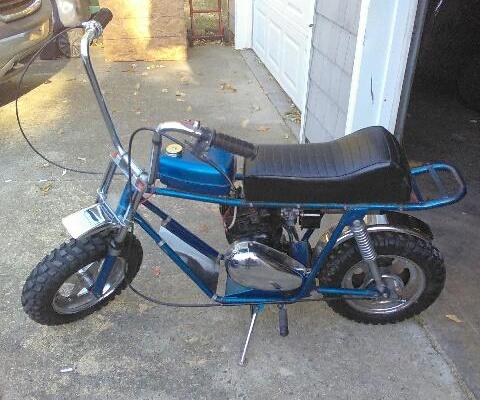
A late 1970 model not in the catalog was the Superstar. Very low production,
it appears to be their introduction to the mini bike mass market, as it was
intended to be sold by JC Penney. But the deal never materialized, so the
few that Speedway made were sold by their dealers.
It was essentially the same as the other 1970 Speedway catalog models, with a few exceptions. The
biggest difference is the Speedway Superstar used a 1968/1969 Rupp gas tank.
Apparently when Rupp changed gas tank designs in 1970, there was a fair
number of left-over earlier style tanks. And Speedway took advantage of that
and used it on their Superstar model. Also the Superstar had a luggage
rack behind the seat and a mud guard in front of the engine.
And a slightly different seat design. But other than
that, the Superstar was pretty much the same as a 1970 Speedway Scarab.
The original Tecumseh engine was black on this model.
Serial number for a 1970 Speedway Superstar. Notice the top edge that should
say "Speedway" but was cut off with scisors!
-
Speedway was sensitive to the influx of the Honda CT70 mini bikes. They were smart enough
to realize that Honda (who was selling their mini bikes for less than cost,
to gain a foot hold in the U.S. market) would be tough to battle. Check out the
ad below where Speedway compares itself directly to a Honda CT70.
-
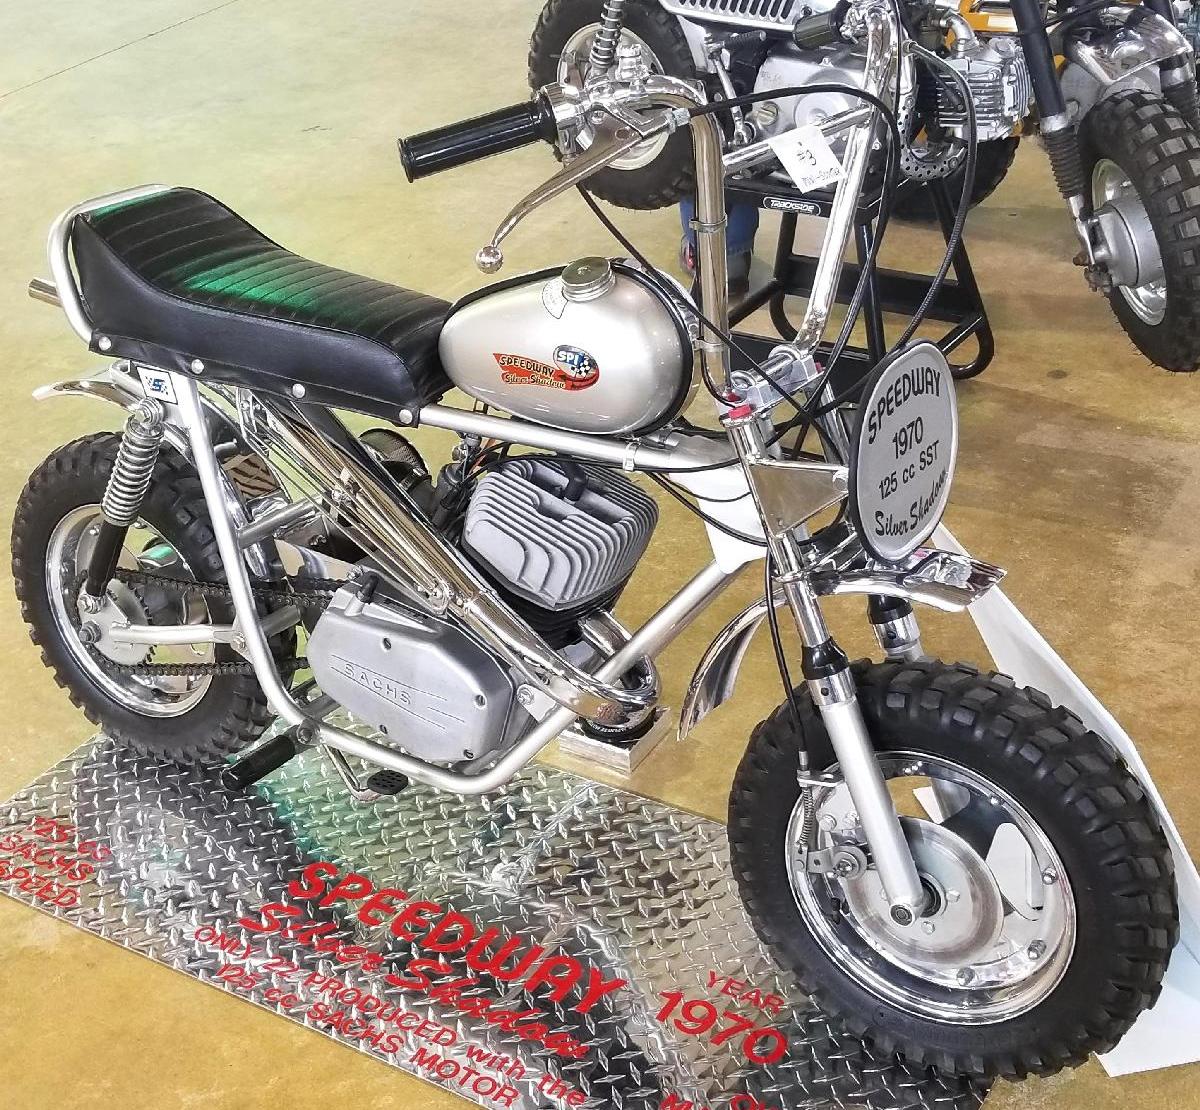
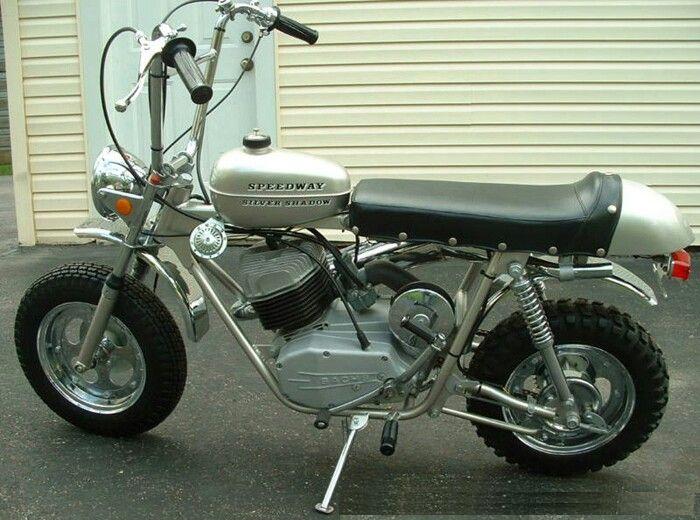
There is one other late 1970 model that should be noted. It is the rarest of the Speedways,
and probably considered to be the best Speedway made. It's the late 1970 Speedway Silver Shadow.
Really just a Speedway Scorpion painted silver. But they added a 125cc Sachs 2-cycle motor.
And instead of lights (like a Scorpion), installed a front number plate (opposed to a headlight.)
Talk about over-powered, this little beast is said to go 80 mph! They did not make many of
these.
-
Note the 1970 Speedway Silver Shadow (and the Superstar) were not shown in the 1970 Speedway catalog.
Speedway did have a habit of doing this - making some low production models or year-end models
that weren't in the catalog.
The serial number tag used on 1970 models is a chrome foil sticker with black lettering. Positioned on the top of the frame top behind the triple tree. The first two digits are "70-" to signify the year. This was the only year they used this style serial number tag and format. From 1971 to 1973 the position of the serial number stayed the same, but they moved to a stamped-in style number, opposed to a foil sticker. In 1973 the serial number moved to a metal tag, riveted to the frame.
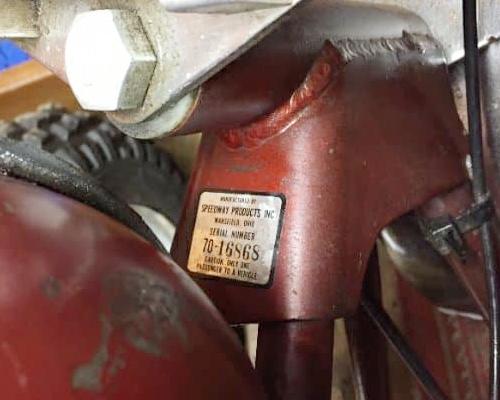
1970 Speedway Scorpion serial number.
-
Note in the 1970 Scorpion serial number above, they forgot to put the
actual number (the "70-" just denotes the year). I guess this happens
when you're a brand new company!
1971 Speedway Mini Bikes.
-
The 1971 Speedway catalog
shows a lot of the same models as the 1970 catalog, but with a new gas tank style. The clutch cover is still
the same (half of the 1970 Speedway gas tank), but the 1971 gas tank is now more slick and modern.
The Scorpion, Scarab, Shark have not changed much. The Shrike is now a torque converter bike
with a jackshaft. Other than the gas tank change, now all models are
using a drum brake for the rear wheel. The Scarab had
motocross tires front and rear (Scorpion has 3.50x10" motocross in rear and a street trials 3.50x10" tire up front.)
The Shrike and Shark used 3.50x10" tires (either trials or motocross style), but sometimes 3.00x10" is also seen.
-
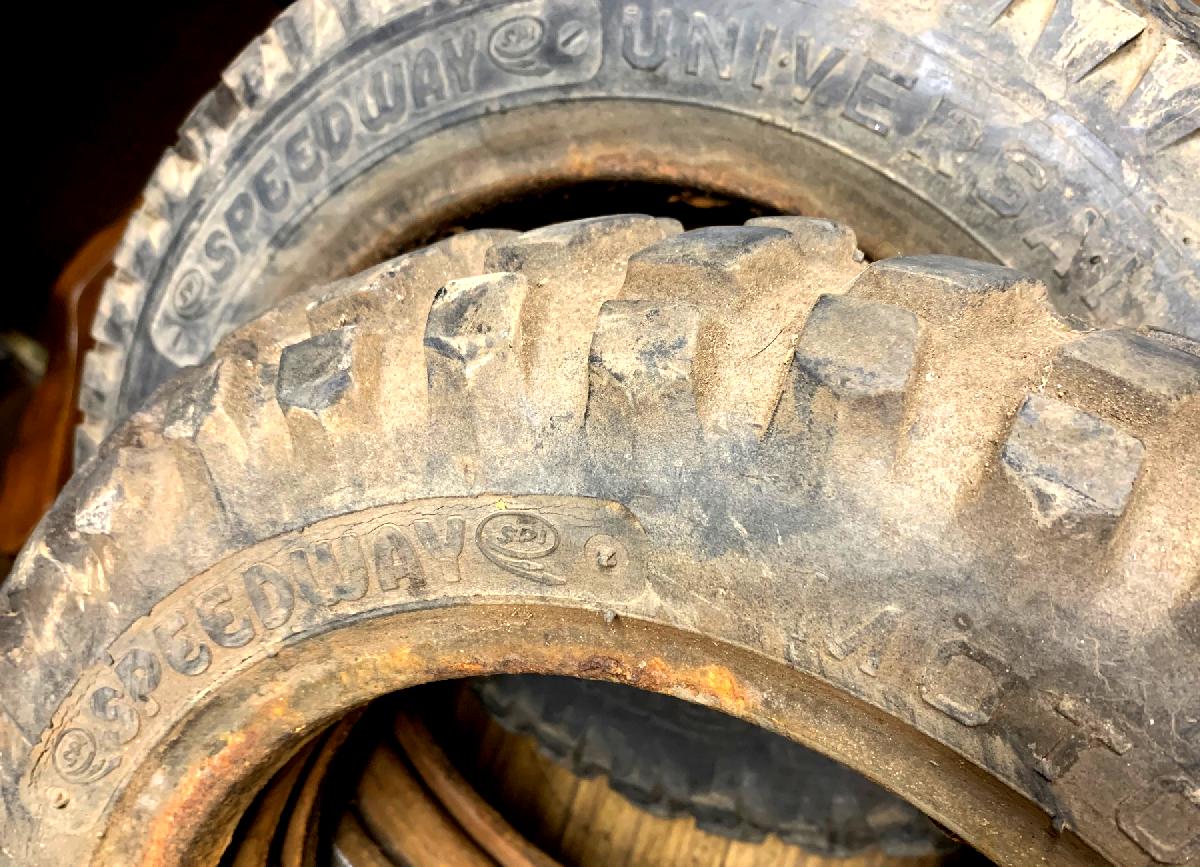
Also 1971 was the last year for
the tires to say "Speedway" on the sidewalls (either "Speedway Motocross" or "Speedway Universal" for the trials tires.)
The Tecumseh engines used are now black (no longer white,
except on the low-level Stinger model). Also the Tecumseh diaphragm carb is replaced
with a standard float bowl variety, and the intake manifold is angled (much like Rupp.)
The Speedway designed DynaTorque 400 torque converter
was still used. The "kick up" on the rear end of the seat is still there too (though slightly less tall.) And in
late 1971 Speedway added a piece of sheet metal across the inside front of the tube kickup
(I guess to support the seat.)
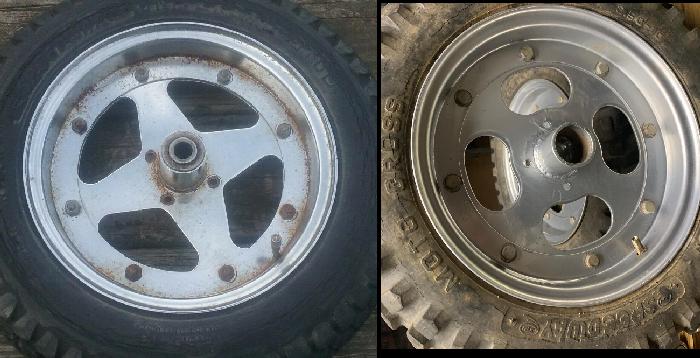
Drum brakes are also standard on 1971 models (disc brakes were largely discontinued, except for some
front brake applications.) The 10" wheels changed too. The cutouts for the "spoke" area are now
kidney bean shaped (instead of rounded triangles.)
Serial numbers for 1971 models are generally in the high 10,000 to 20,000 range.
-
Speaking of the DynaTorque 400 torque converter, the driven side is usually 5" (not today's
standard of 6"). Also it was a symmetrical type of torque converter. From what I have seen,
usually part (or all) of the original torque converters are missing on today's bikes. To deal
with this, I replace the original 5" driven unit with a 6" TAV20 Comet style symmetrical torque converter.
Likewise the driver gets replaced with a Comet symmetrical style too. This works very well, but some
modifications to the torque converter cutout need to be done to make it fit. Note you can not
use the TAV30 asymmetrical style torque converter on Speedways that originally had a symmetrical TC.
-
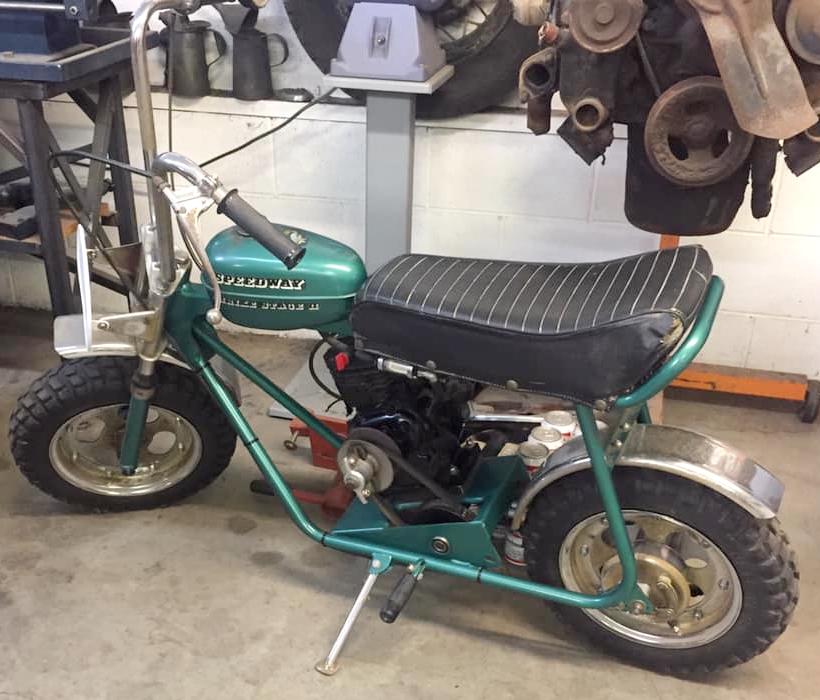
Something Speedway did in late 1971 was to make a "Shrike stage 2" model. This happened for
sure on the Shrike, not sure if the Scarab got this treatment too. The "stage 2" means
the torque converter driven increased from 5" to 6", and the Tecumseh went from 3hp to 4hp.
-
Some new models appeared in the 1971 catalog. The Speedway Silver Shadow SST, with a 125cc Sachs engine,
is part of the catalog. It now has a rear fender 'tail' that looks a bit weird! There's also a Silver Shadow SSR
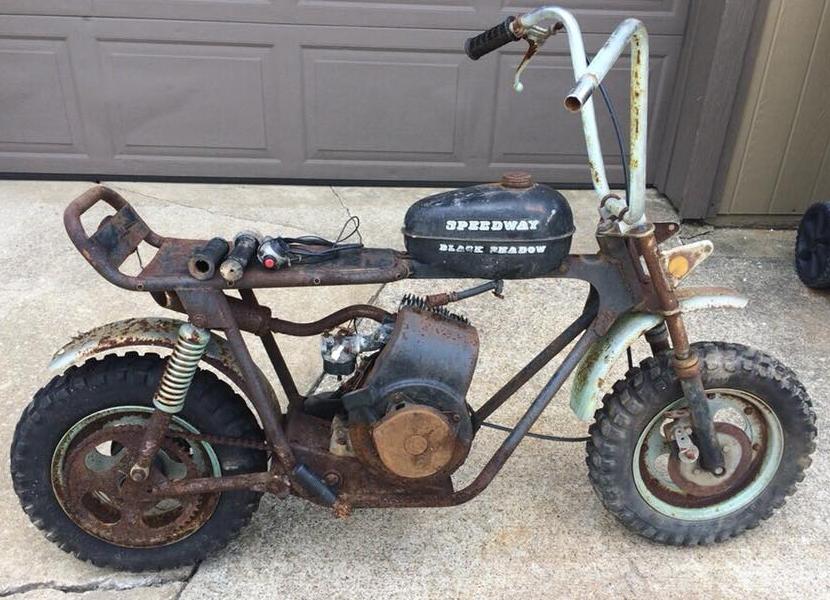
model, which is the same as the SST, but with lights (street legal.) Lastly there was also a "Black Shadow" Speedway
model too (not shown in the catalog.) It's basically a Silver Shadow with an 80cc Sach motor
and no flaring behind the seat.
1971 Speedway Black Shadow, wrong motor (should have an 80cc Sachs.) The 1971 Speedway Black Shadow was different
than the 1972 model (notice the kick up behind the seat.)
1971 Speedway Silver Shadow SSR (lights). Notice the difference from the 1970 model, with
the rear seat shoud tail.
-
But the big model is the yellow 1971 Speedway Super Spyder bike (aka the Super Bitch).
Again it uses the Sachs 125cc motor, but is much
larger with 16" spoked wheels. It's not street legal (no lights), and surprisingly came with trial tires
(opposed to motocross tires.) Unfortunately this model never went into production. But I hear a guy
in Ohio made a clone of the Super Spyder using various parts and information from the Speedway catalog.

-
Note that 1971 Speedway models with 10" wheels are much more common than their 1970 counterparts.
Actually 1970 models are hard to find - the 1971 models with 10" wheels seem to be much more plentiful.
Personally I like the 1971 Speedway 10" wheel models the best. They seem to be more "dialed in" than
the 1970 models. And in 1972 some things were removed from the 10" wheel bikes that make them seem less "cool."
1972 Speedway Mini Bikes.
-
The 1972 Speedway catalog
shows a pretty big change in the product line up.
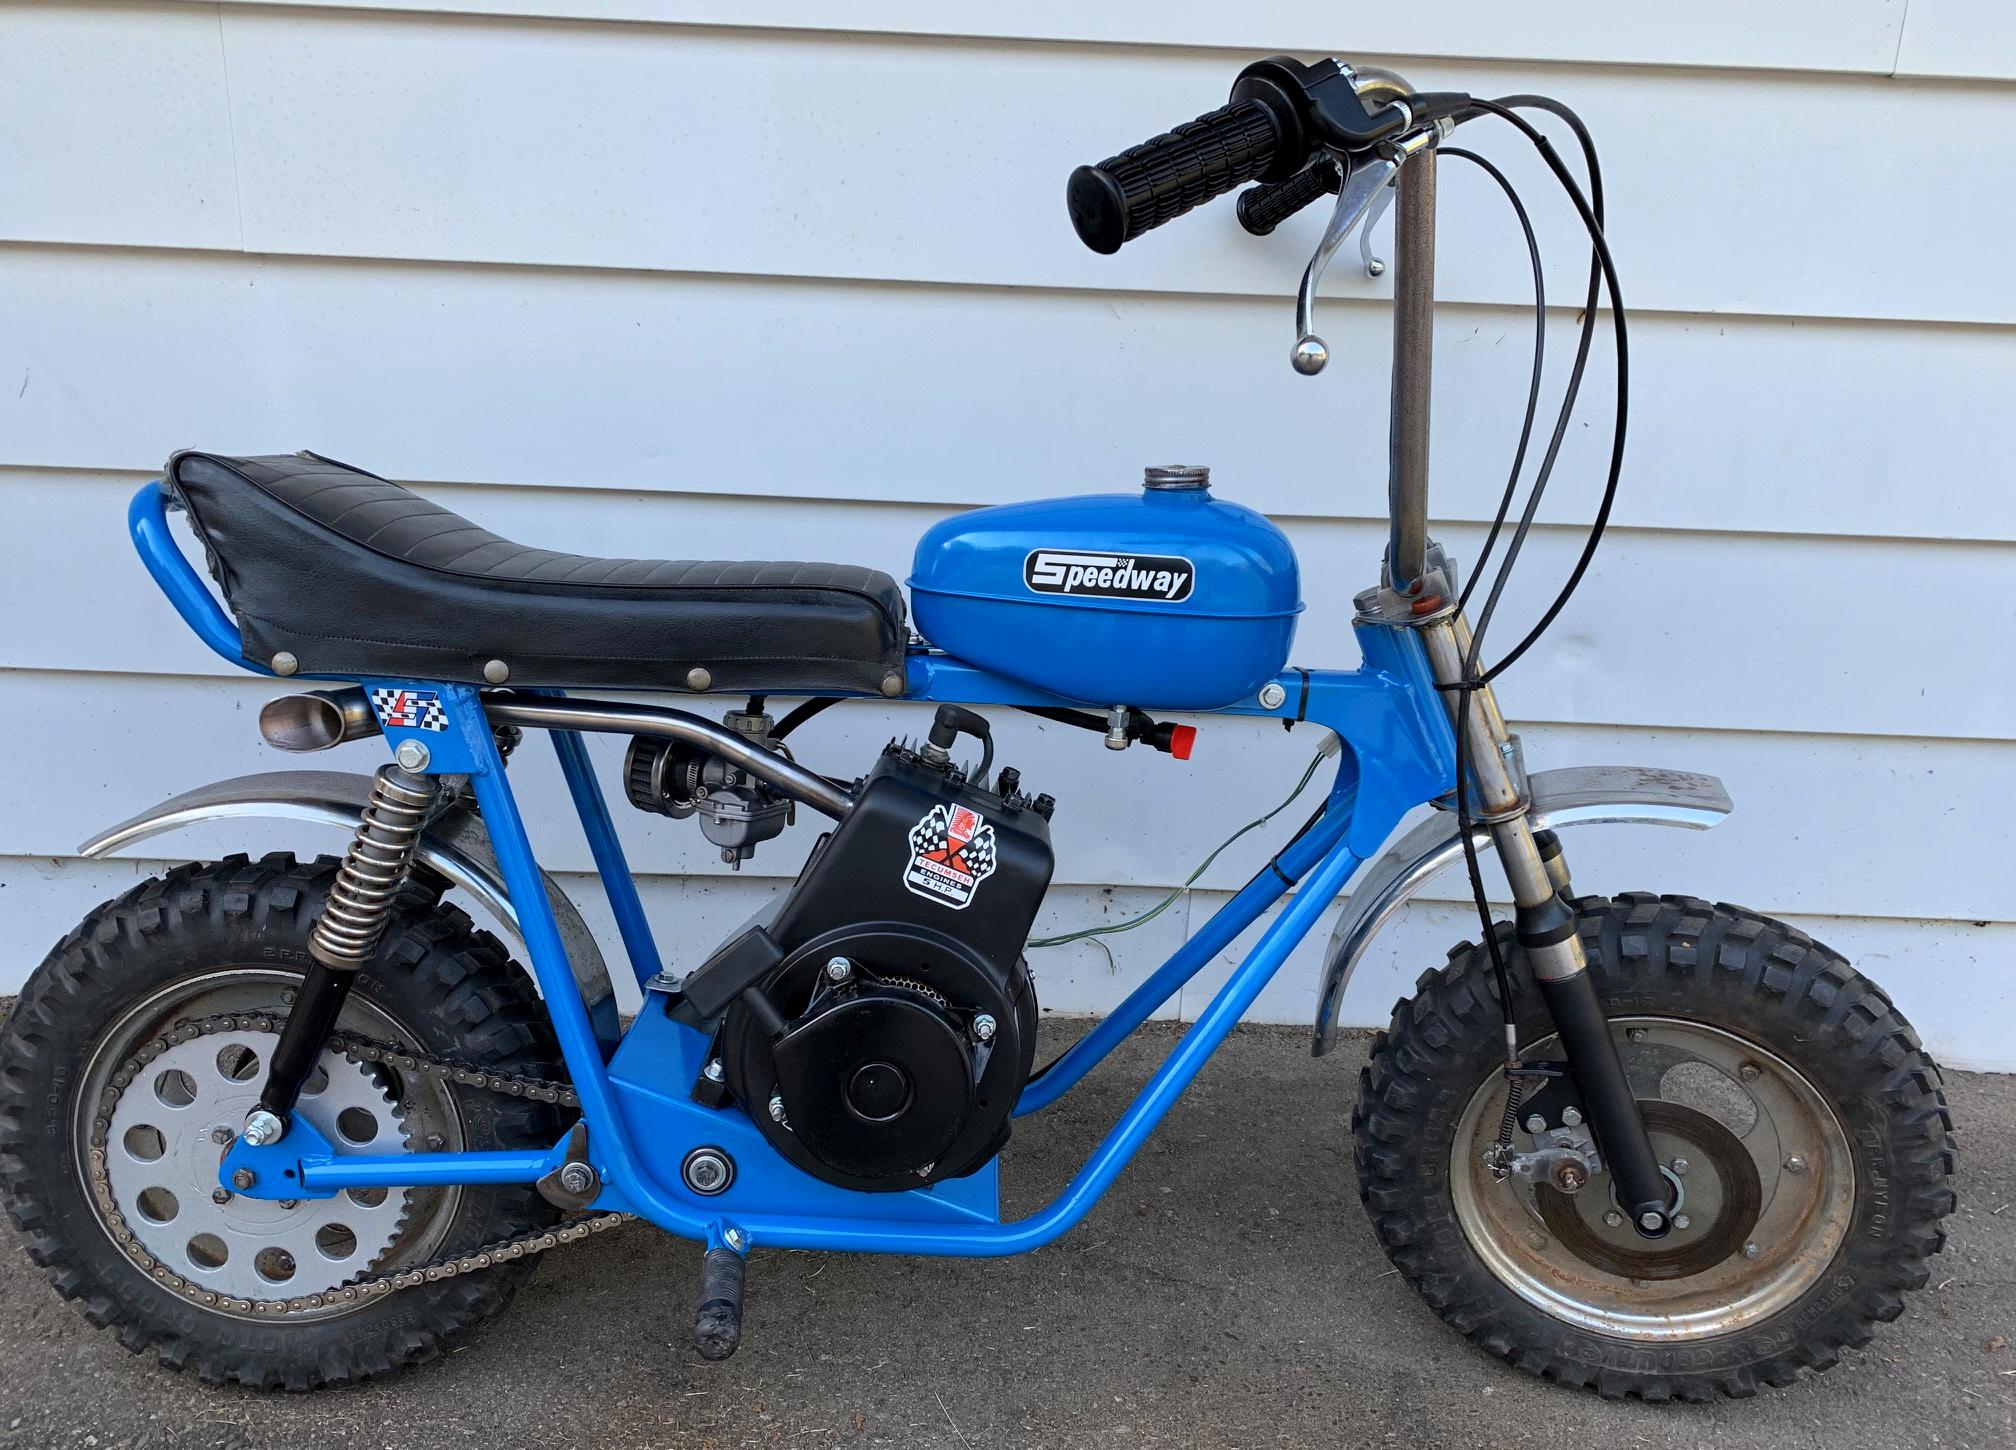
The big change is the move to 14" wheel bikes. The Speedway Green Horn, Speedway Red Baron,
and Speedway Blue Angel are new to the line up. These are quite nice bikes, and handle great.
The 14" wheels are pretty awesome. The Green Horn has a Tecumseh HS50 five horsepower engine,
and lights (usually HS50 model 67008). Remember 1972 is the first year for the Tecumseh HS50 motor, and Speedway put
it to good use on the Green Horn. The Red Baron is basically the same as a Green Horn
(lights), but uses a HS40 Tecumseh four horsepower motor. Likewise the Blue Angel also
has the HS40 engine, but no lights. Other than the color and lights/no lights and 4 or 5hp
engine, these three models are essentially the same. Also notice these models use a
different gas tank (and handlebars, fenders) than the 10" wheel models.
The 1972 to mid 1973 Speedway models were the last year to have the serial number stamped into the frame (in front of the gas tank). So basically 1971 and 1972 and mid 1973 they were stamped into the frame (1970 they had a silver sticker.) Then after mid 1973 they used a riveted plate with the serial number. Also the 1972 models seemed to be generally in the 20,000 to mid 30,000 number range.
1972 Speedway Green Horn, non-stock carb.

-
In 1972 the 10" wheel models are still there, with the Scorpion (lights) and Scarab (no lights)
being available. The Shrike and Sabre are still available (no rear suspension.)
Also the 10" frame models have a different rear end. Instead of the "kick up" at
the end of the seat, it is now just protruding with no kick up, a flat rear end
(which is handle for lifting the bike into a pickup truck.) The footpegs changed
too from a thin 3/16" thick mount and round peg, to a U shaped peg (and the Hunt Wilde plastic
cover could no longer be used.)
1972 Speedway Blue Angel, non-stock carb.
Another 1972 Speedway Blue Angel, all original survivor with original HS40 engine.
-
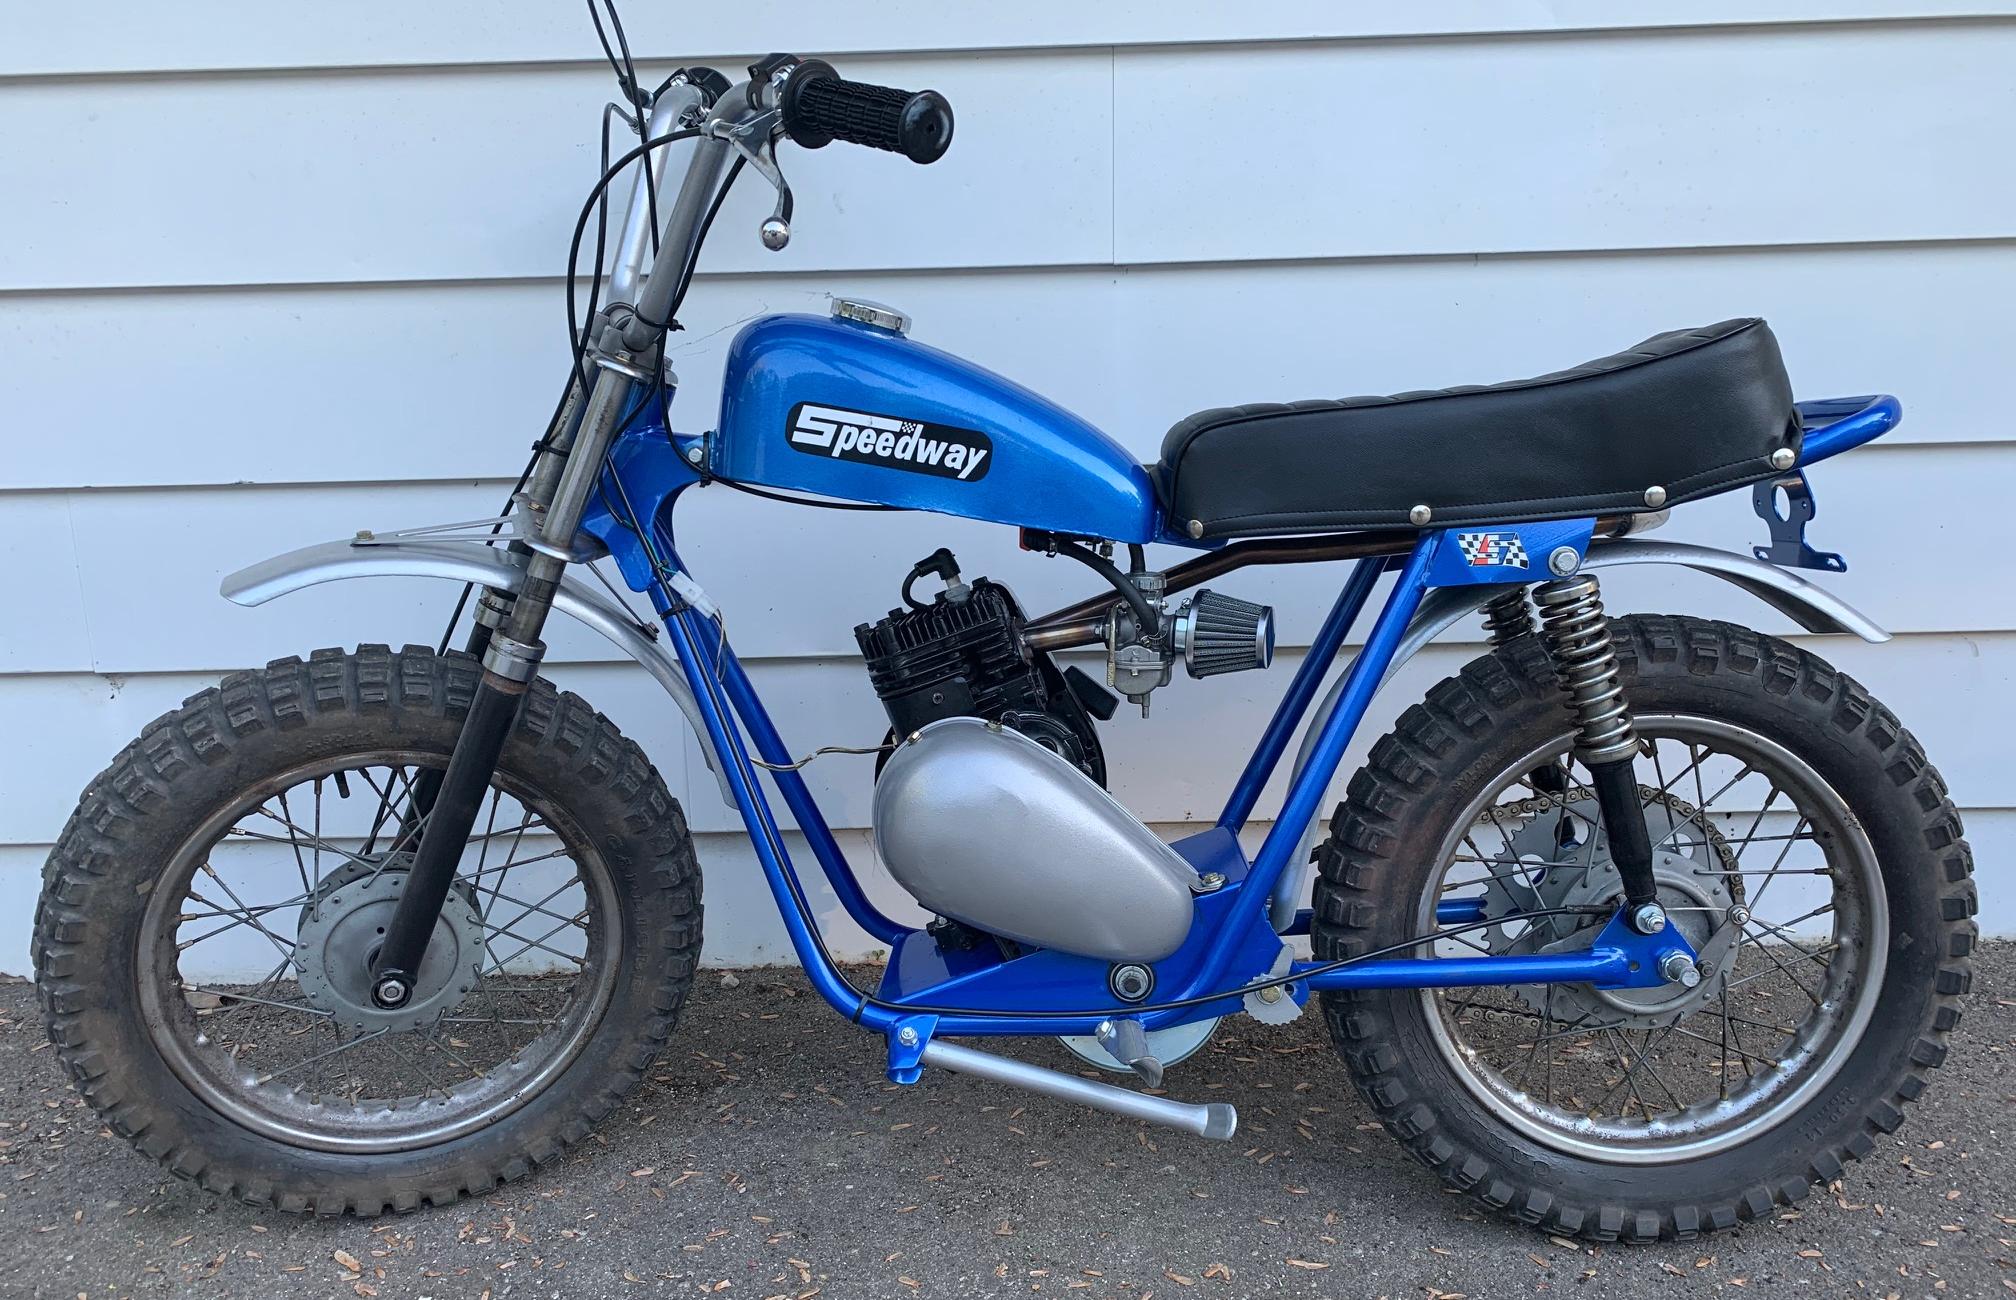
Speedway does continue to use the Sachs motors on a few models too. The Speedway Black Shadow (10" wheels)
has a Sachs 80cc motor. The Speedway Widow Maker has 14" wheels and a Sachs 80cc motor. Neither of these
have lights. The Super Spyder has a Sachs 125cc motor and 16" whees and a 5-speed manual transmission.
All these Sachs motor based Speedways are pretty rare. The Speedway Widow Maker and Black Shadow come up
now and then. But the 1972 Speedway Super Spyder was never produced, at least in any numbers.

1972 Speedway Red Baron with a Sachs 80b engine. This could have been a special order,
or just a re-painted and replaced gas tank Widow Maker. Definitely not a transplanted motor,
as the bike had a Sach 80b motor from the factory because of the down pipe exhaust mount.
Perhaps the owner wanted a street legal bike, and bought the optional lighting kit,
and decided they wanted to make it a "Red Baron"? Or the factory did this to an existing
Widow Maker? It's hard to say for sure...

A change in torque converters happened in 1972. Speedway now used a Fairbank Morse driven unit. Also Comet was used on some model in late 1972. Also in 1972 the torque converter driven unit moved to 6" diameter (instead of 5") on most models. Also Betor shocks were now used instead of Sebac shocks. And around mid 1972, some of the 14" wheel models had the sides of the gas tank are recessed, as a place marker for the tank decal.
-
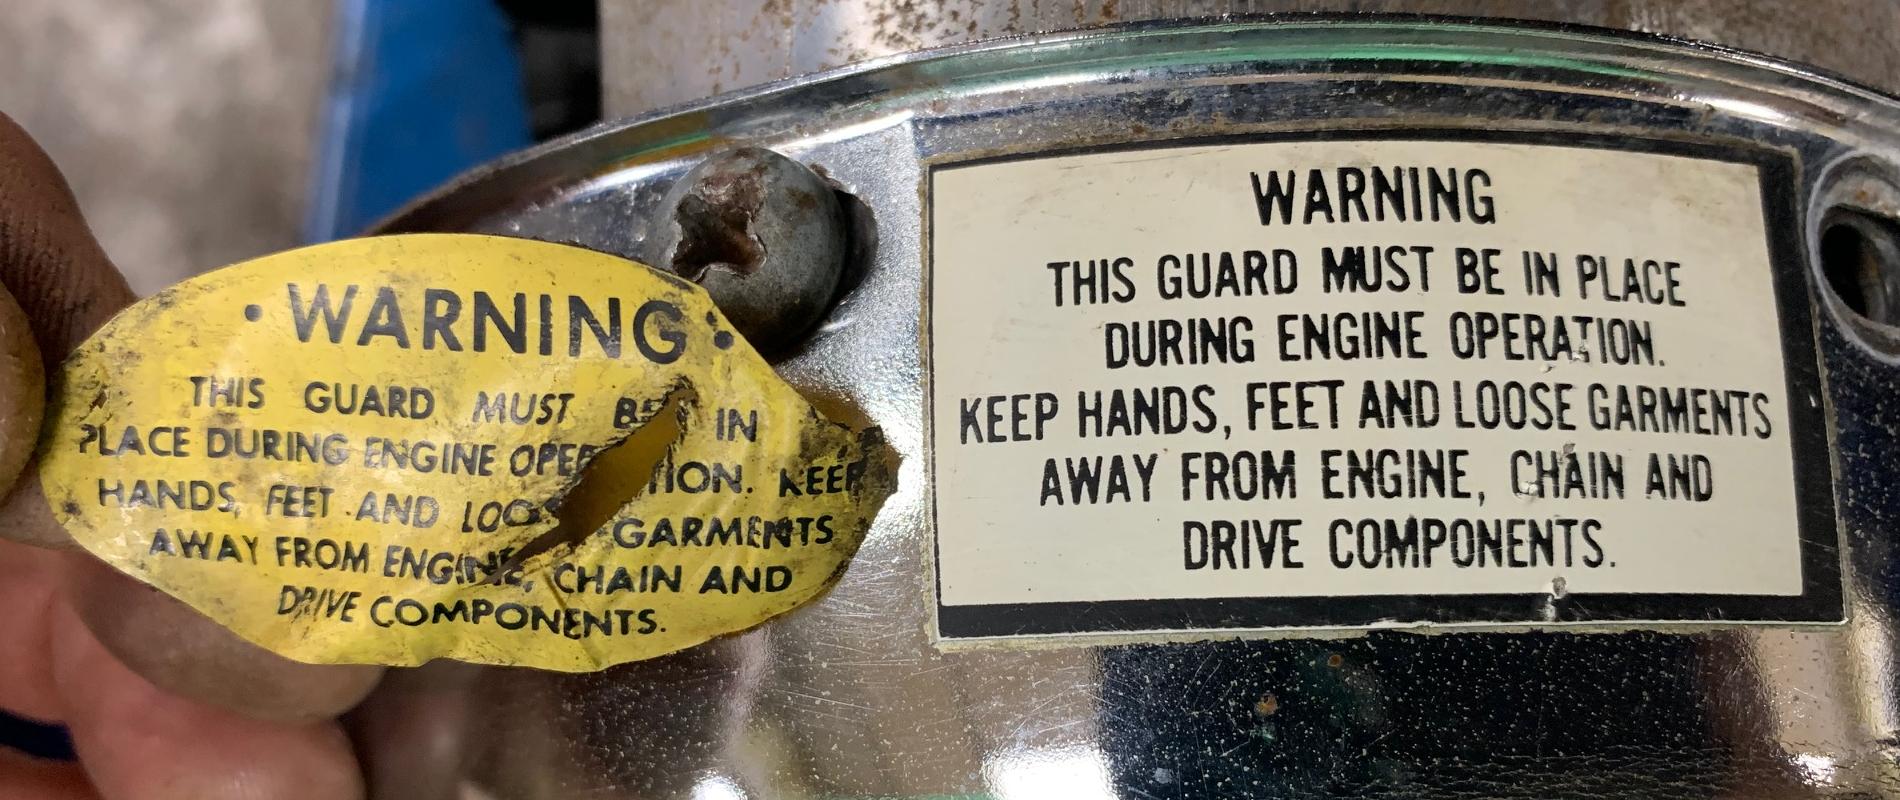
Below is an original 1972 Fairbanks Morse style Speedway torque converter, as used
on an original 1972 Speedway Blue angle. Also notice the clutch cover warning decal.
The rectangle decal is from 1972, the oval style is 1970 and 1971.
1972 Speedway torque converter on a Sach 80b engine.
Speedway clutch cover warning decals.
-
The gas tank for 14" wheel models changed sometime during mid to late 1972. The smooth sided
gas tank was replaced with indents, which nicely houses the "Speedway" gas tank decal.
This was done because the smooth sided gas tanks dented very easily with one's knees
during rides. Where the indented side gas tank sides were more rigid. So 1972 model
14" wheel Speedways could have either style of gas tank.
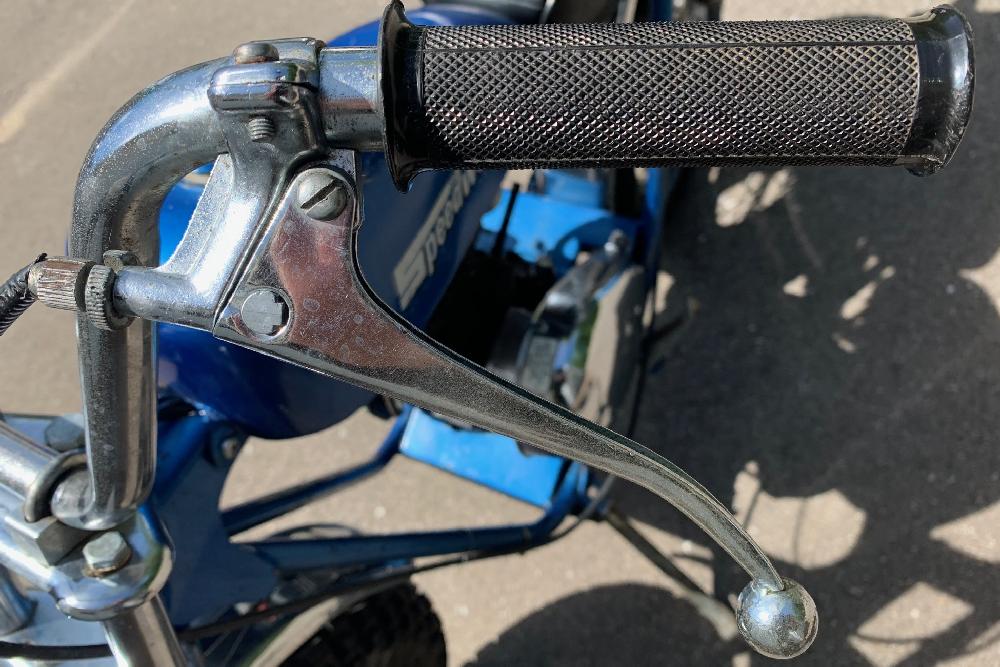
Below are some details to a 1972 Speedway Blue Angle. Notice the throttle and grips and brake lever. The throttle and brake lever are 'cherry' style (made in Japan) types. The grips are incredibly hard, and really not comfortable. That's why you don't see originals too much!

-
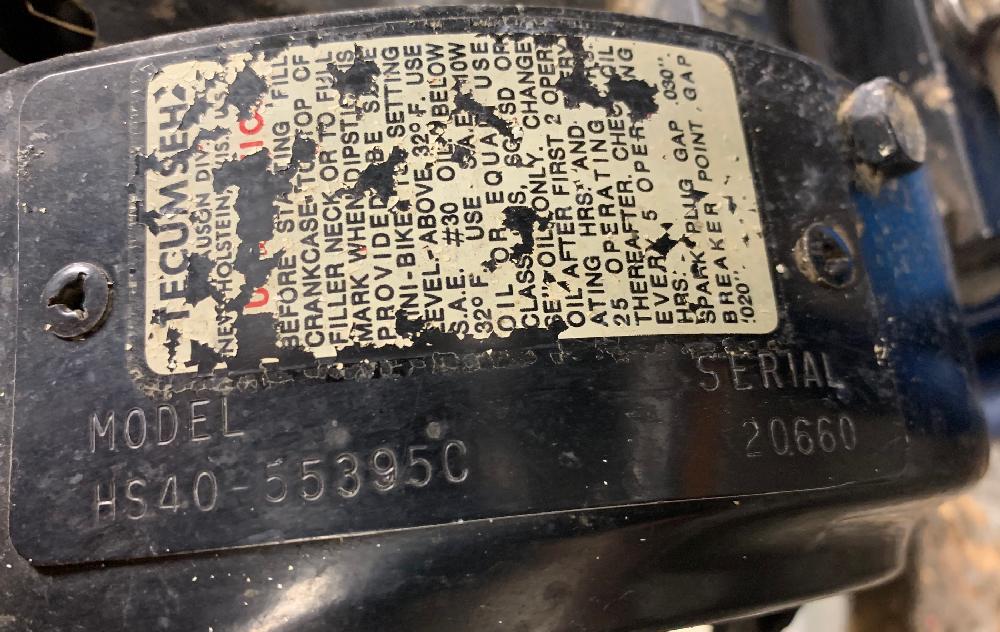
The engine used in 1972 for the 14" wheel bikes is a Tecumseh model HS40-55395c in black
(no lighting coil), as seen below.
-
In 1972 Speedway had a nice
owners manual
that came with their bikes. It lists all
the 1972 models inside, it's very complete, and applies to 10", 14" and 16" wheel bikes.
1973 Speedway Mini Bikes.
-
The 1973 Speedway catalog
shows a trimming of their tranditional 10" and 14" wheel Tecumseh engine based models,
and expansion of their Sachs/Fugi 2 cycle motor models. It was a
move to bigger bikes. Frankly probably not a great move, as the Japanese bikes (Honda, etc.) were really
taking over that market of 2 cycle bikes.
The stamped serial numbers in 1973 were in the mid 30,000 to high 30,000 range. Then in summer 1973, Speedway changed to a riveted tag for the serial number. The 'tag' style numbers were in the 40,000 range, but early to mid 1973 serial numbers were still stamped into the frame (and were in the mid to high 30,000 range.) Also later 10" wheel model bikes (summer 1973) used the same footpegs, handlebars, kickstand, seat as the 14" wheel models. This allowed Speedway to stock less parts specific to certain models (saved money.)

-
About the same time (summer 1973) Speedway changed to all black frames. No more colored frames
like prior years. The only thing not chrome or black was the gas tank and lower fork stays!
Also in the summer of 1973 they switched to a Salsbury or Comet20 torque converter system.
When they switched to the non-Speedway specific units required the clutch cover cutout modified so it would fit,
in addition to the motor plate cut out.
Handlebar Changes occurred in late 1973 with the riveted plate serial number models. I believe Speedway ran out of the tranditional high 10" wheel model handlebars. So they moved the stock 14" wheel handlebars to the 10" wheel models. And then installed lower hung motocross handlebars on the 14" wheel models. Personally I don't like this change, and usually put the "traditional" Speedway 10" and 14" model handlebars on the respective models.
Another change in 1973 to the 10" wheel models was the torque converter opening was enlongated to allow for a 6" driven torque converter unit. Also the swing arm pivot plates were changed too (moved back), again to allow for the 6" driven TC unit (so the TC didn't hit the pivot tube of the swing arm.) But if you are using a new 6" driven Comet20 torque converter with 3/4" belt (since the original 5/8" belt unit is probably long gone), you still have to open up the TC cutout just slightly in the engine plate. The larger belt width (5/8" to 3/4") requires this change.
Frame changes on the 10" wheel models also occurred in early 1973. The problem with cracked neck frame plates on 10" wheel models had gotten so prevelant that Speedway added a third metal plate to the two lower engine braces as they met the neck tube (closest to the fork tubes.) This new plate tied the two side neck plates together, adding much strength. This was a welcome change and effectively eliminated the cracked frame problem on 10" wheel models. Also in summer 1973 Speedway changed the U shaped footpeg mounts so the footpegs could be moved closer or further from the center of the frame (I guess for large footed riders.) Also all models used the same footpegs now too (where the 10" models had tubular footpegs, all bikes now had the upside down U footpegs.)
The mounting of the 10" wheel gas tank changed in early 1973. It's the same gas tank, but now it has four mounting points (instead of three). It sort of mounts like a Rupp gas tank. The single connection point under the front edge of the seat is gone (because gas tanks were breaking at this mount.) Now four holes are drilled through the top tube of the frame on the sides (like Rupp) to bolt the gas tank. Also the neck bolt changed sizes from 5/8" (normal for pretty much any mini bike) to 1/2". Obviously the nylon neck bearing changed to accomodate this. The rear fender mounts changed too, because a cracked rear fender was very common on the 10" wheel models. The mounting holes were enlarged, and rubber grommets put in the holes. This helped, but the rear fender still would crack behind the rear mount. And finally the 10" tires changed. No longer where those nifty "Speedway" motocross aggressive tread tires available - all 10" wheel bikes had smooth trials style tires installed. Also Speedway changed the plastic front/rear wheel spacers (for disc brake rotor or the rear sprocket) on 10" wheel bikes from plastic to metal. This was a very welcome change as the plastic spacers cracked with hard usage.
Fork trees on 10" wheel bikes changed in 1973. Left is a 1971 front fork, right
is a mid 1973 front fork (notice the tree plates are no longer flat steel.) Also
notice the fork cap oil bolts are plastic on earlier models, and metal on
later years.
-
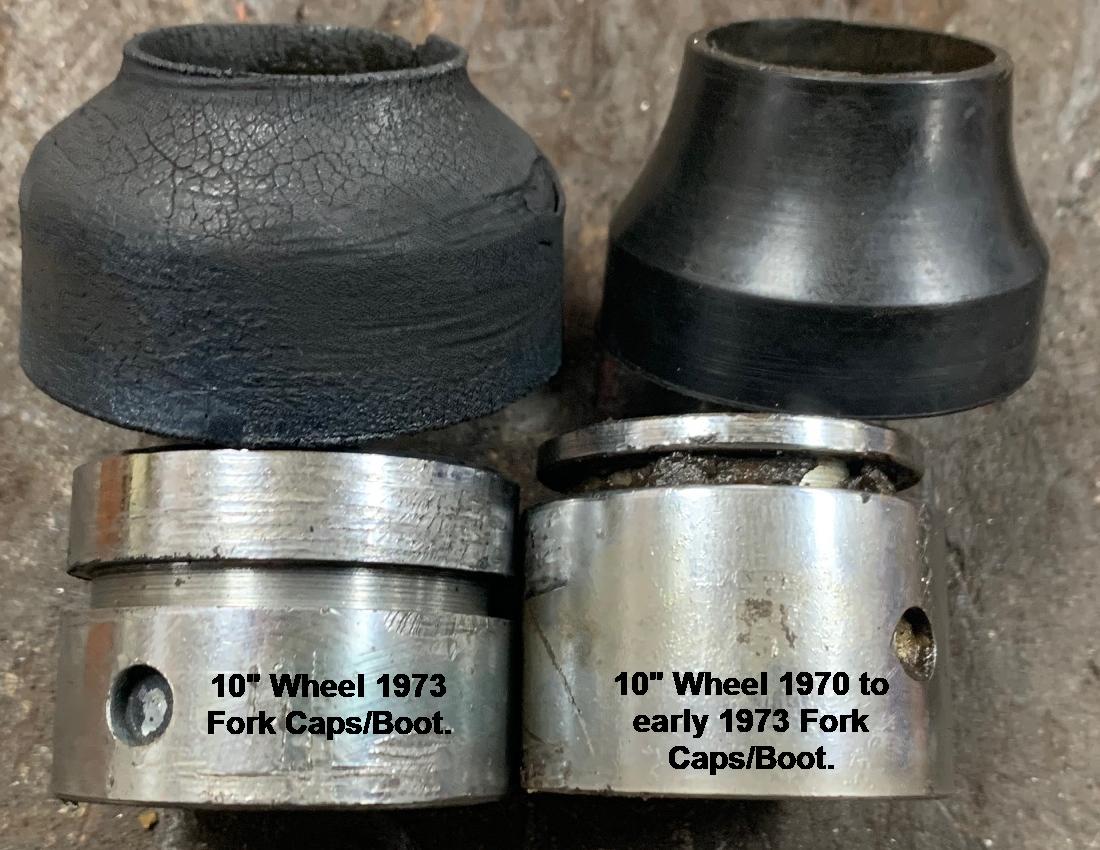
Some other construction things changed in 1973. The front forks changed on the
10" wheel models to be more consistent with the 14" wheel models. For example,
the front fork cups changed on the 10" wheel models to be identical to the 14"
fork cups. This changed the caps and the rubber boots. Also the construction of
the fork tree changed too. Instead of thick flat plates for the tree, they are now
thinner pressed metal.

-
The top line Speedway was the Super Spyder with a 125cc Sach motor and 5 speed transmisiion.
This bike had a 17" front wheel and 16" rear wheel. This is no mini bike! The Speedway Enduro
model was next up with a 100cc Fugi motor and 5 speed transmision. The Enduro had a 16" front
wheel and a 14" rear wheel. This bike had lights too.
A similar bike to the Enduro was the Speedway Motocross, which was basically a
light-less Enduro (all features the same as the Enduro, minus lights).
The Widow Maker had a Sach 80cc motor with a torque converter and 14" wheels.
The Tecumseh engine powered bike models were scaled way back. The Green Horn and Blue Angel are gone. Now the only 14" wheel model with a Tecumseh 4hp motor is the Red Baron (introduced in 1972). Uses a Comet torque converter (until late 1973) and still has full lights.
The only 10" wheel models are the Scorpion (lights) and the Shrike (no rear suspension and no lights). That's it for the entire Speedway 10" wheel line in 1973 (Scarab and Shark are discontinued). The Scorpion and Shrike both use a Tecumseh HS40 four horsepower engine. These do look quite a bit different with the black frame and flat tail.
-
In 1973 Speedway's future was looking dismal. The Japanese invasion of good quality
mini cycles at low prices was just killing Speedway (and many other mini bike makers.)
The competition from Japanese bikes was just too great to over come.
Then in April 1974 Speedway Products was sold for an undisclosed amount to Fox Corporation (Janesville, WI)
according to Bill Graff, a Fox spokesman.
The company acquired "the entire Speedway line and most of the company's assets".
John Morrow, former Speedway president, also moved to the Fox Corporation and was
named Vice President of operations. Unfortunately that was the end of Speedway.
It was a good solid run of good quality mini bike (and mini cycles.)
-
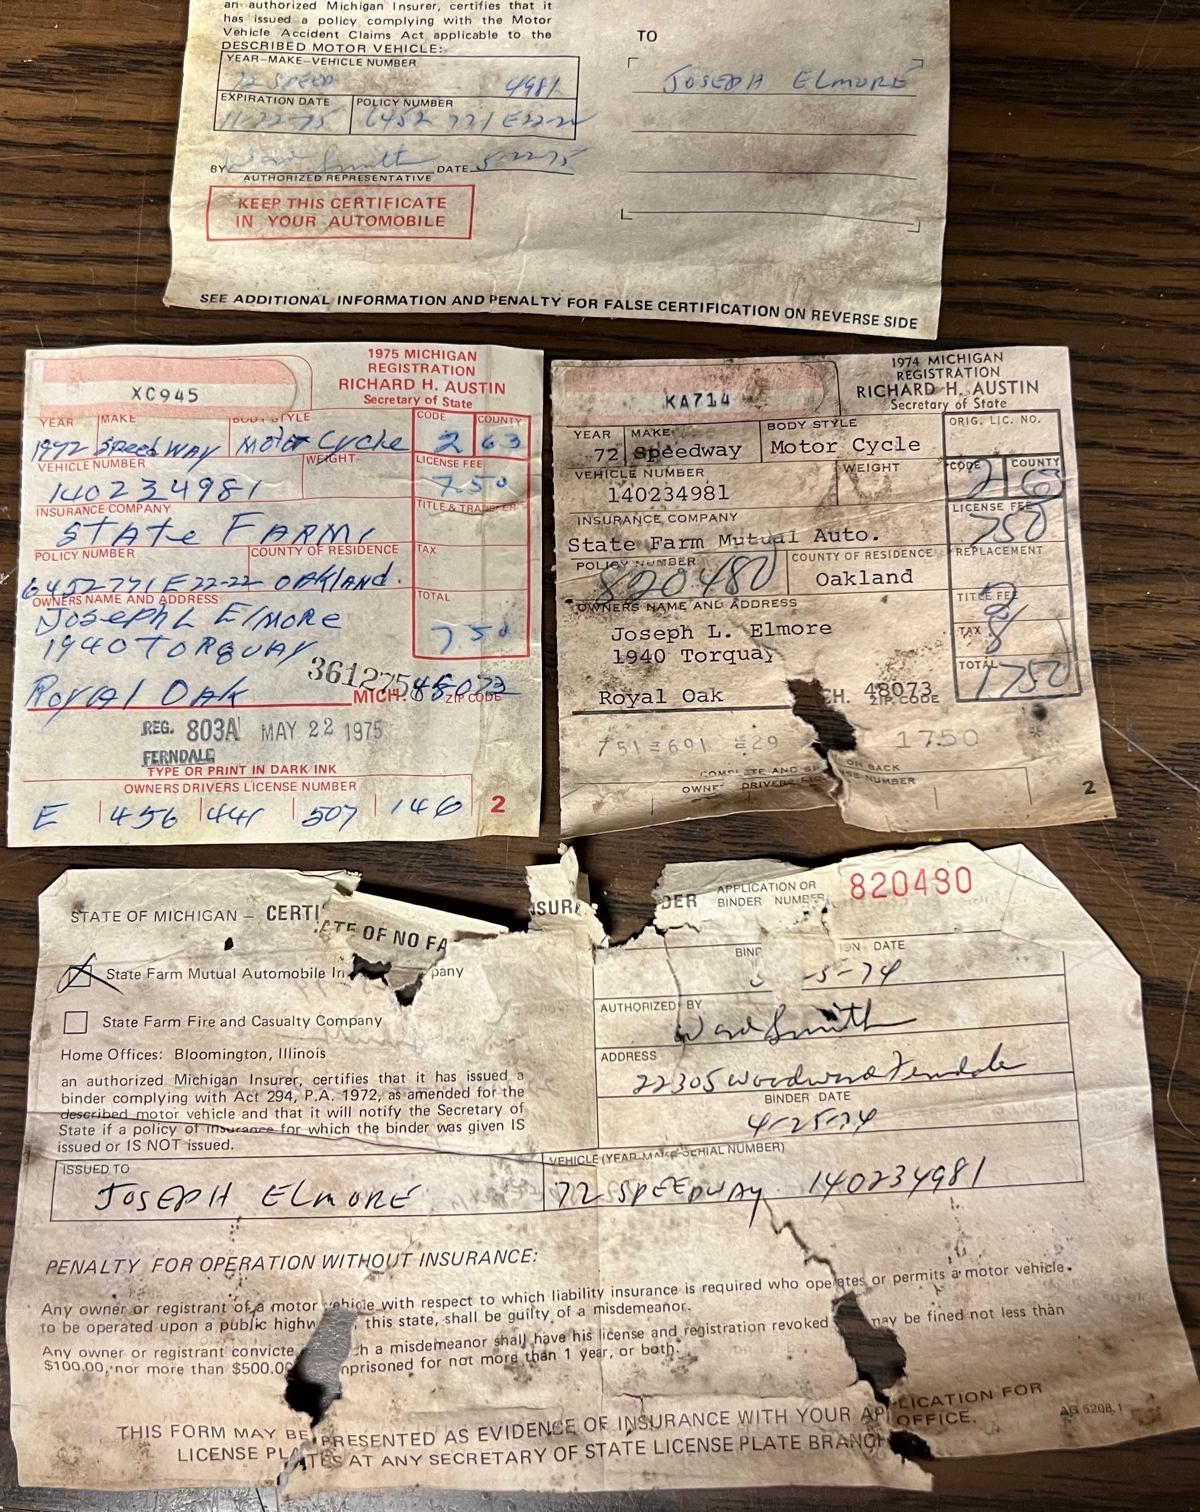
In 1974 a Speedway bike appeared in the JC Penney catalog.
It was basically a 1972 Speedway Green Horn (the bike was even green, though a different shade),
but labeled as "El Tigre." It used a Salsbury torque converter (opposed to a
Fairbanks Morse/Comet set up.) The paperwork (owners manual) for the El Tigre
was dated March 1974. Now did Speedway sell JC Penney this bike, or was
this Fox Corporation using leftover Speedway parts? It appears the deal was set up
with Speedway, but Fox probably did the production of the bikes.
Fox sold Speedways are pretty rare. You can tell them because the lettering on
the gas tank is different.

Speedway Repair Info.
-
Below is a list of problems and solutions to common Speedway minibike issues.
-
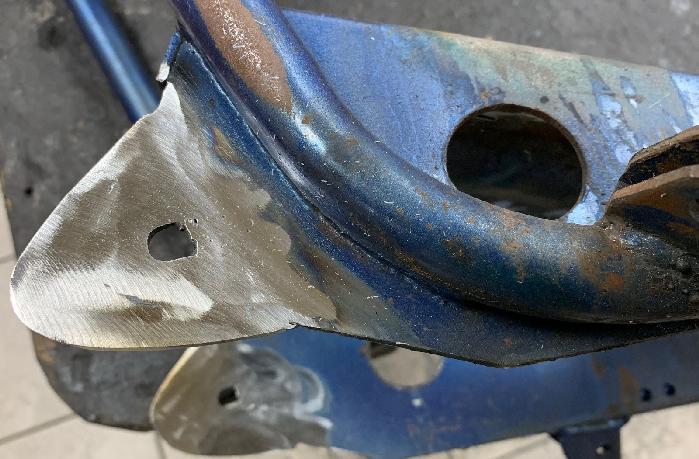
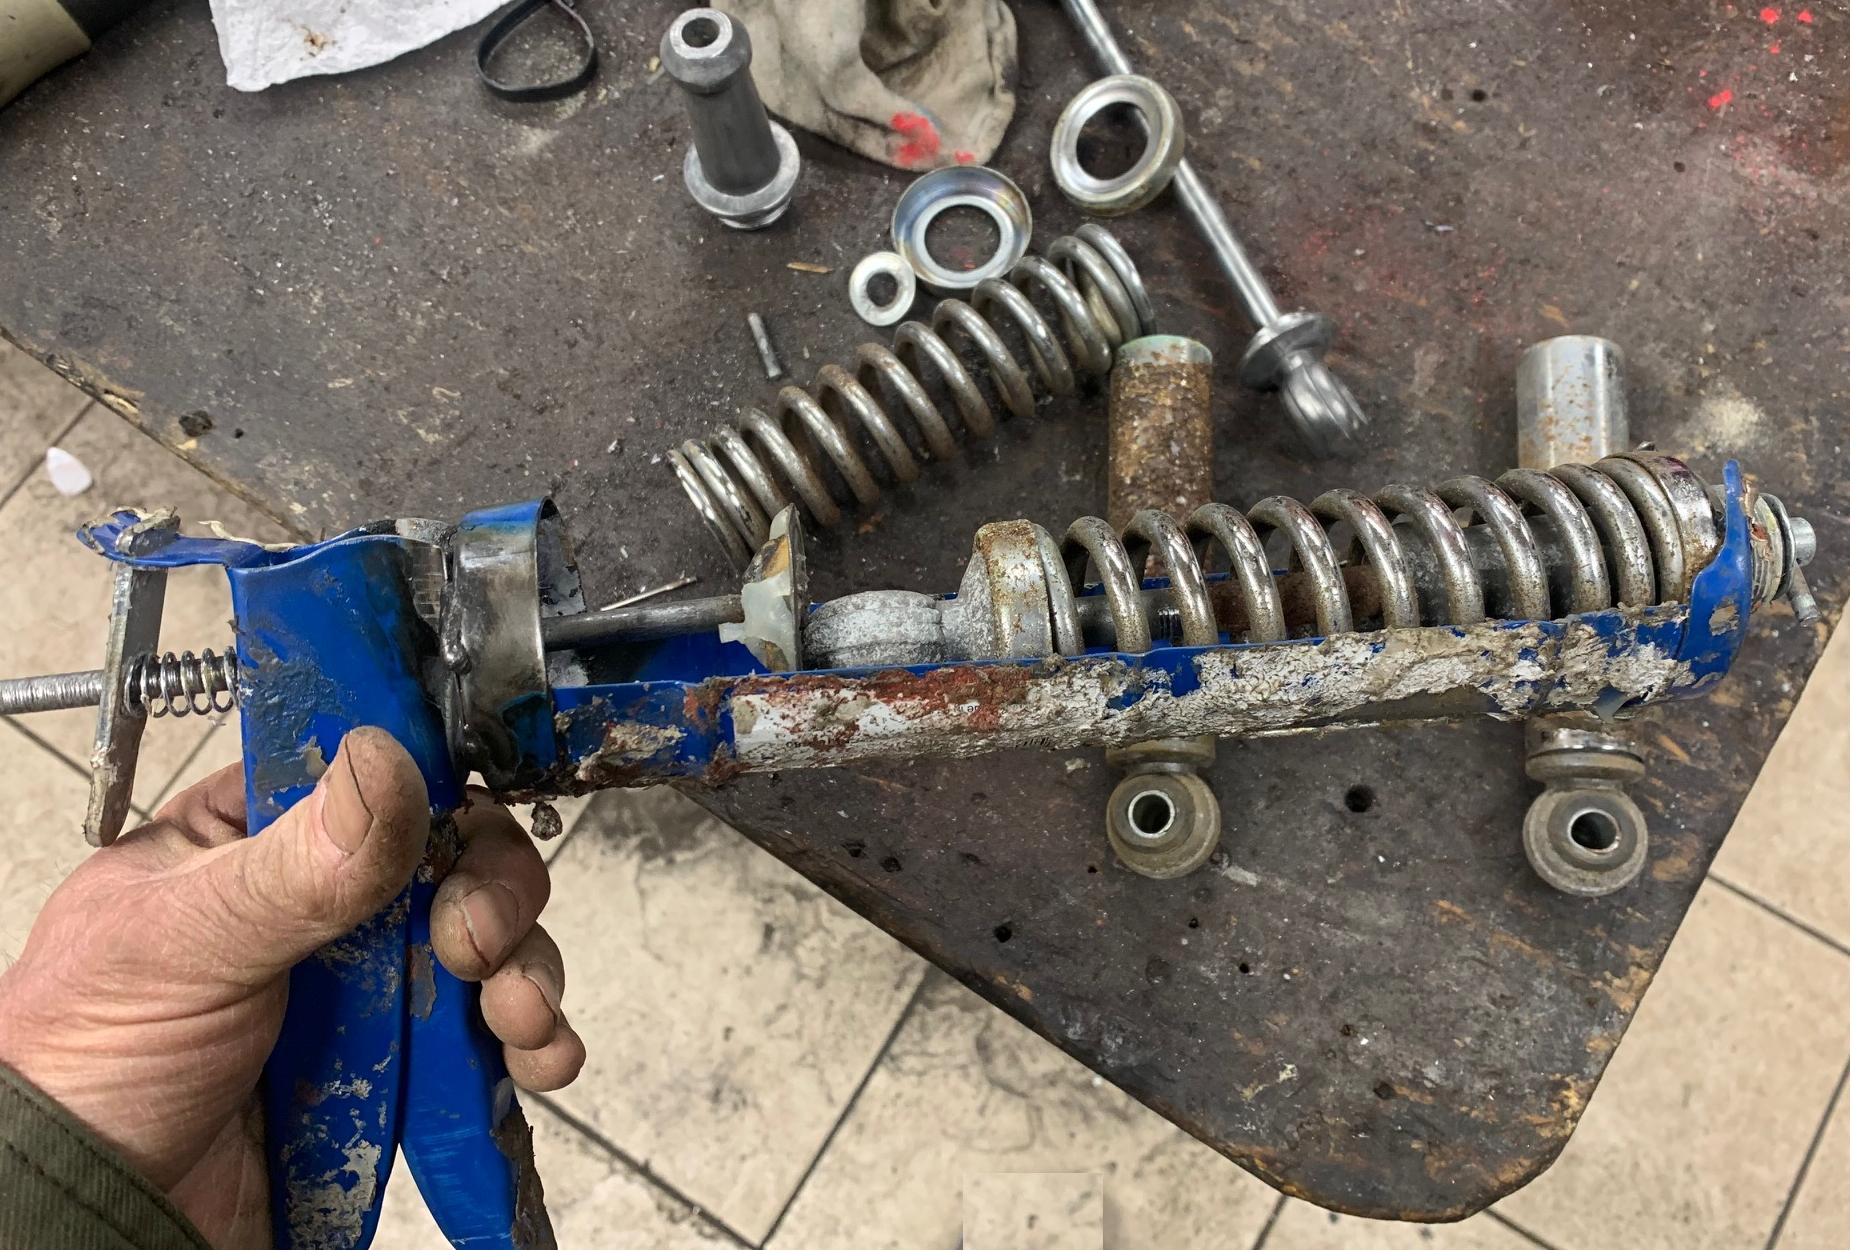
When buying a 10" wheel Speedway, always check the neck tube side plates for cracks. This is
a really common problem, as seen in the picture below. In 1973 Speedway fixed the problem
by adding a lower neck plate. This took care of the issue, and significantly strengthens
the entire frame structure. But 1970 to 1972ish Speedway models with 10" wheels and no lower neck plate,
the side neck plate crack(s) is pretty common to see.

Without the added bottom neck plate, the entire motor plate has sway. That means if the bike is riden off road, as a corner is made, the motor plate actually moves, because the two neck down tubes are not stiff enough. This puts pressure on the side neck plates, and they crack. In addition usually the front fork springs are too soft (or the front end has seized.) With the front forks bottomed out, the energy has no where to go, and the frame can crack at the neck tube side plates.
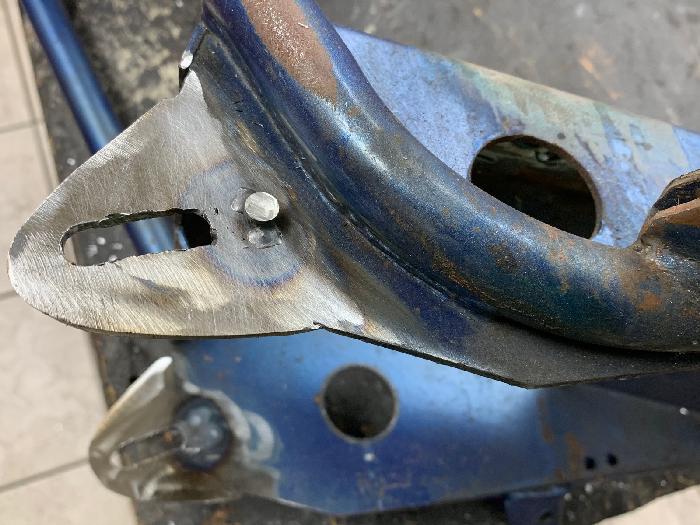
To fix this problem, around 1973 Speedway added a third lower neck plate to tie the two side neck plates together. This makes the motor plate much more stable and makes the entire frame much more rigid. All the 14" wheel models had this modification. But on 10" wheel bikes that don't have the bottom neck plate, it's a good idea to add it. And frankly the bottom neck plate really doesn't show (since it's under the two neck tubes coming to the engine plate.) If you are repainting your Speedway frame, I highly recommend this modification. With this lower neck plate, you can *feel* the frame is more solid when riding off road.
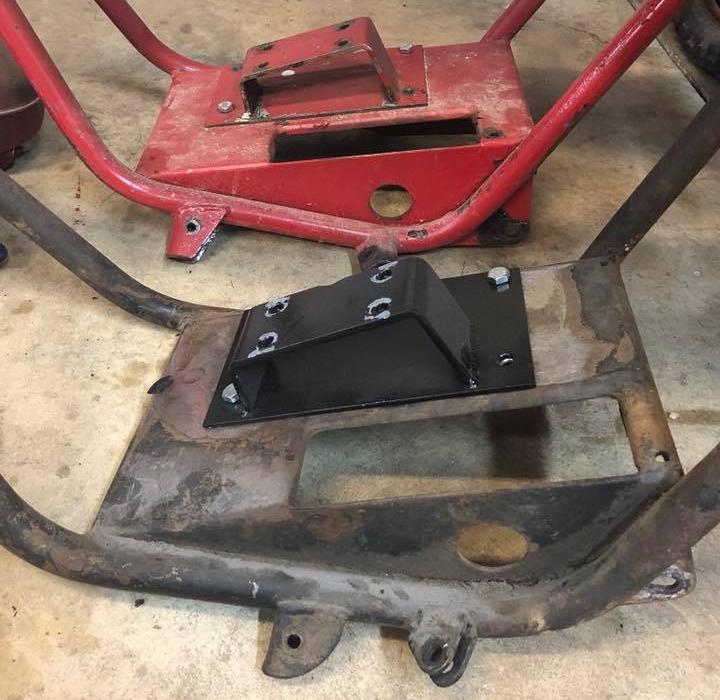
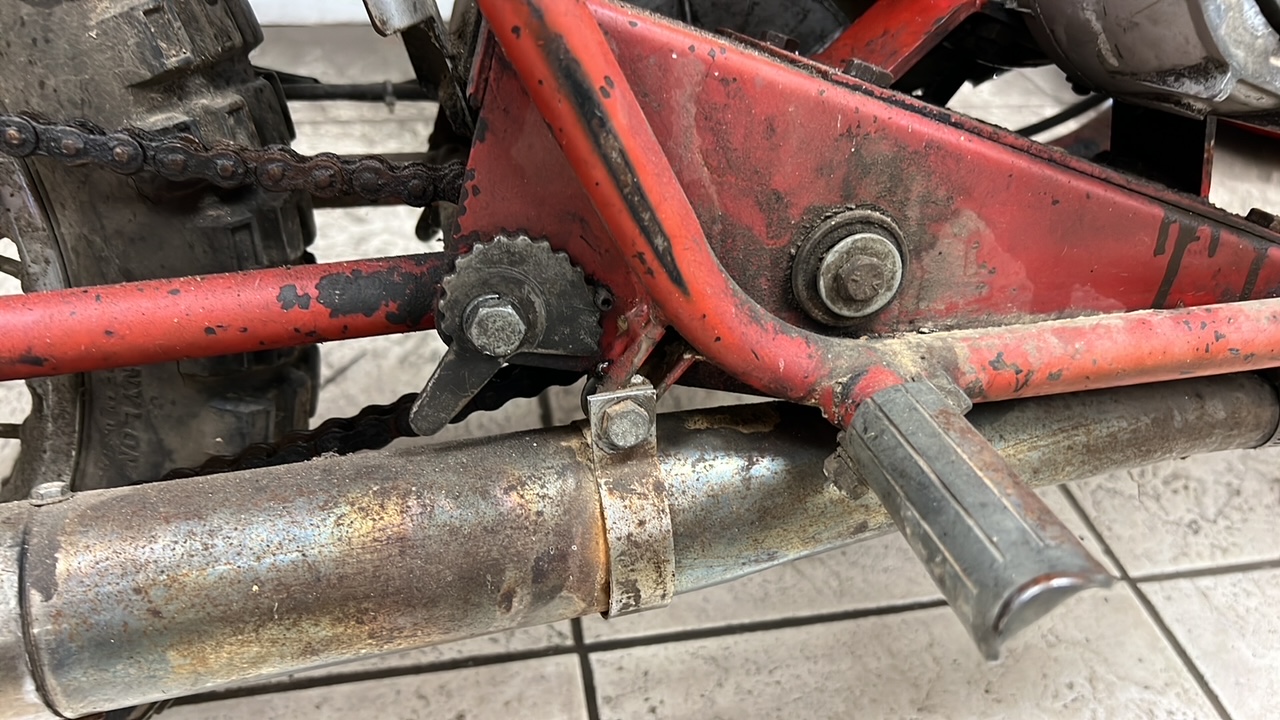
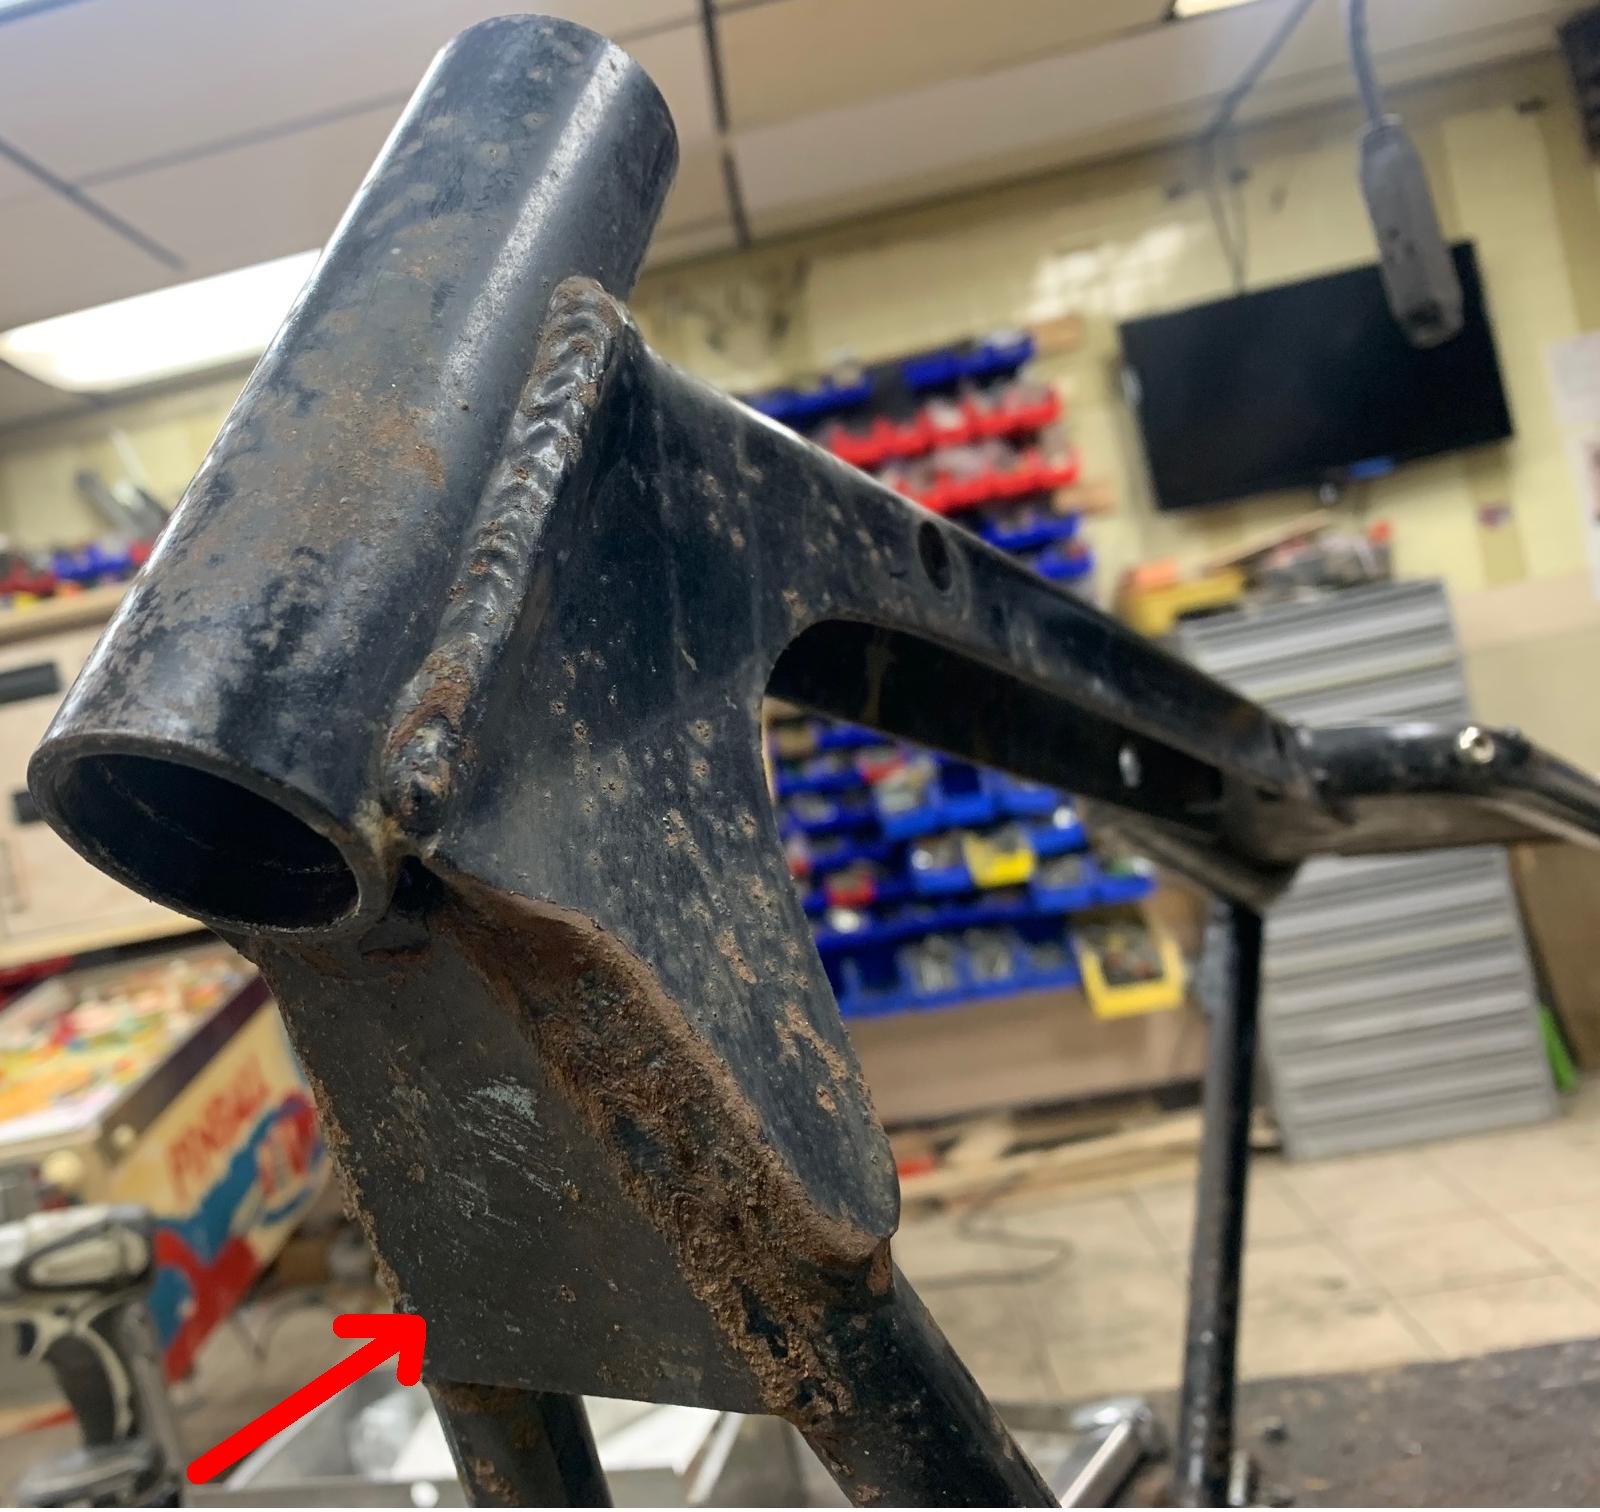
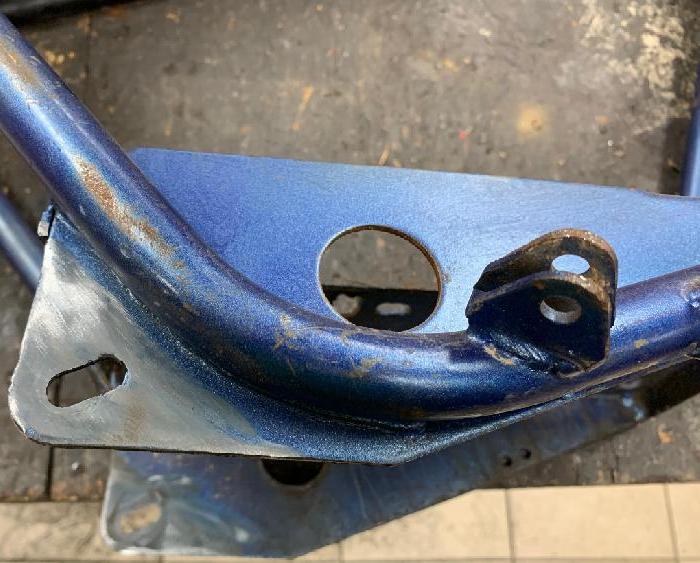
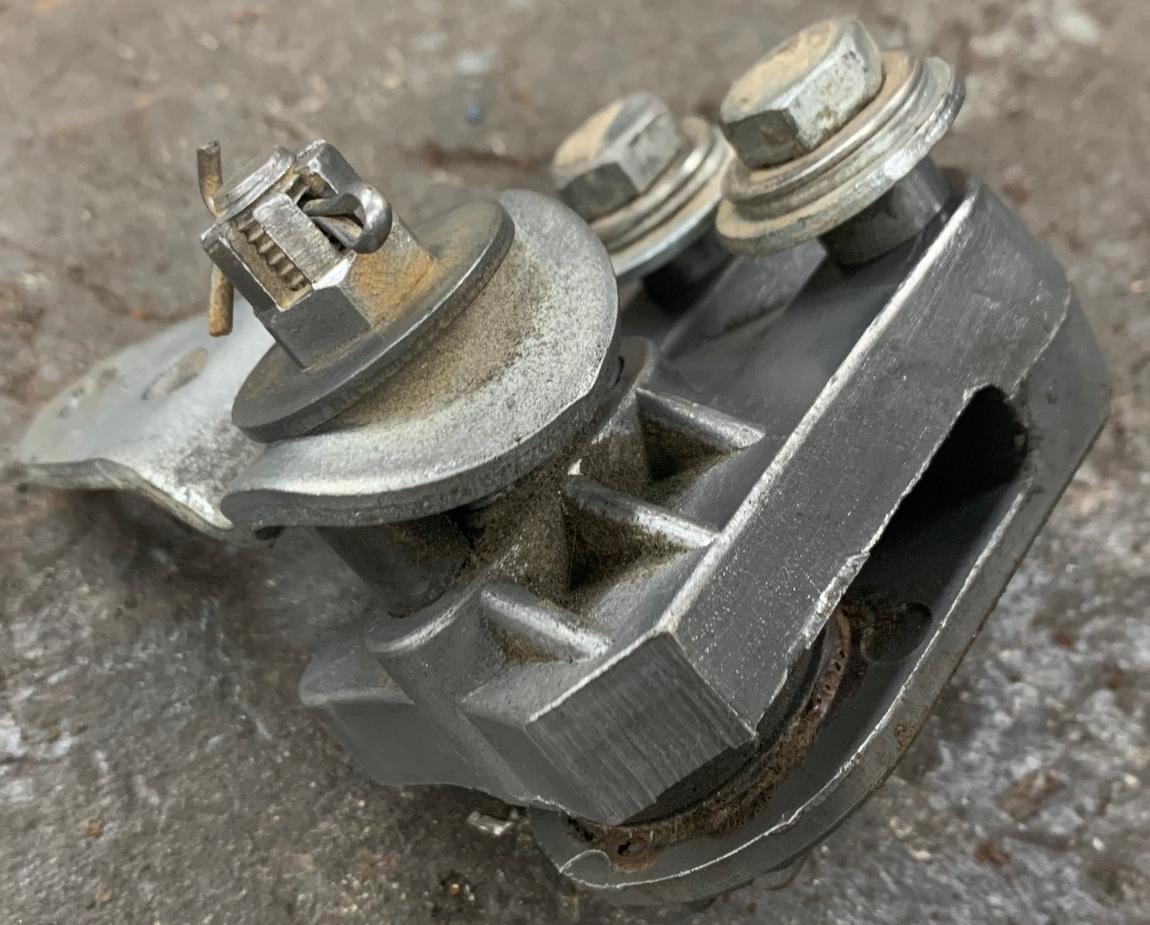
A later (1973) Speedway 10" wheel mini bike neck tube area. The metal plate
underneath the two tubes coming from the engine plate was added on 1973-ish 10" wheel
models to prevent typical neck tube side plate cracks. If you have a 1970-1972
Speedway 10" wheel frame without this metal plate, you really should add it.
It dramatically strengthens the frame.
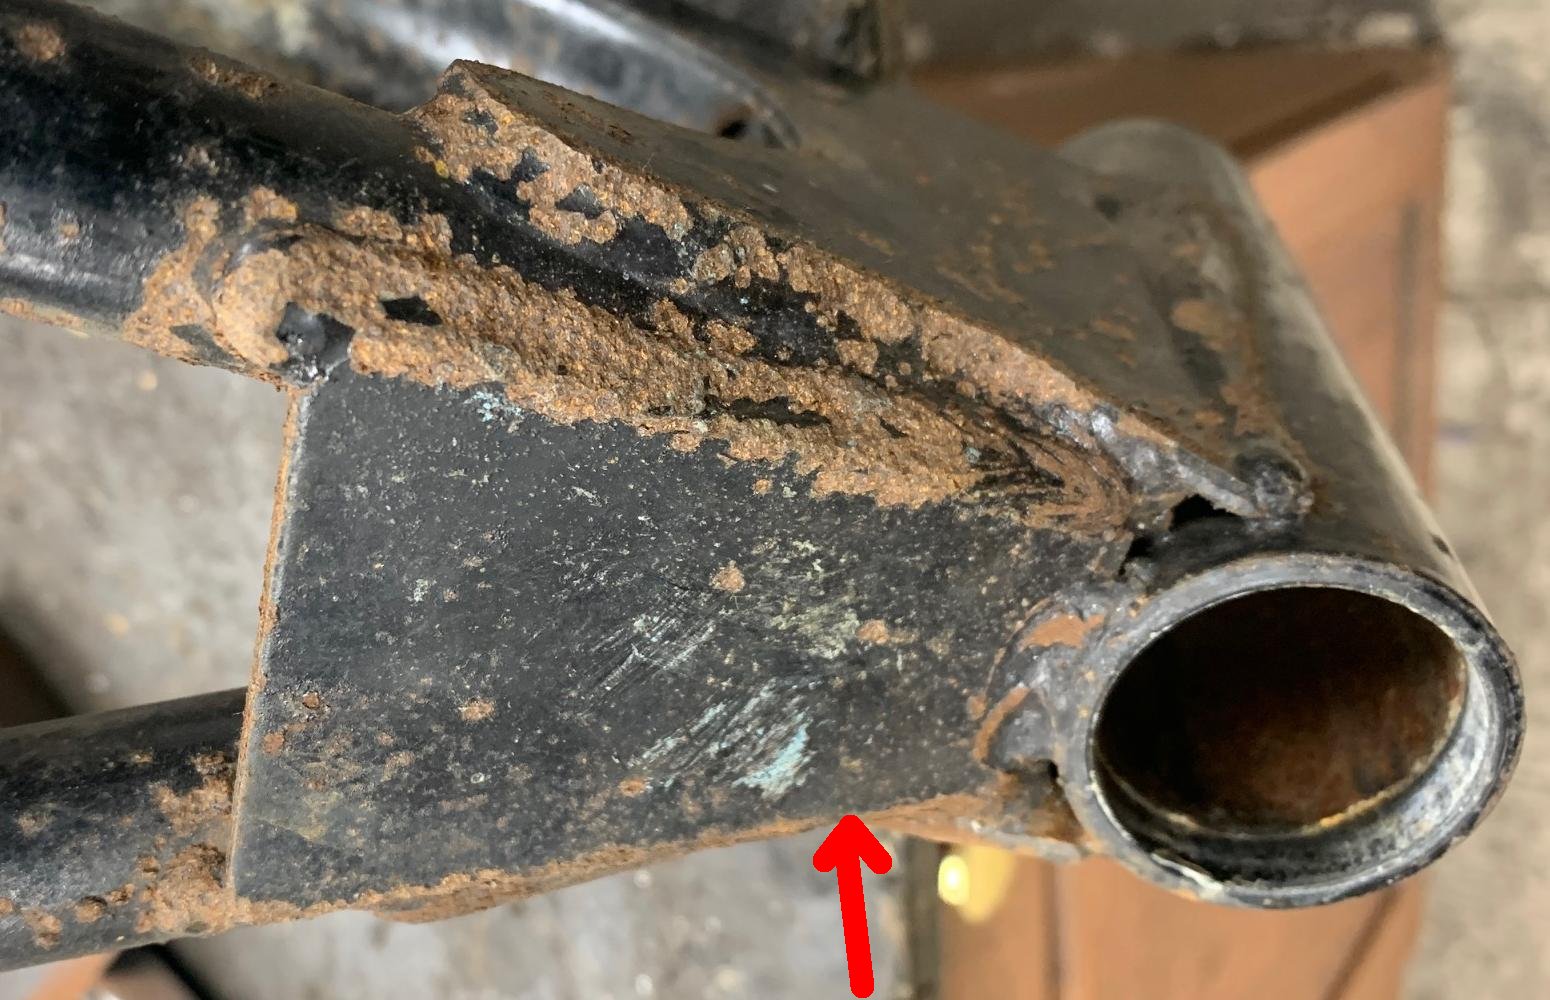
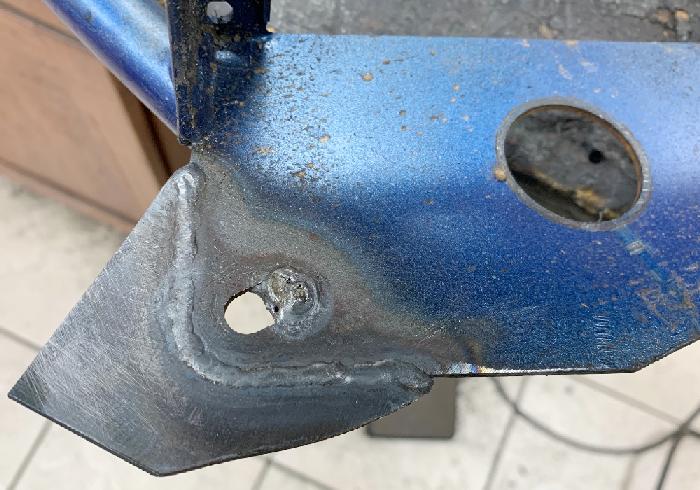
Another angle of the lower neck tube plate, from the bottom of the frame.
-
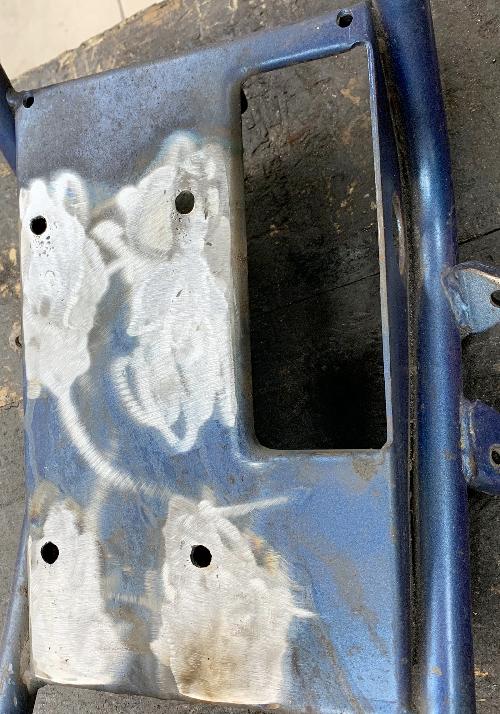
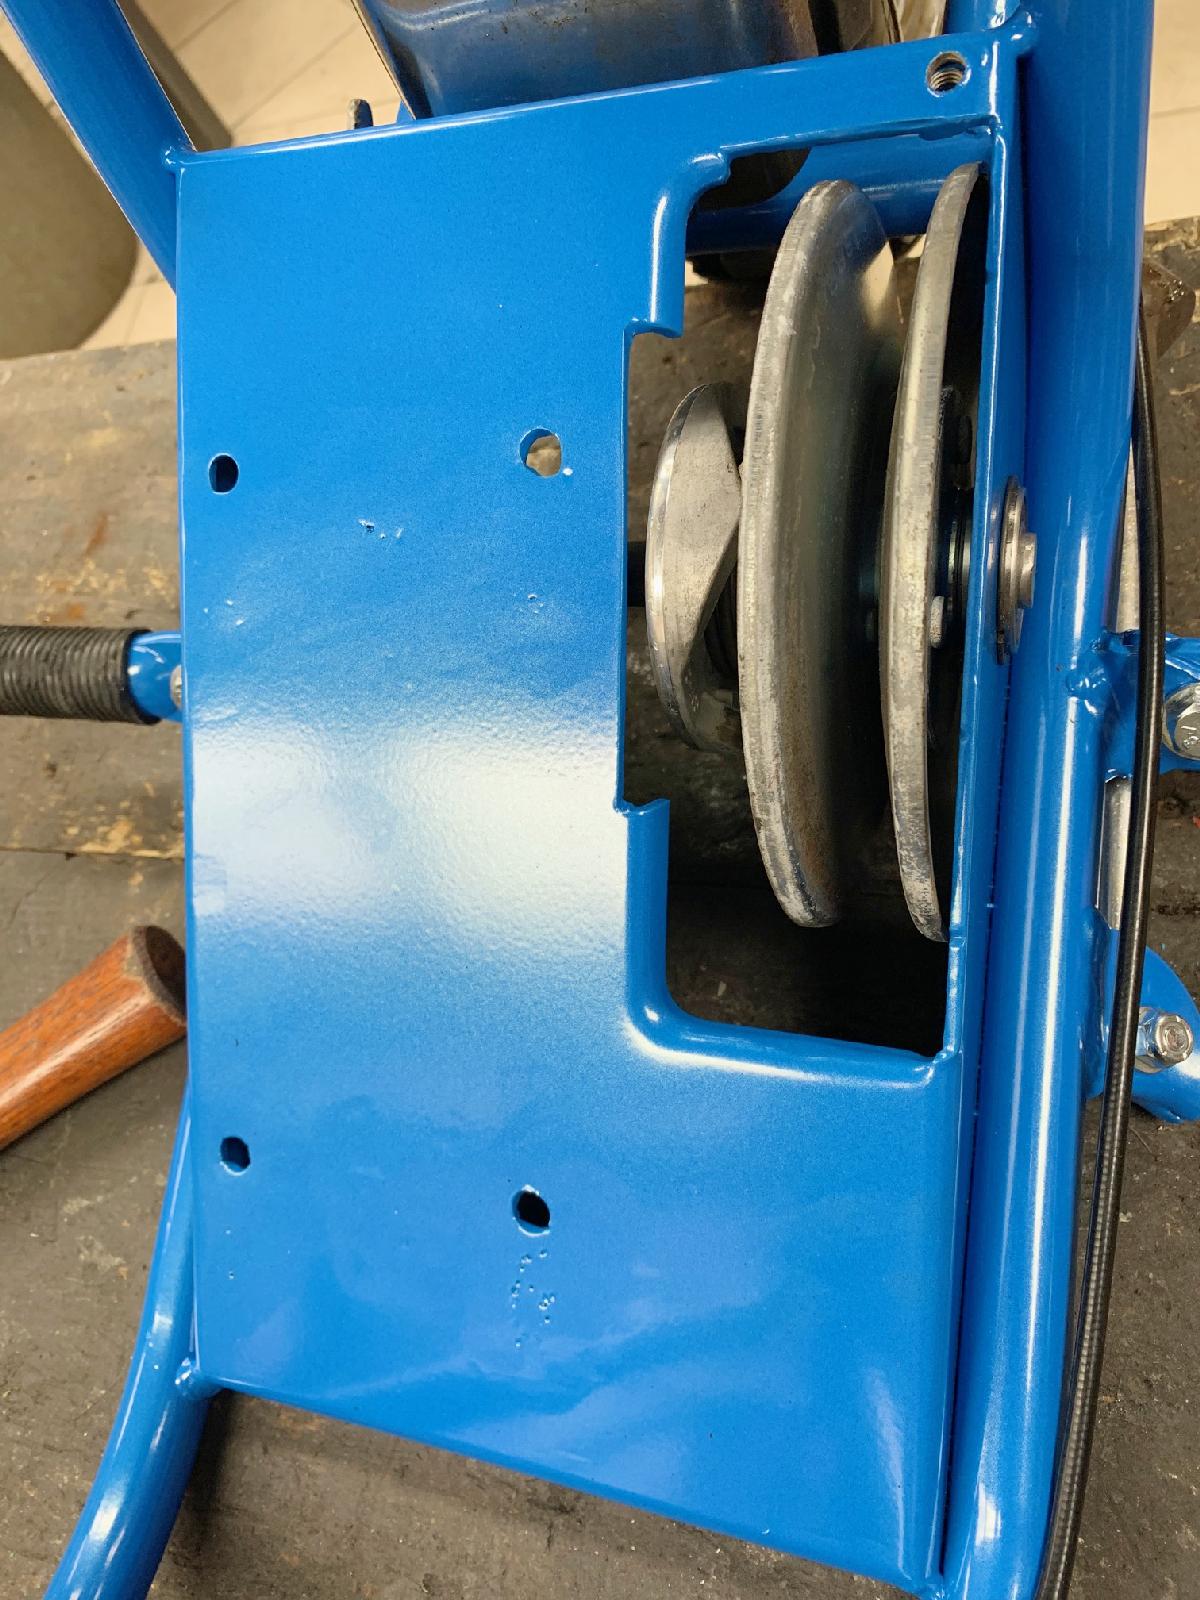
The motor plate always seems to be swiss cheese on Speedway mini bikes
(especially the 10" wheel models). I think this happens because of the
problems with their original torque converter system, and lack of part
availability. Hence people hack in other clutch systems that require
the motor to be moved (or slid to adjust a chain.) This is frustrating to me, because I don't
like swiss cheese engine plates! I generally TIG weld the extra slots
and holes shut, and re-drill the four motor plate holes (2 5/8" from
the top edge of the motor plate to the center of the forward most two 5/16" holes)
Using a TIG welder to fill-weld the old holes and re-constructed
the correct motor position holes (2 5/8" from front edge of motor
plate to the center of the forward most two holes). When the frame is painted this will
look pretty good (compared to swiss cheese!)
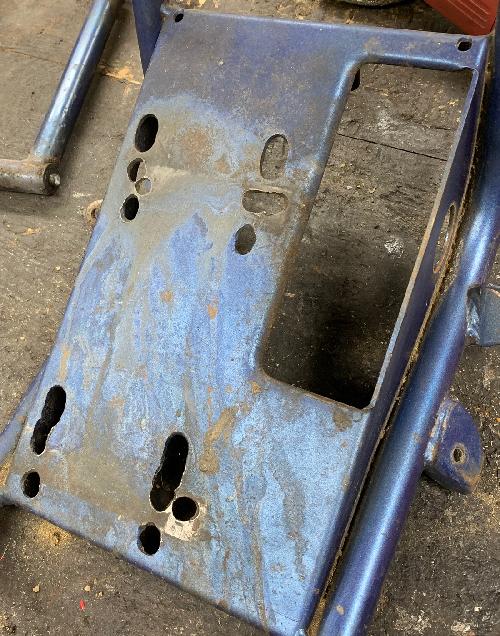
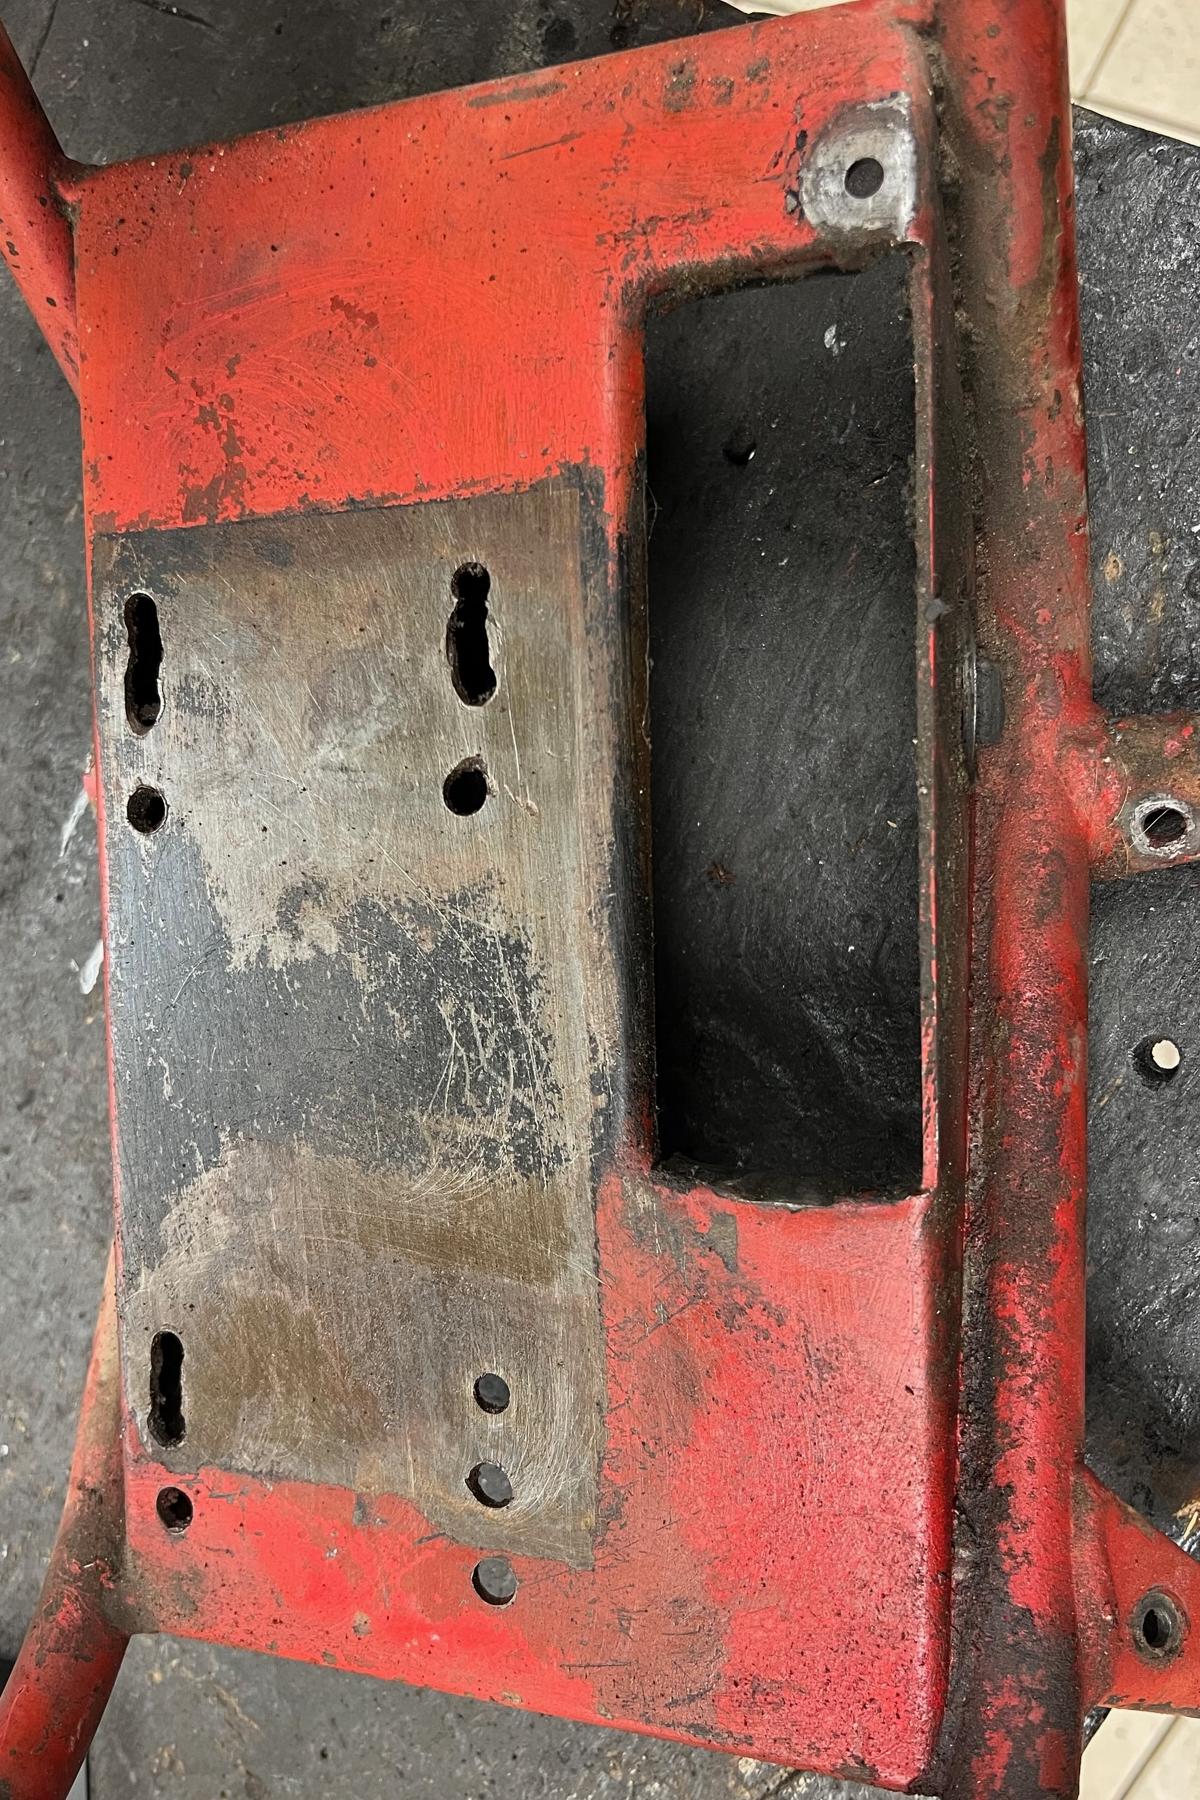
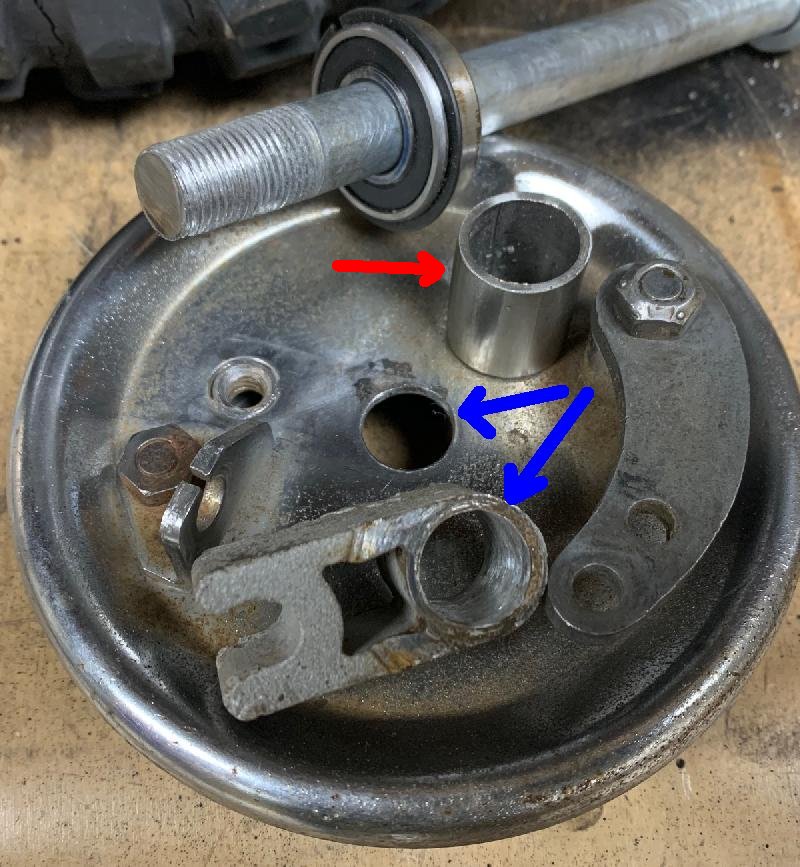
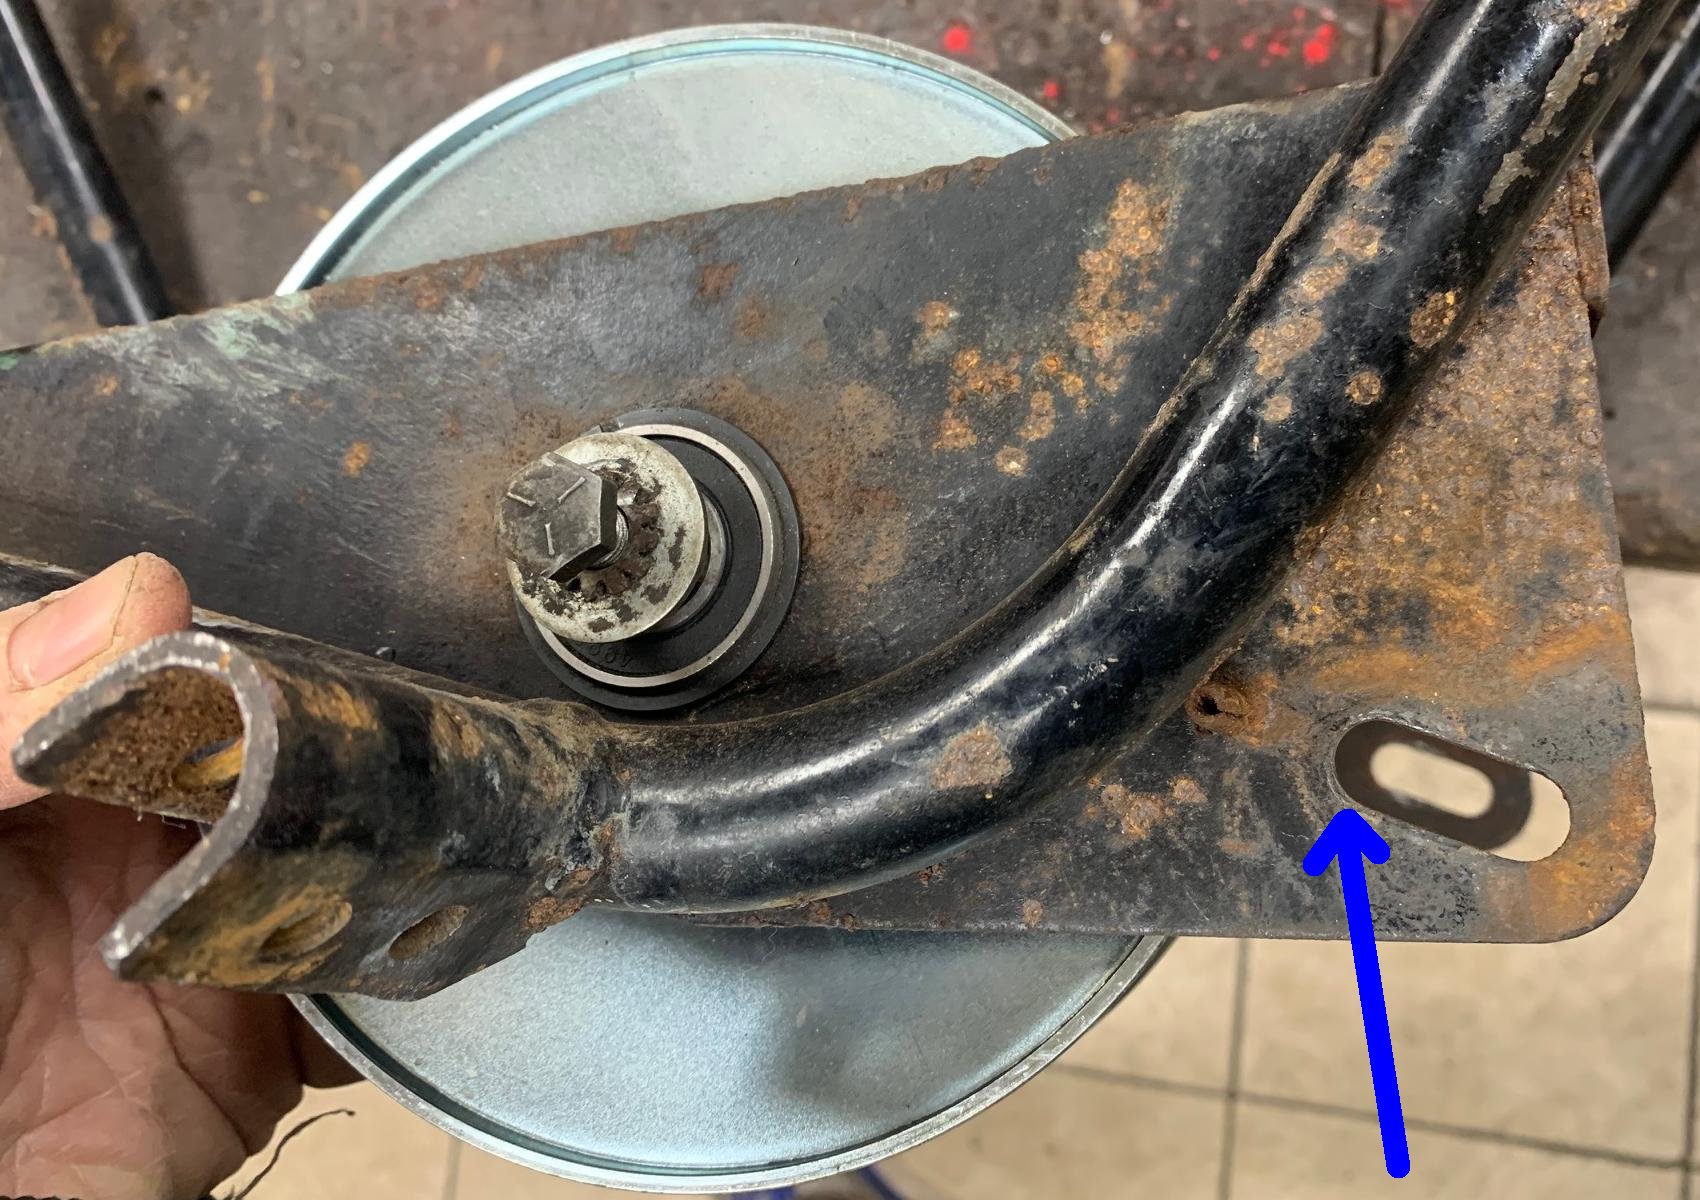
Speedway Red Baron 14" wheel mini bike motor plate. Mods like this
aren't as common as the 10" wheel bikes, but it still happens.
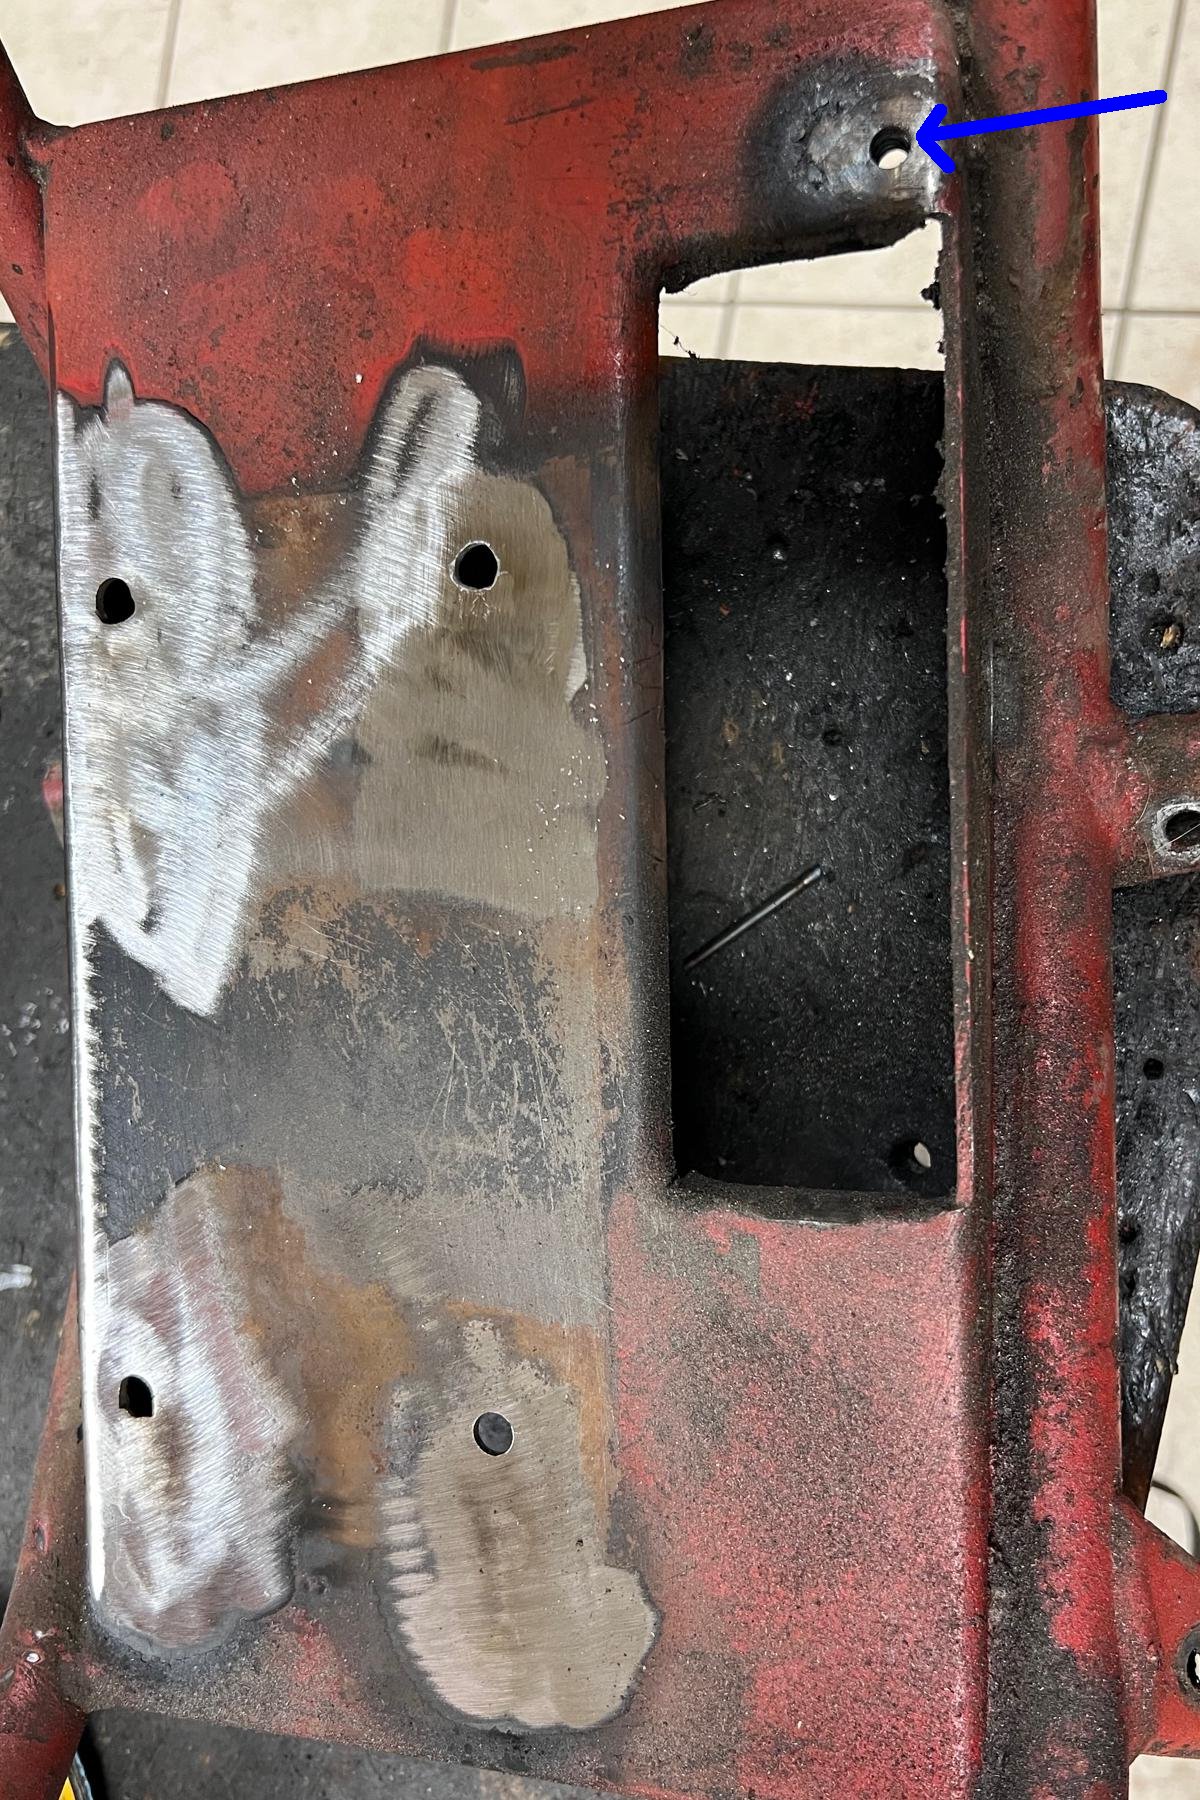
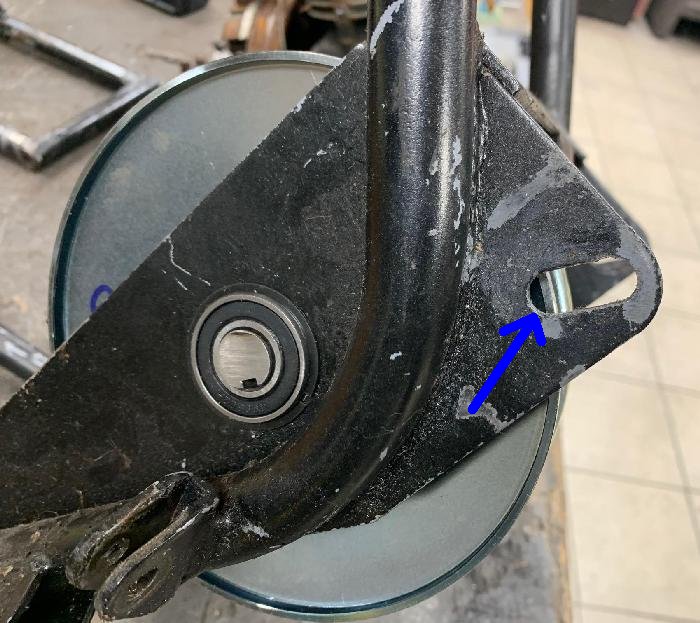
Speedway Red Baron 14" wheel mini bike motor plate after the extraneous holes are
TIG welded shut, ground flat, and re-drilled. Also note the hole with the blue arrow
in the motor plate. This hole is stock, but I always weld a 1/4-20 nut on the bottom
side of this hole. That makes mounting the torque converter cover so much easier.
For some reason Speedway did not do this, and removing the TC cover for maintenance
is easier with the threaded nut permanently attached.
-
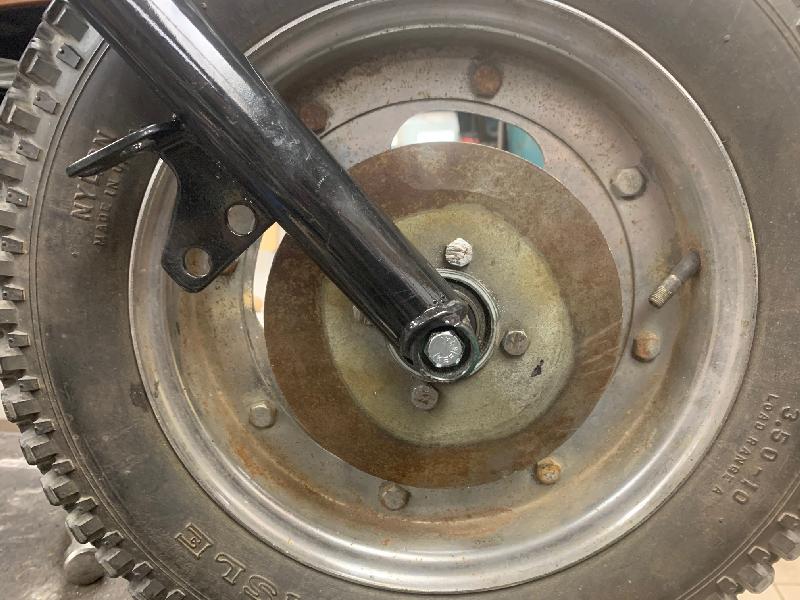
The 10" wheel bearings and axles are interesting. For some reason Speedway used
3/8" or 1/2" diameter axles (when the stardard was 5/8"). This is just weird
to have that small of an axle. Luckily the wheel bearings are the
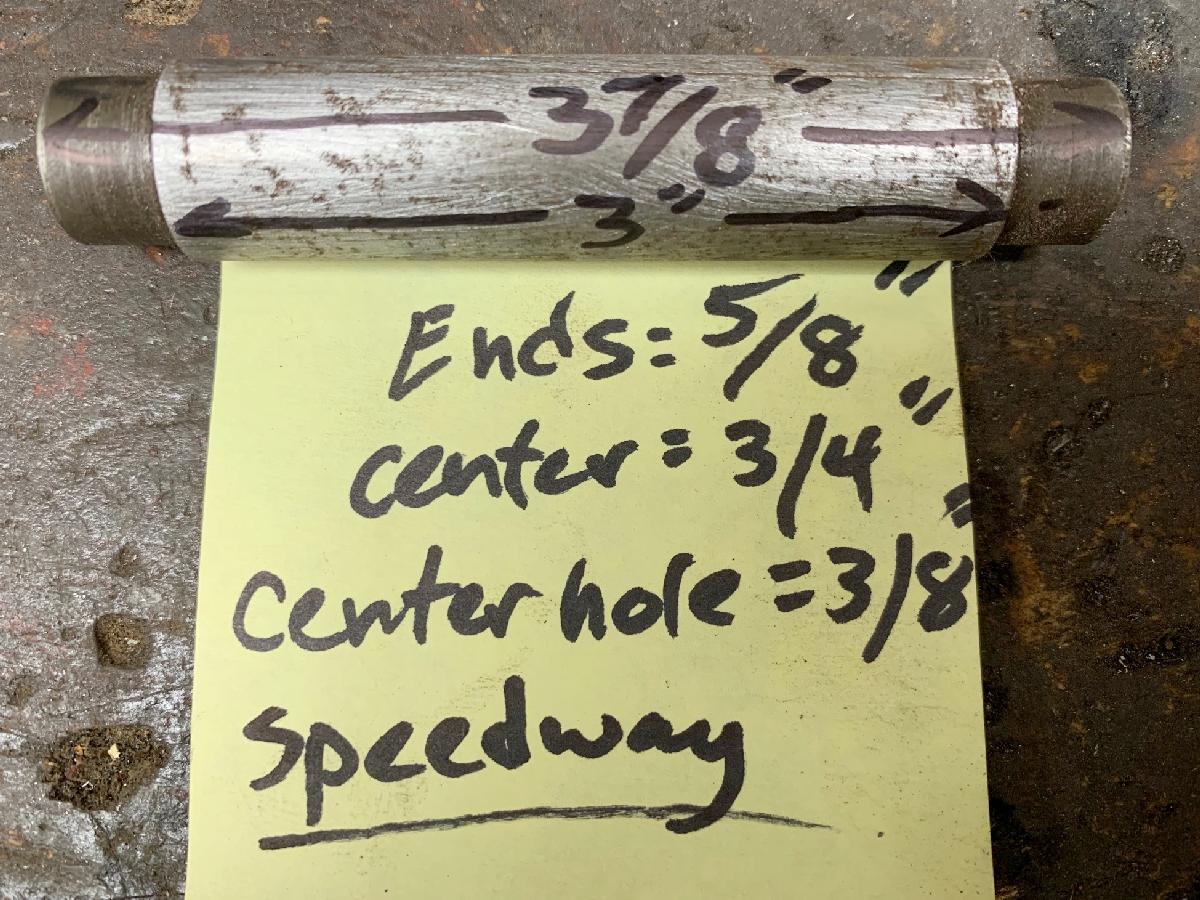
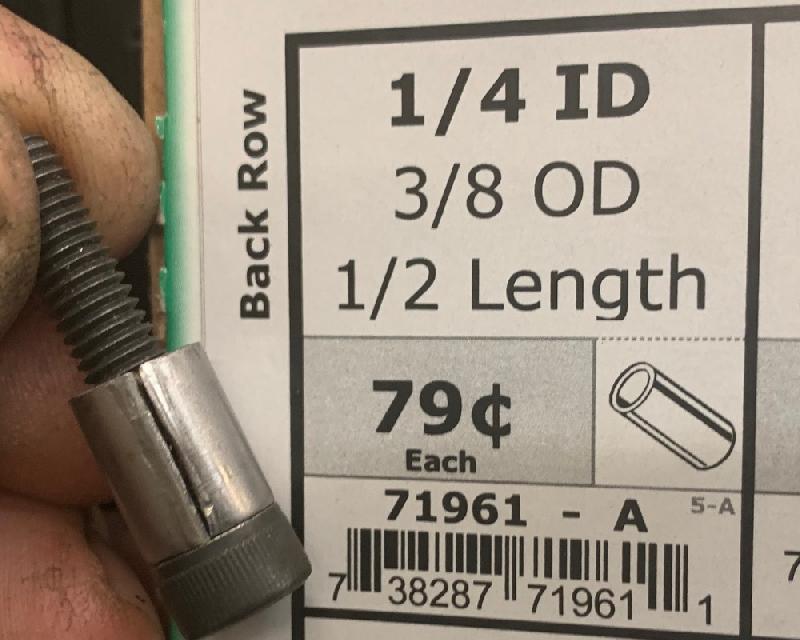
standard 1 3/8" OD and 5/8" ID bearings, but they used a spacer that goes
inside the hub and into the bearing for the 3/8" axle. The spacer is 3/4" diameter with
a 3/8" hole drilled down the center (for the axle.) And the ends of
the spacer are machined from 3/4" to 5/8", to fix inside the 5/8"
wheel bearing.
In 1973 though the axles changed on 10" wheel bikes - they now had 1/2" diameter axles front and rear. Instead of using the special center wheel bearing spacer that fits inside standard 1 3/8" x 5/8" bearings, they changed to 1 3/8" x 1/2" bearings. This is a major drag because 1 3/8" by 1/2" high speed wheel bearing today are impossible to find. That means you have to re-use the original bearings, or convert to a 5/8" axle and use standard 1 3/8" x 5/8" bearings.
-
Because the 10" wheel bearing spacer is non-standard, if it's missing, you have to come
up with some sort of a solution. If you're only missing one, what I do is
convert the rear wheel to a 5/8" axle. You will have to drill the swingarm
(or frame on a Shrike) from 3/8" (or 1/2") to 5/8" holes. Also the brake plate will
need to be drilled too. Then any sort of bearing wheel spacer (nothing special) with
a 3" length (goes inside the wheel hub between the two new wheel bearings)
can be used along with the much stronger 5/8" axle. Also the sprocket
side axle spacer will need to have a 5/8" hole too. I don't do
this on front wheels because the drilling is more involved, and the welded hole
on the front tubes are set up for a small nut (a larger axle nut won't fit
inside the tube.) It is possible to use a 5/8" front axle, but it's more work
and perhaps not worth it. But on the rear wheel it's very easy to use a 5/8" x 7" axle
(if you have a 5/8" drill bit and some 5/8" ID hole spacer/pipe material.)
-
On 14" wheel bikes they also used a smaller axle too. I have converted
these to 5/8" axles too, but for a different reason. The wheel bearings on the
14" wheel bikes are metric with a metric sized axle, and it's hard to find replacements bearings that have
the original ID hole for the metric axle. Hence using a standard 1 3/8" OD by 5/8" ID bearing and new 5/8" axle
is a good solution (if you need new wheel bearings.)
-
Another issue on Speedways is the plastic wheel spacers for the sprocket or
front disc plate. For some odd reason Speedway used plastic spacers for this.
That may be fine 40 years ago, but today they are often cracked/compromised.
In 1973 Speedway figured out this was an issue and started making them
out of metal. But for the first couple years they were plastic. The only
solution is to make a new one out of aluminum or buy new ones (I see them
on ebay for $100 a pair.) No easy task to make them unfortunately.
And the problem with plastic wheel spacers becomes bigger with larger/more powerful engines often used today.
-
The gearing for Speedway mini bikes is important. If you gear too high,
there's not enough power. If you gear too low, not enough top end speed.
Personally I find 30 to 40 mph to be the top speed to hit with a
stock Tecumseh HS40 or HS50 engine (at 3600 rpm). With that in mind, this is what
the bikes used originally for gearing (which seems to work well) via
the 7.5" jackshaft 5/8" diameter with a Comet series20 torque converter.
The calculations below assume a 16.5" tire height for 10" wheel bikes,
and a 20.5" wheel height for 14" wheel bikes:
- 10" wheel bikes: 54 tooth rear sprocket, 11 tooth jackshaft, 4.9 to 1, yeilding about 37mph. I consider this the ideal set up.
- 10" wheel bikes: 68 tooth rear sprocket, 9 tooth jackshaft, 7.5 to 1, yeilding about 24mph. I change this to a 14 tooth jackshaft sprocket giving 4.9 to 1.
- 10" wheel bikes: 48 tooth rear sprocket, 8 tooth jackshaft, 6 to 1, yeilding about 30mph. I change this to a 10 tooth jackshaft giving 4.8 to 1.
- 14" wheel bikes: 54 tooth rear sprocket, 9 or 10 tooth jackshaft, 5.4 to 1 (10t), yeilding about 40mph. Some 14" wheel bike use a 9 tooth at the jackshaft (6 to 1) yeilding 36mph (this allows the motor to rev higher for more power but lower top speed.) To be honest, the 9 tooth jackshaft sprocket seems to work better with an HS40 motor (Red Baron/Blue Angel.) If using an HS50 motor (Green Horn) a 9 or 10 tooth jackshaft sprocket works.
- 14" wheel Widow Maker (Sachs 80b engine.) These bikes used an 8 tooth jackshaft sprocket and 58 tooth rear sprocket. But in 1973 Speedway changed the rear sprocket to 72 tooth because the Widow Maker needed more power from a dead start and up hills.
On 10" wheel bikes personally I find the 4.9 to 1 ratio to be the best with a Tecumseh HS50 engine. If you are using a smaller engine (HS40 or H35) then other ratios may be better. On the 14" wheel bikes the drive ratio needs to be different (5.4 to 1 or even 6 to 1) because the rear wheel is bigger.
-
The Sachs 80b engine (73cc, bore 46mm, stroke 44mm) which was fitted on the Speedway Widow Maker and some other models
frankly did not have the versatility of the Tecumseh models (like say the Green Horn/Red Baron/Blue Angel.)
And the Widow Maker was actually available NOS (new old stock) into the 2000s (which
probably tells you something.) Parts for the Sachs 80b engines are difficult. Rings are available at
Treatland.Tv
(sold separately, you need two per engine.) These are 46mm x 1.5mm as used on some Peugeot moped engines.
Another issue with the Sachs 80b engines is the 17mm Bing carburetor with a #45 idle jet and #80 main jet. The Bing carb has a "tickler" (which just feeds more gas to the float bowl), but no choke on this carb. This can make the Sachs 80b engine a bit hard to start when it's cold. And that's why the pull start on the Sachs 80b is often broken (a broken return spring being the main culprit.) The engine can be started with a 14mm socket attached to a drill, spinning clockwise on the flywheel nut (with the pull start removed.) Some people have pull a Dellorto carb on the Sachs 80b to aid in starting (since Dellortos have a choke), as Dellorto parts tend to be easier to get.
Get the Speedway Widow Maker Sachs80b Service Guide. Interestingly the service guide says the gas to oil ratio should mix at 25:1, but Speedway puts a 16:1 sticker on the gas tank. Breaker point gap is .014" to .018" and can be adjusted through holes in the flywheel. Spark plug gap is .020" using Bosch w225t1 or Champion L81.
Note the Widow Maker was available in 1972, but in 1973 Speedway changed the rear sprocket from 58 tooth to 72 tooth. This helped the Widow Maker have better "off the starting line" power.
-
Personally I always make a new jackshaft. I buy lengths of 5/8" rod with the 3/16" keyway
milled into it, and cut it to 7.5" length. Usually end up taking .050" to .075" off that
length for a final fit. Use new 5/8" jackshaft bearings. Drill the ends of the new jackshaft
about 3/4" deep with an "H" bit (.266"), and then tap it with a 5/16-24 drill bit about 1/2" deep.
This leaves the end of the jackshaft flush with the outside of the jackshaft bearings. Using
two 5/18-24 bolts 1/2" in length and a washer works great. Some
people like to use 5/8-18 nylon locknuts on the end of the jackshaft (you will need a longer jackshaft
and a 5/18-18 die to do that.) Personally I don't go that route, but if you prefer, that works too.
-
I also make jackshaft spacers from 3/4" stainless steel tubing (with a .035" wall thickness.)
Do *not* use or trust anything with an allen wrench screw! You will regret that, trust me.
Using spacers means no allen screws on the jackshaft sprocket. That's the right way to
do this. Allen screws always find a way to loosen, and at the most inappropriate times, leaving
you stranded and pushing the bike home.
-
The torque converter (TC) used on most 10" wheel bikes for the first three years (pre-1973) was
a 5" driven 5/8" wide belt custom style symmetrical unit made by Speedway. Yet another problem as belts and
parts for this are impossible to find. Later 10" wheel Speedways went to a 6" Fairbank Morse driven
torque converter, but again, parts are hard to find (and the entire jackshaft/TC setup is hard
to work on.)
Because of this I convert to a standard 6" driven Comet symmetrical torque converter series 20 and a Comet #203578 (3/4" wide) belt. You will get much better performance and parts are easy to get. You will need a new 7.5" long 3/16" key slotted 5/8" jackshaft (with end bolts). But that's pretty easy to construct. Make sure you use spacers on the jackshaft (don't rely on set screw colars!!) I drill both ends of the 5/8" jackshaft and tap for 5/16-24 bolts. Install new 1 3/8" by 5/8" bearings (they fit right into place.) Believe me, it's worth it to do this conversion on the 10" wheel bikes.
For the 14" wheel bikes, they should have an updated torque converter (maybe even a Comet) with a 6" driven unit. They will use a 5/8" wide symmetric belt, most likely the Comet #200419 belt. These bikes can be updated to the newer style Comet series20 with a 3/4" belt too (using a Comet #203578 belt), but the benefits are less obvious than the conversion on a 10" wheel bike.
-
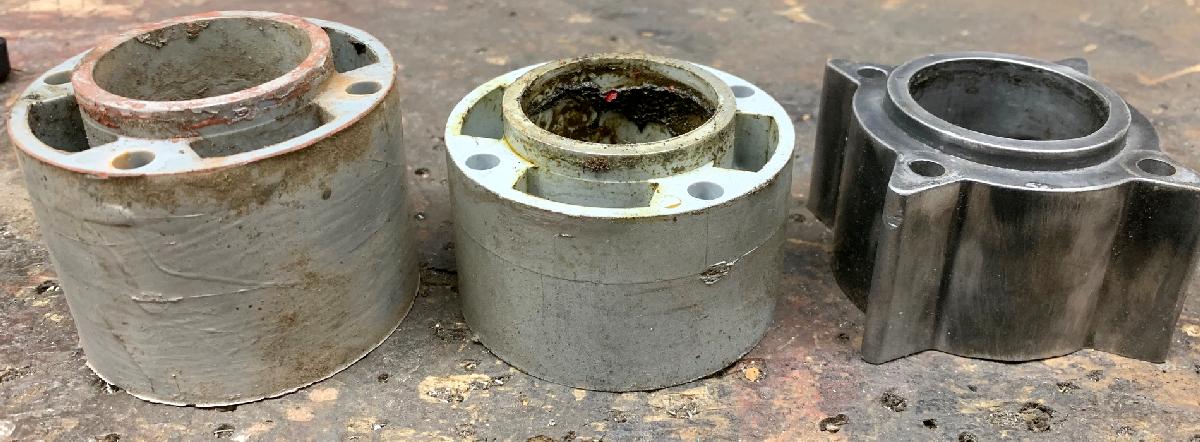
The big problem with 10" wheel Speedways with 5" driven 5/8" wide belt is the original torque converter belt.
Unfortunately I do not have a replacement number for you! You can not use a Rupp
(Gates 6061) belt, it's too big (see picture.) This is probably the main problem,
and why I convert to a Comet series20 (with a readily available 3/4" wide #203578 belt.)

-
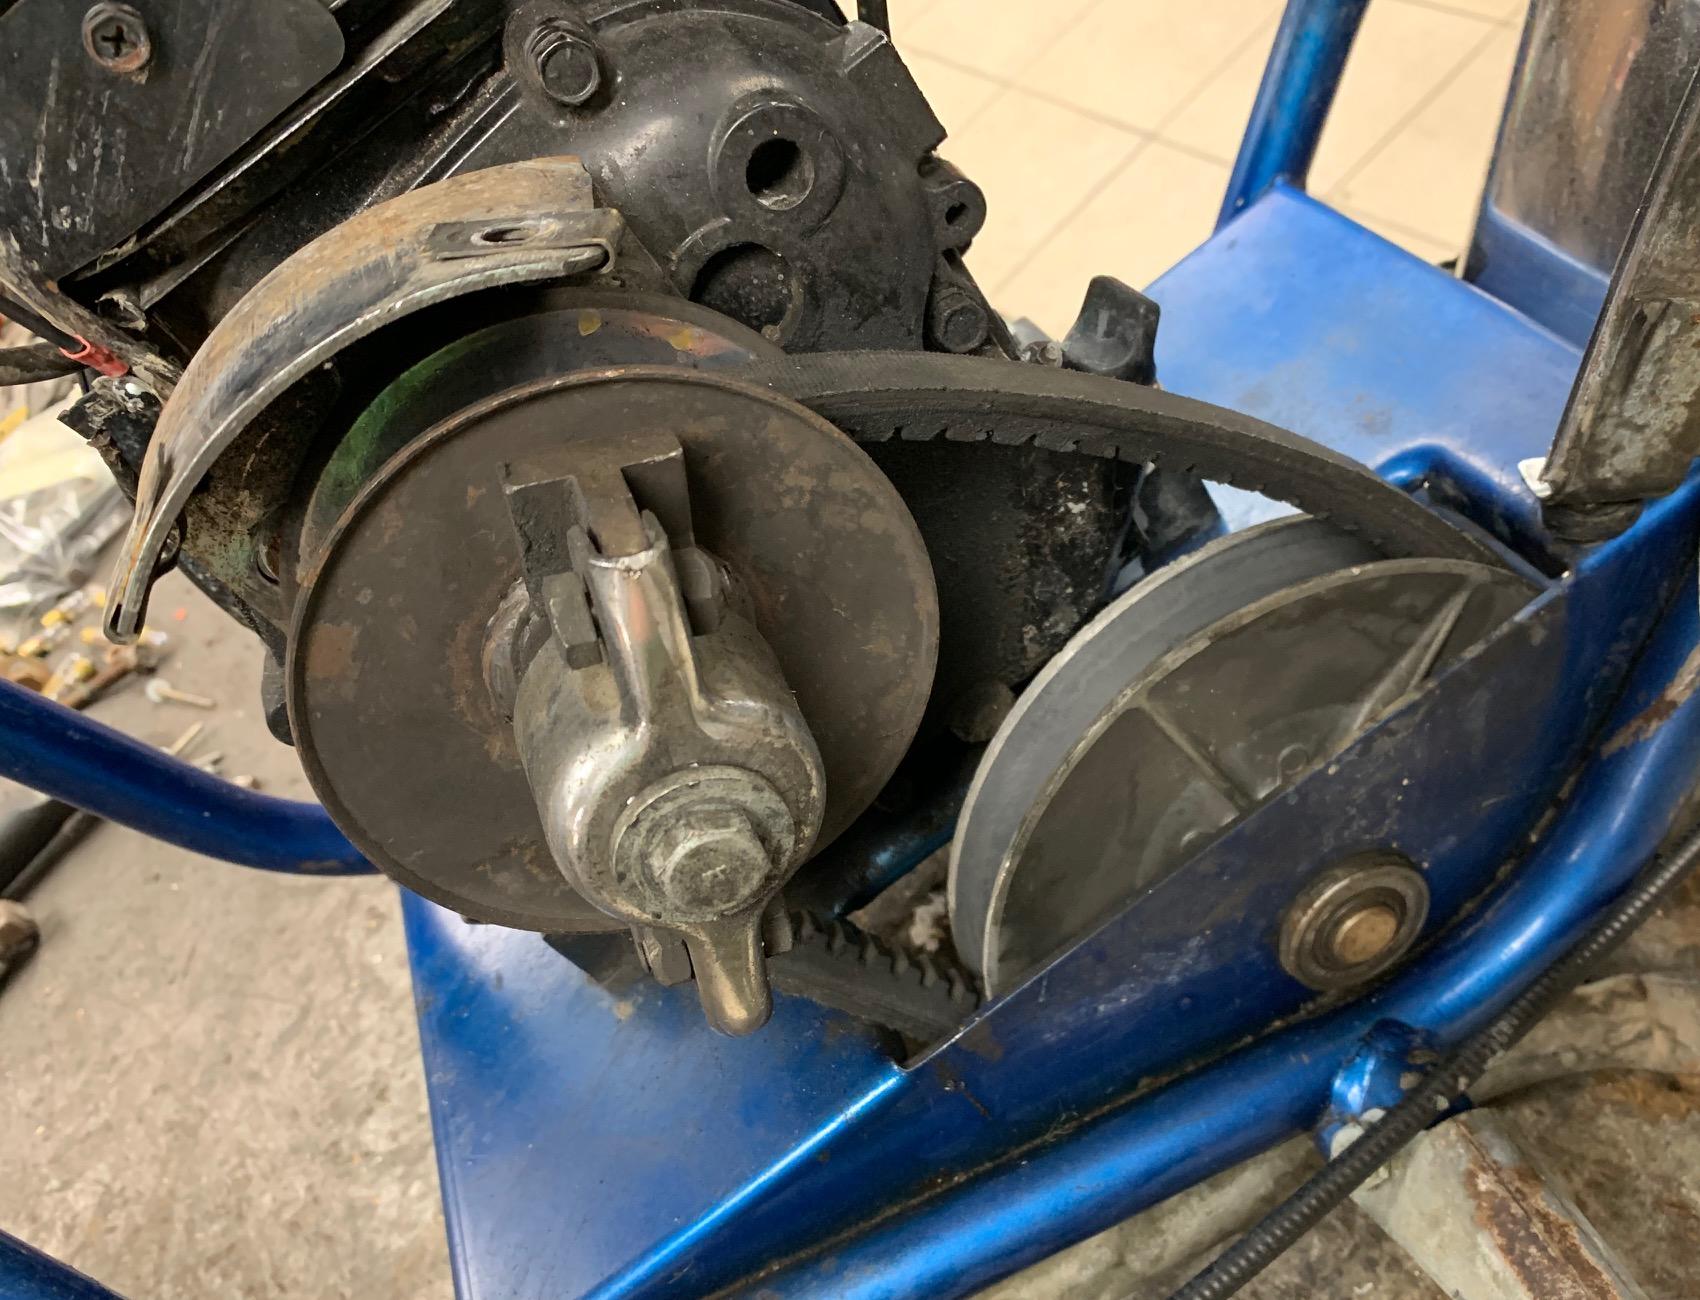
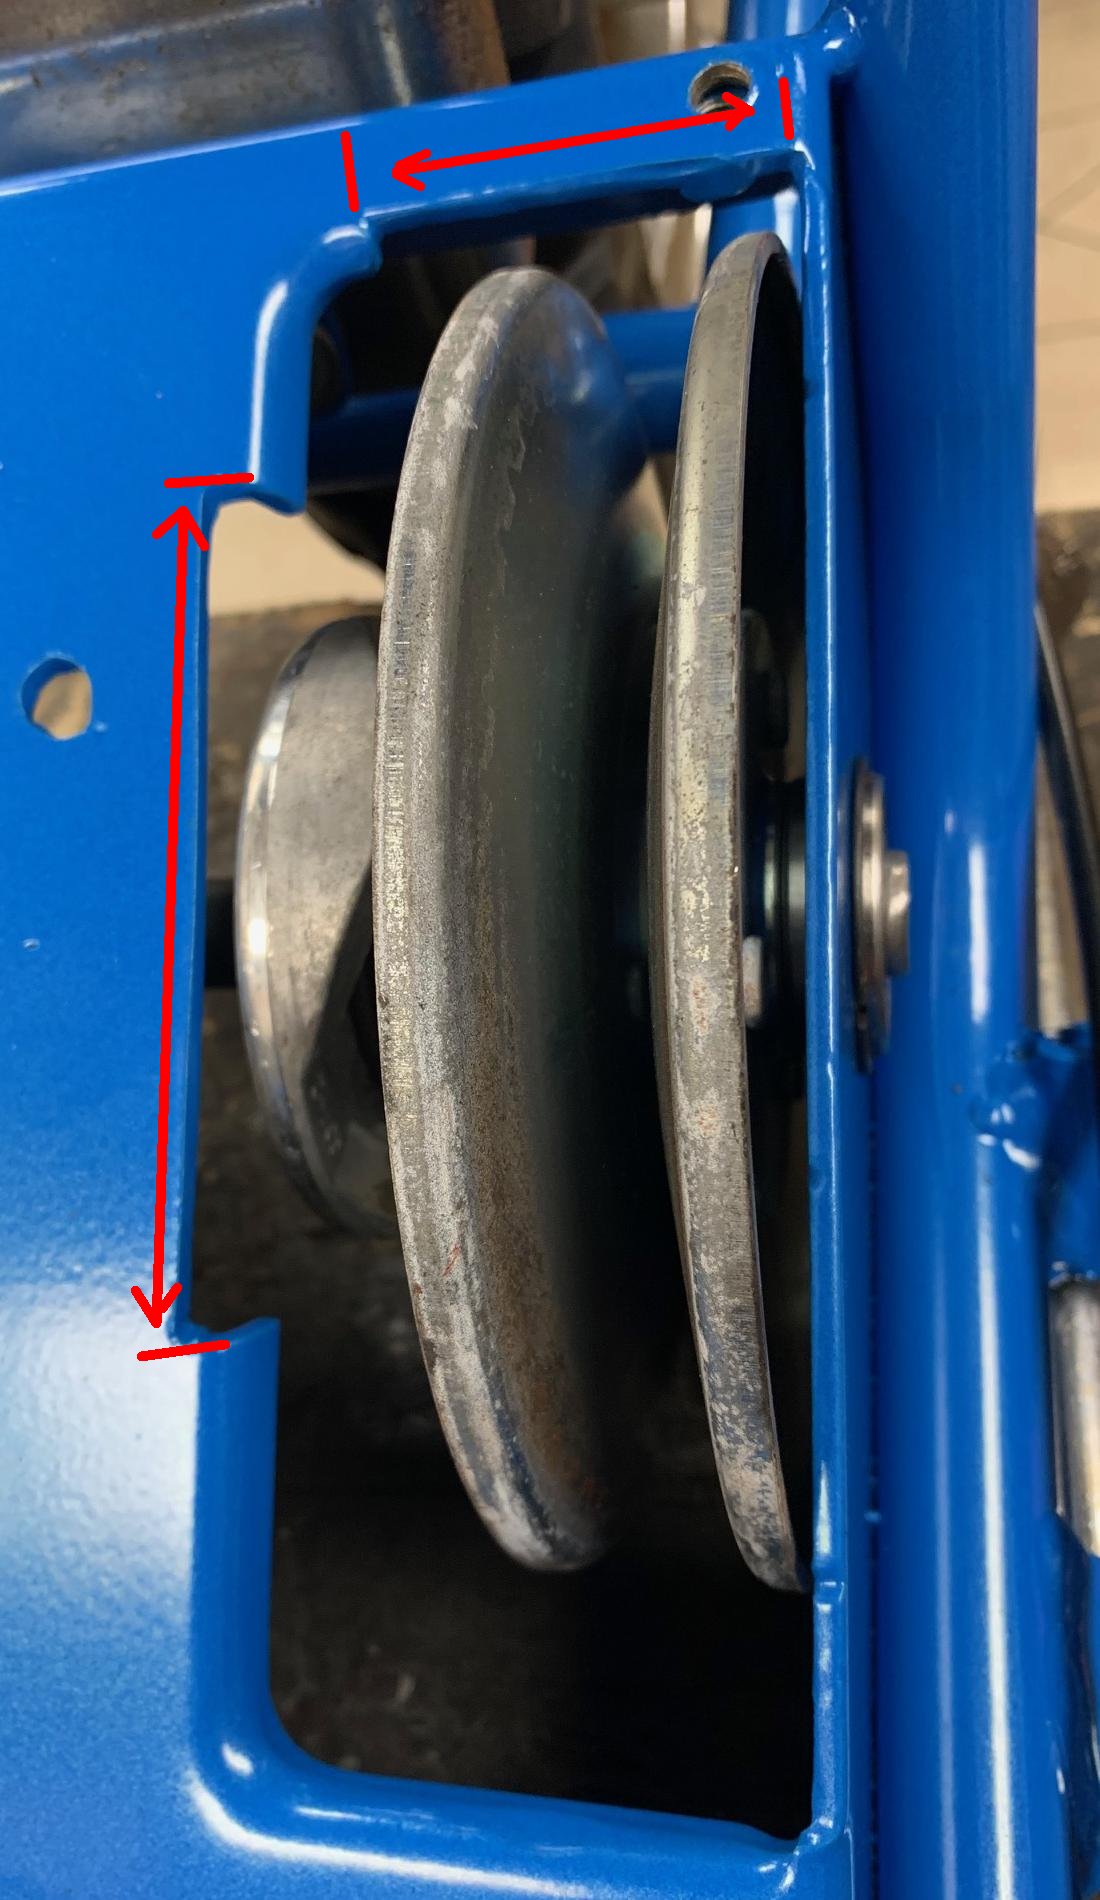
To do this conversion the frame opening for the driven needs to be enlarged slightly. Note the pictures
below which show this. Also on rear suspension 10" wheel bikes pre-1973, I move
the swingarm back about 1/2". Though not completely necessary, it gives more room between
the belt and the front edge of the swing arm. This involves a bit of welding
(to extend the frame pivot point), so it's probably not for most people. Note you
don't have to do this on models without rear suspension (like the Shark or Shrike.)
Red arrows show the portion of the engine plate that was slightly enlarged
to accomodate the 6" series 20 Comet style torque converter.
Here the Comet series20 installed on a Speedway Scarab.
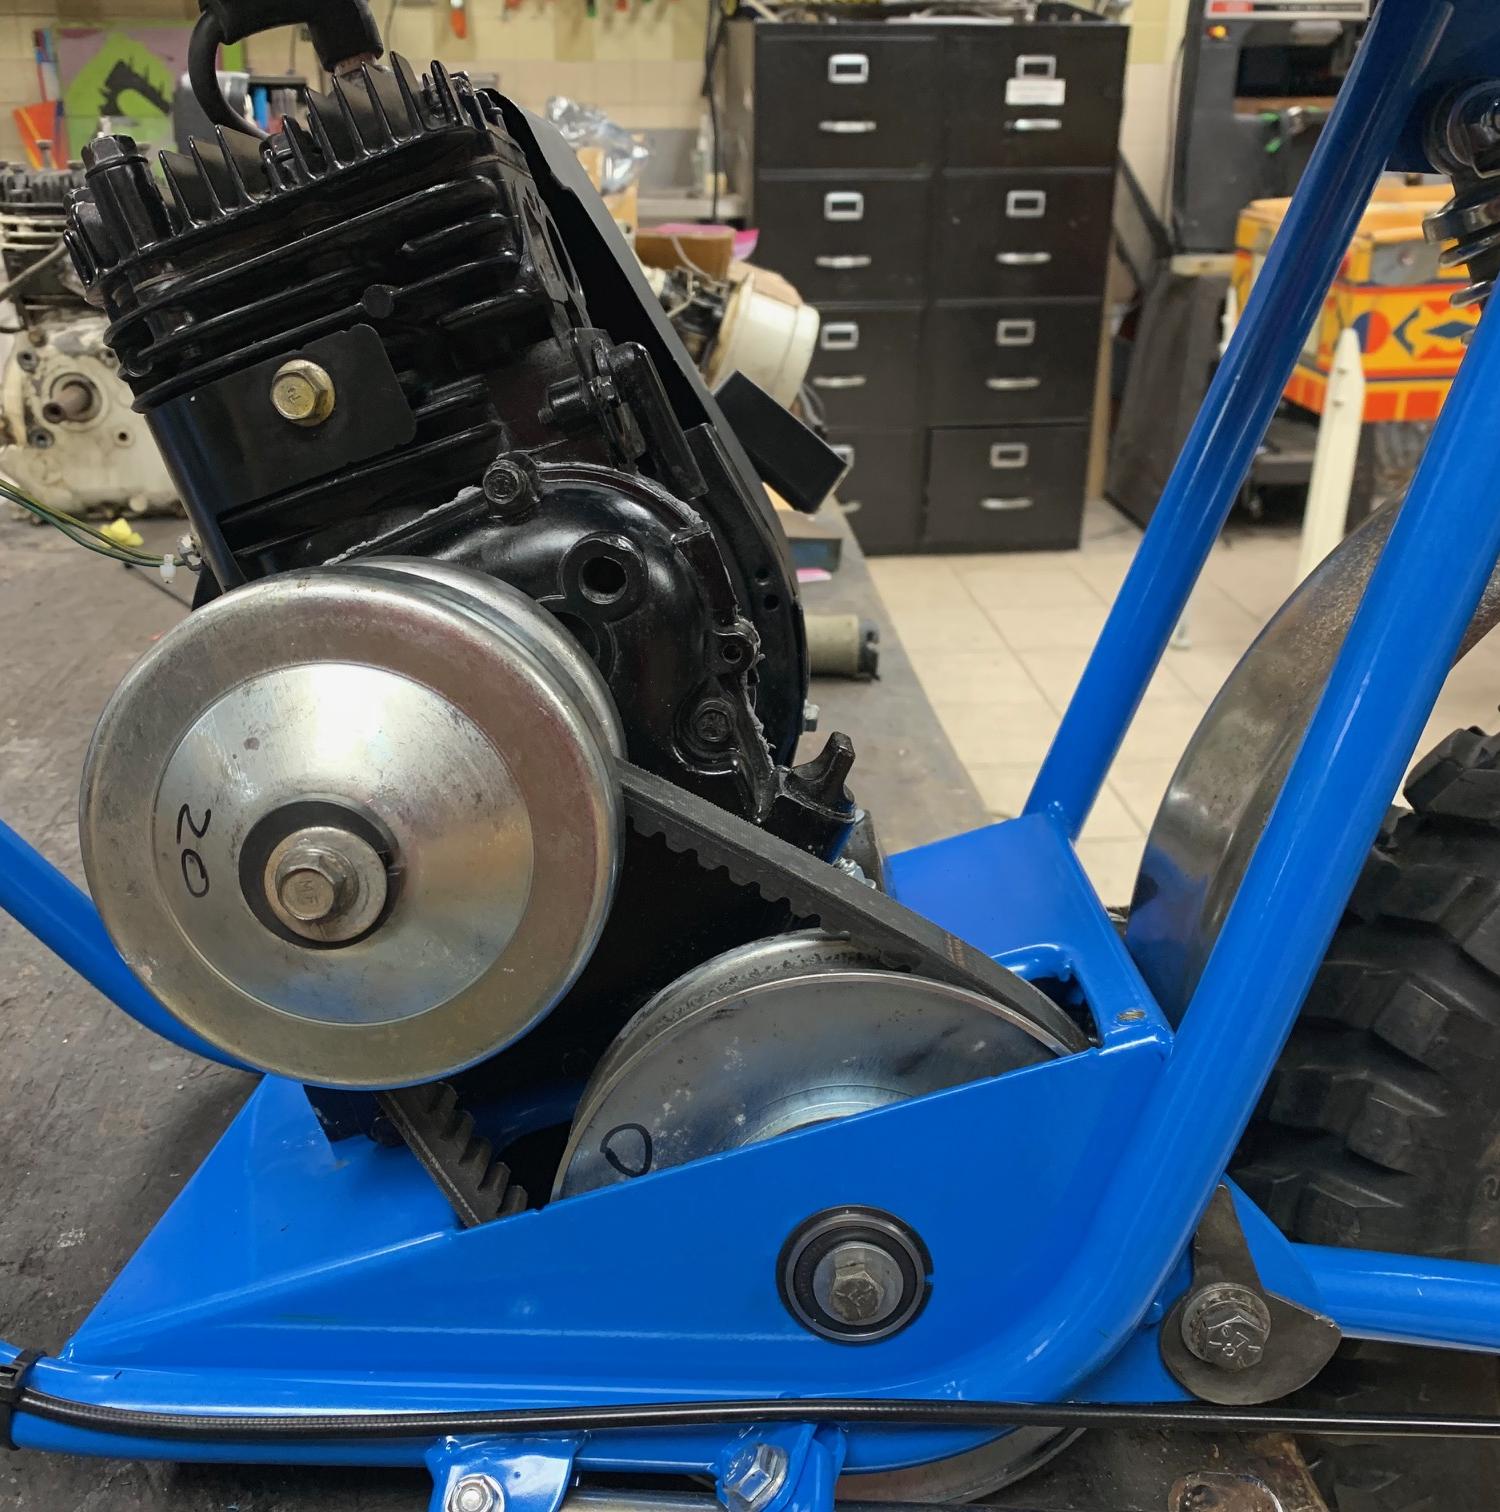
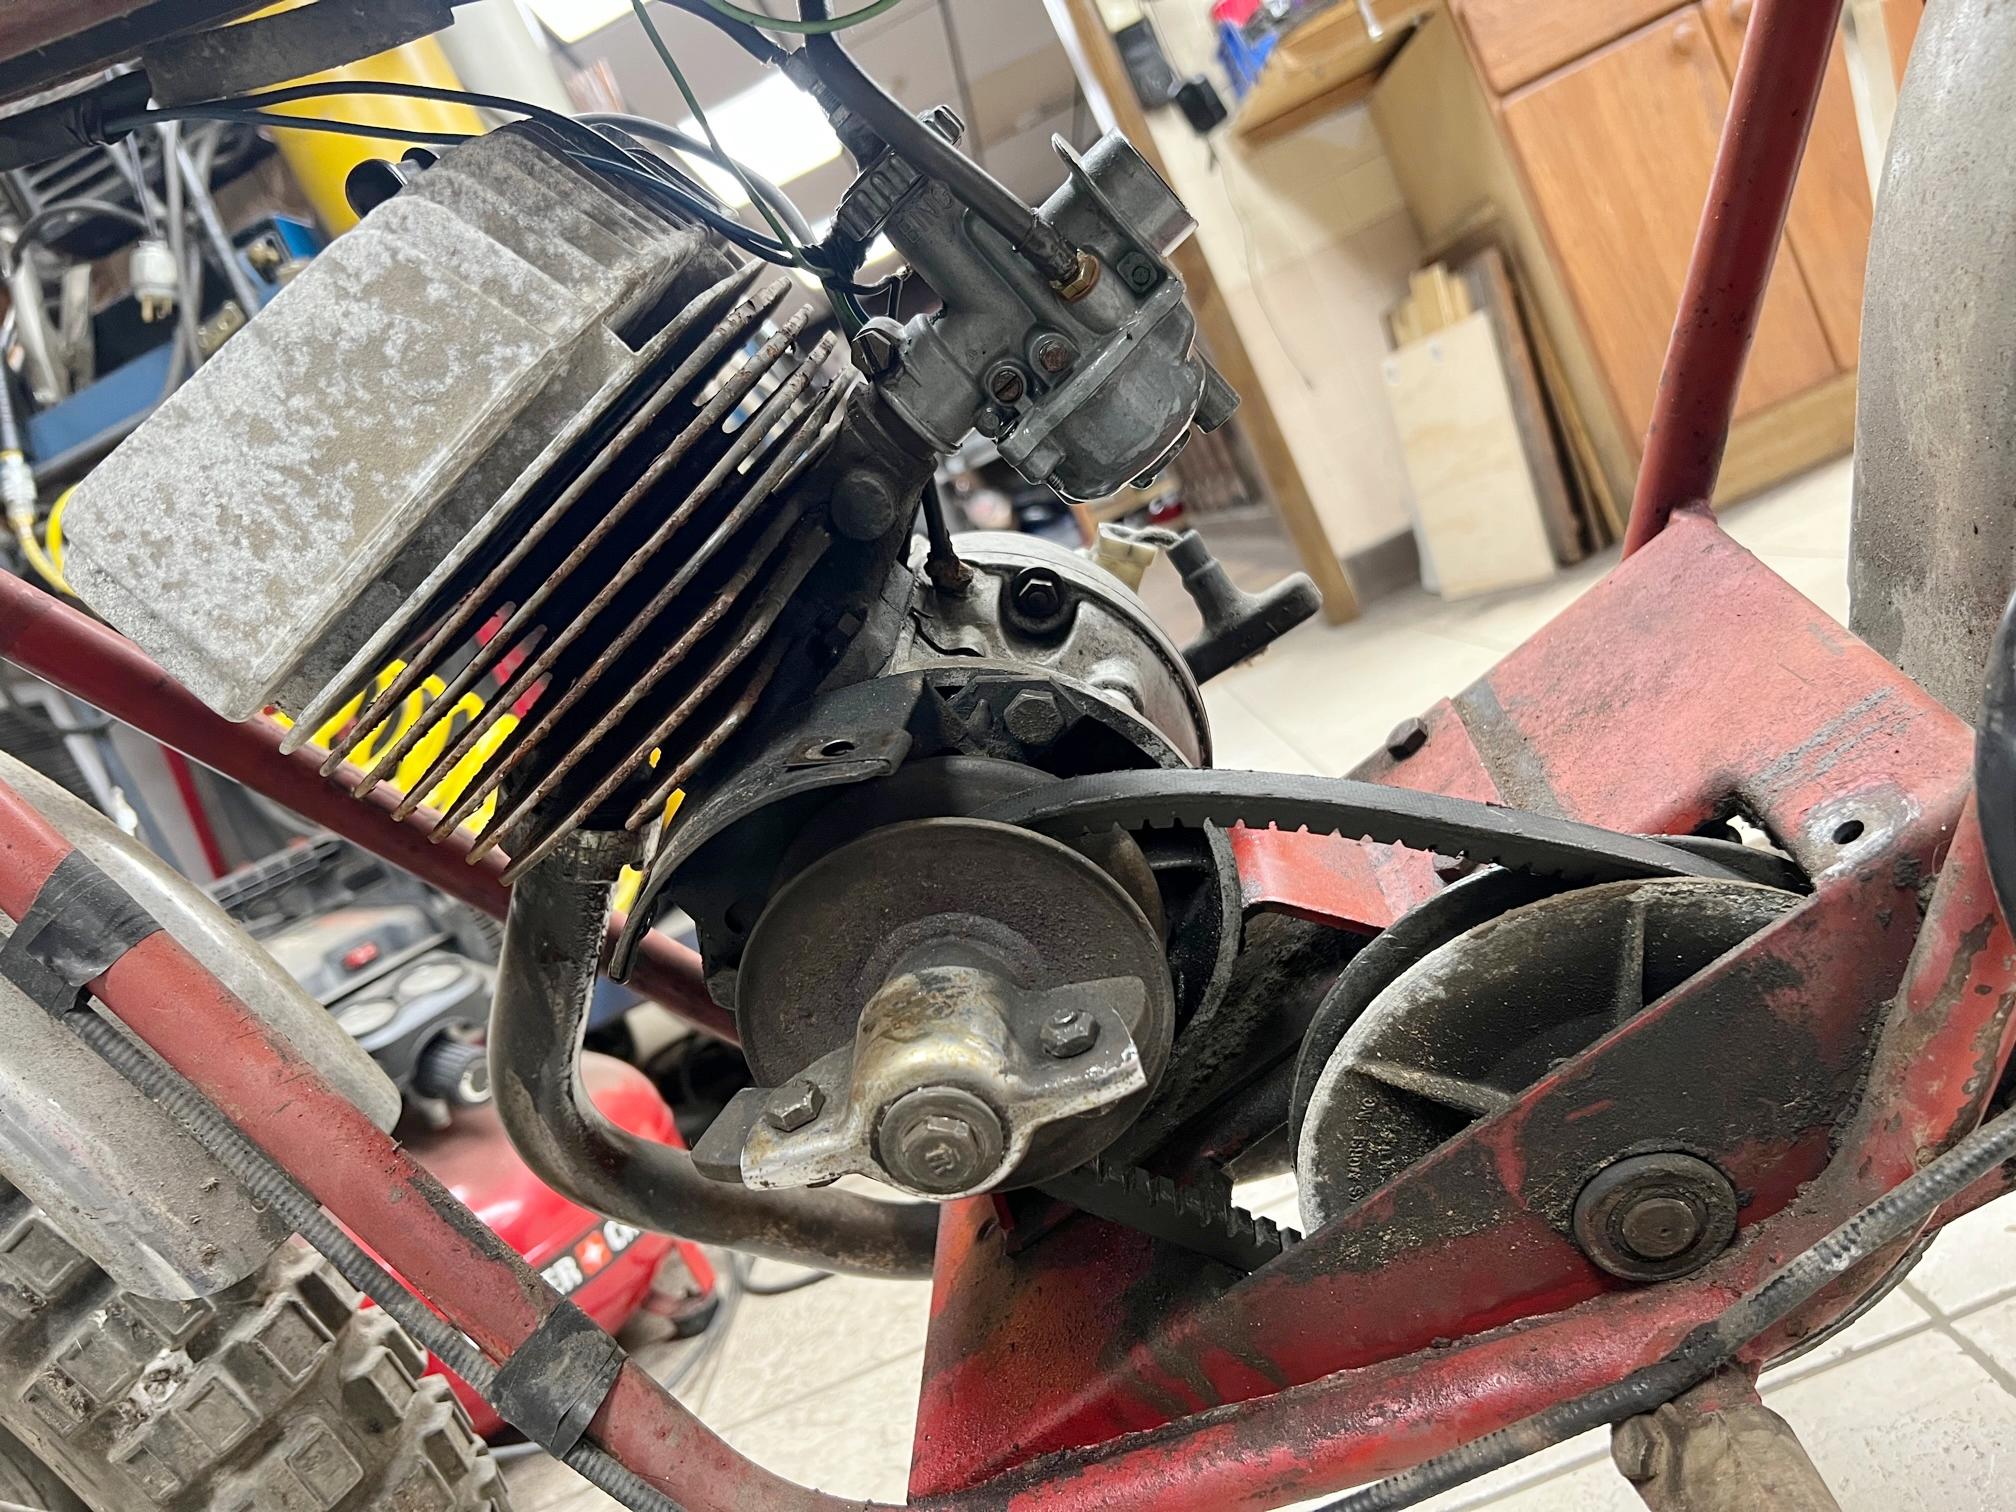
Here the potential problem on 10" wheel suspended Speedway mini bikes...
the front side of the swing arm can touch the new 6" driven Comet.
For this reason I move the swing arm pivot points back 1/2" so
there's no interferance.
Here the problem can really be seen in the picture below, where
the new Comet 6" torque converter driven interferes with the position
of the swing arm. This is a pre-1973 Speedway with 10" wheels.
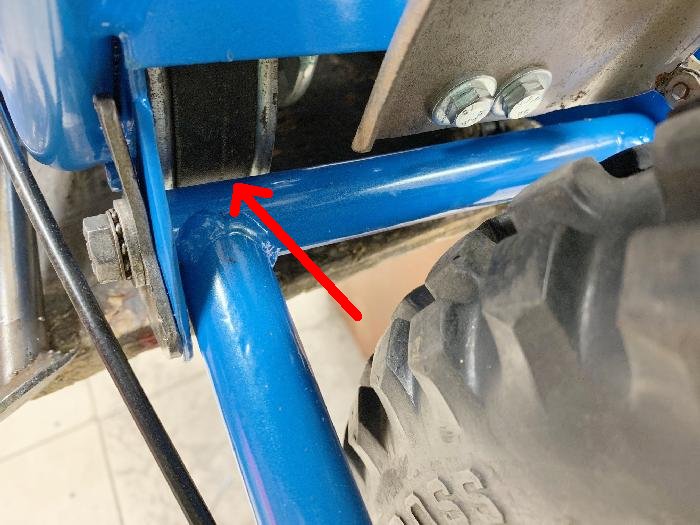
Here's a 1973 Speedway 10" wheel bike and you can see
the new Comet 6" torque converter driven does *not* interferes with the position
of the swing arm. Speedway moved the entire jackshaft towards the front of
the frame to avoid the TC/swingarm problem.
In order the extend the swing arm pivot point, it is a bit of work. Here's how I do it so the Comet 6" driven won't hit the front edge of the swing arm. Note depending on your chain, this may not be necessary. It just depends... If the swing arm is adjusted back all the way and your chain tension is good, you may not have to do this. As a rule I always do it, because I just don't want any issues (and I have a TIG welder.)
Here's some added metal welded to the swing arm tab on the main frame. Also the front 1/2"
edge of the slotted hole was fill welded. That's because the whole pivot section is
moving back about a 1/2 inch.
Here's the added metal ground flat to blend with the original metal.
Now the swing arm adjustment slot is re-cut. Also a metal tab (which is an upside down
allen head screw with the screw part cut off) welded in place. This is the point where the adjustment
wing hits to make chain adjustments easier.
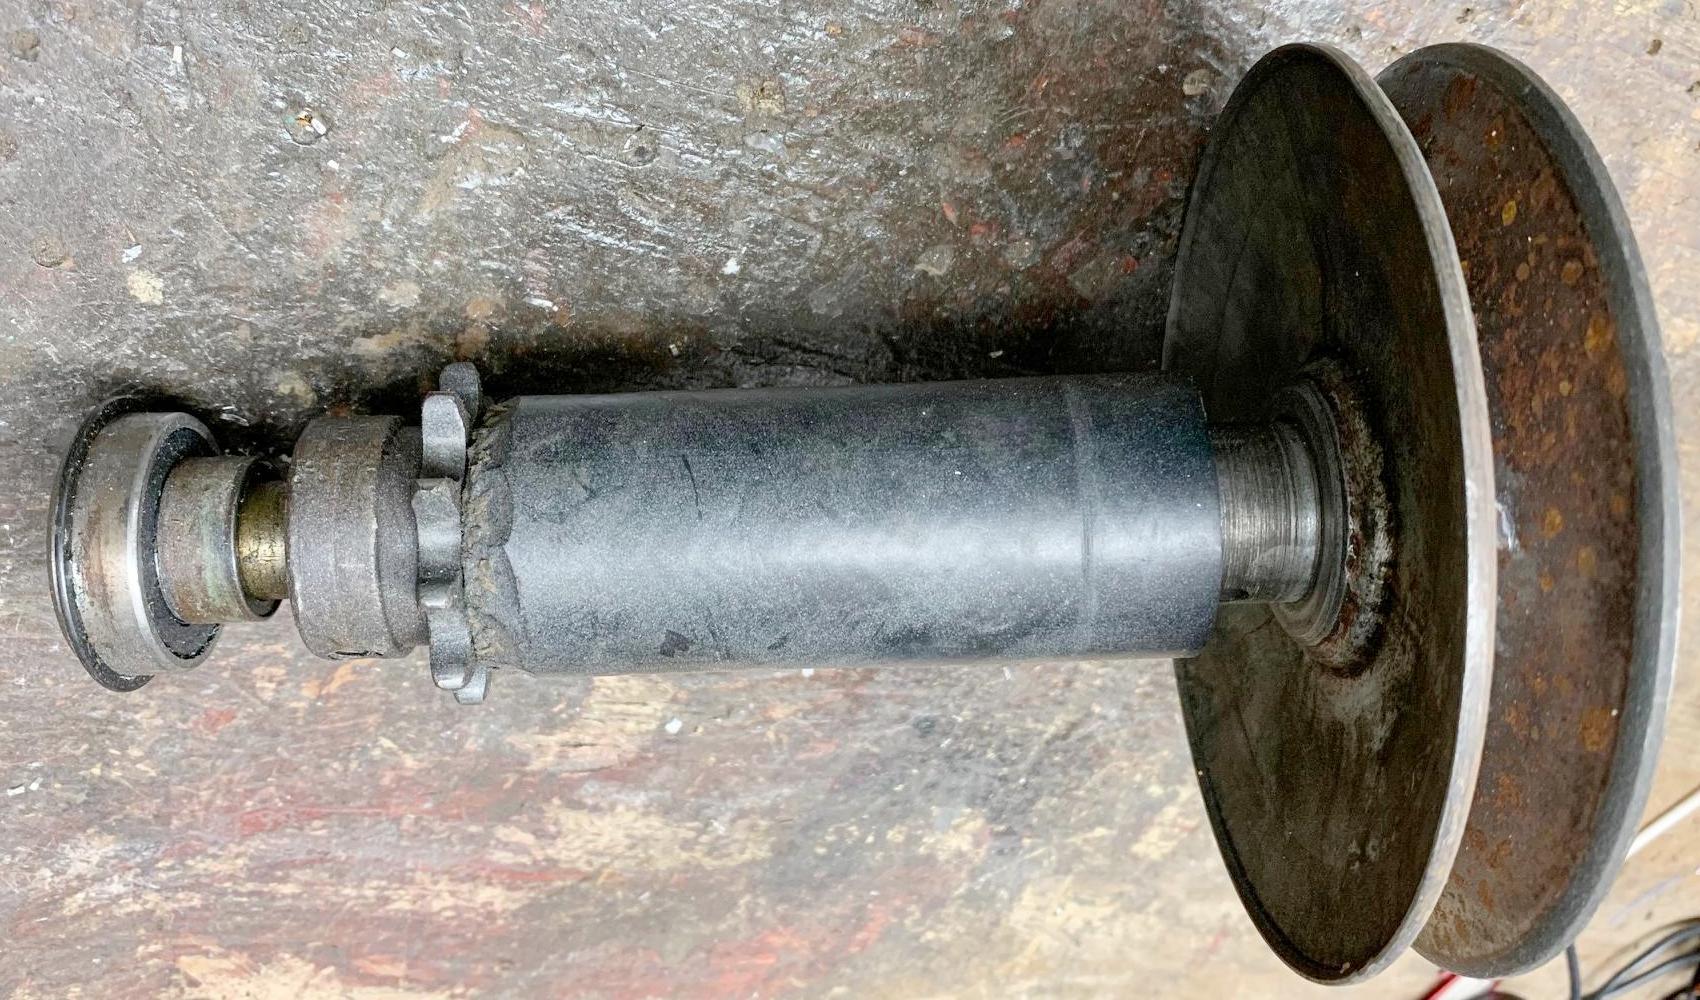
-
On full suspension Speedways (all 14" wheel models and
10" Scarab and Scorpion models) is another factor that should be checked. There is a 5/8" metal pivot rod
drilled/tapped with 3/8-24 threads on both sides. This rod should
spin inside the swing arm tube! Usually it's rusted in place, and will need to pressed or drilled out.
It the rod does not press out easily, STOP. It is easy to distort the swingarm if you use too much pressure. Instead drill out the frozen rod! The rod is rather soft leaded steel and will drill easily. They used leaded steel because it's easier to drill and tap. To drill out the rod, start with a 3/8" drill bit and finish with a 5/8" drill bit. I use a mill for this task. If you can press out the rod, cleaned up the outside, re-grease it, and re-use (always grease the pivot rod.) But usually I have to make a new 5/8" rod (7" long) and re-tap the ends 3/8-24 and 3/4" deep. BlackWidown Motorsport also sells this rod.
IT IS VERY IMPORTANT that this swingarm rod moves inside the swingarm tube! If it doesn't, the chain adjuster and bolts at the ends will constantly loosen, and the chain will throw. Note all Speedways with rear suspension use this 7" long 5/8" diameter swingarm pivot rod (both 10" and 14" wheel bikes.)
-
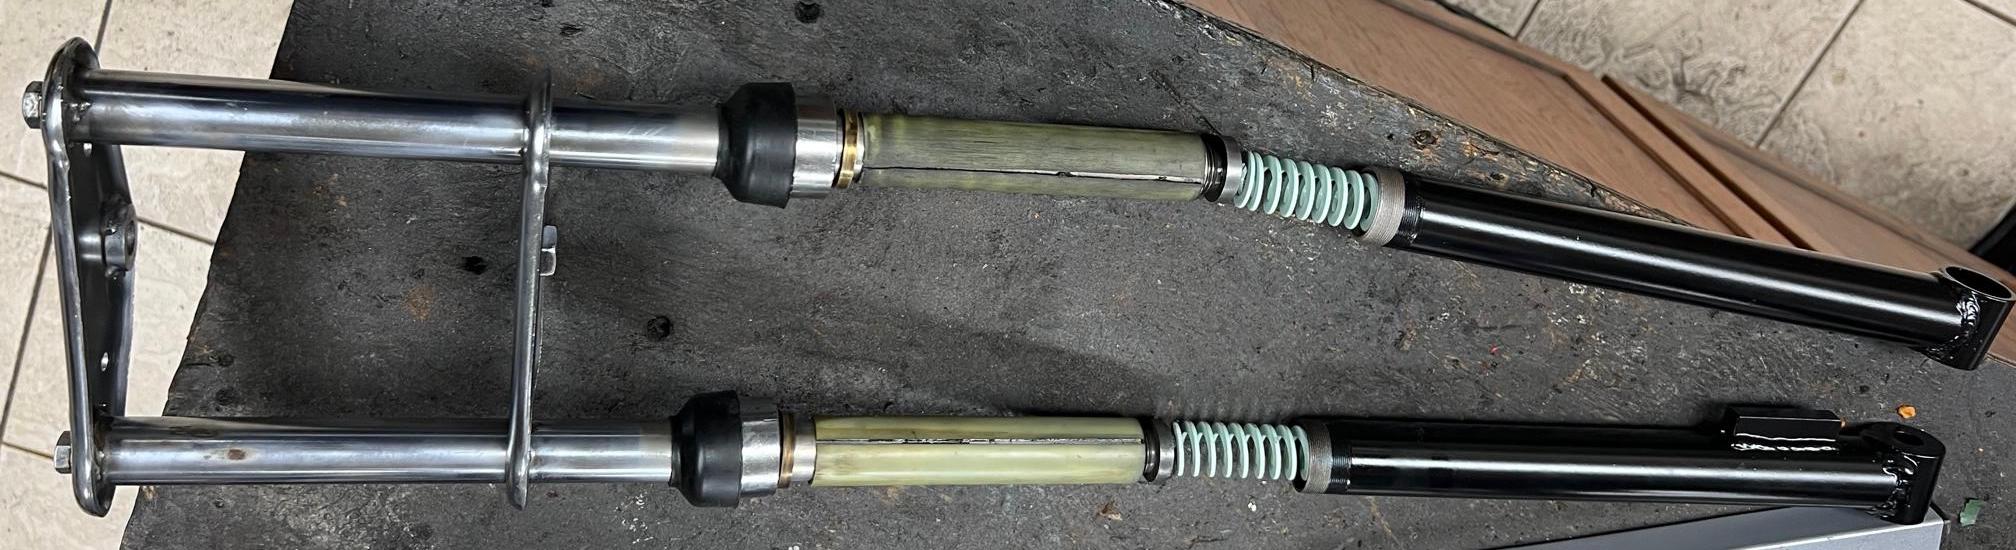
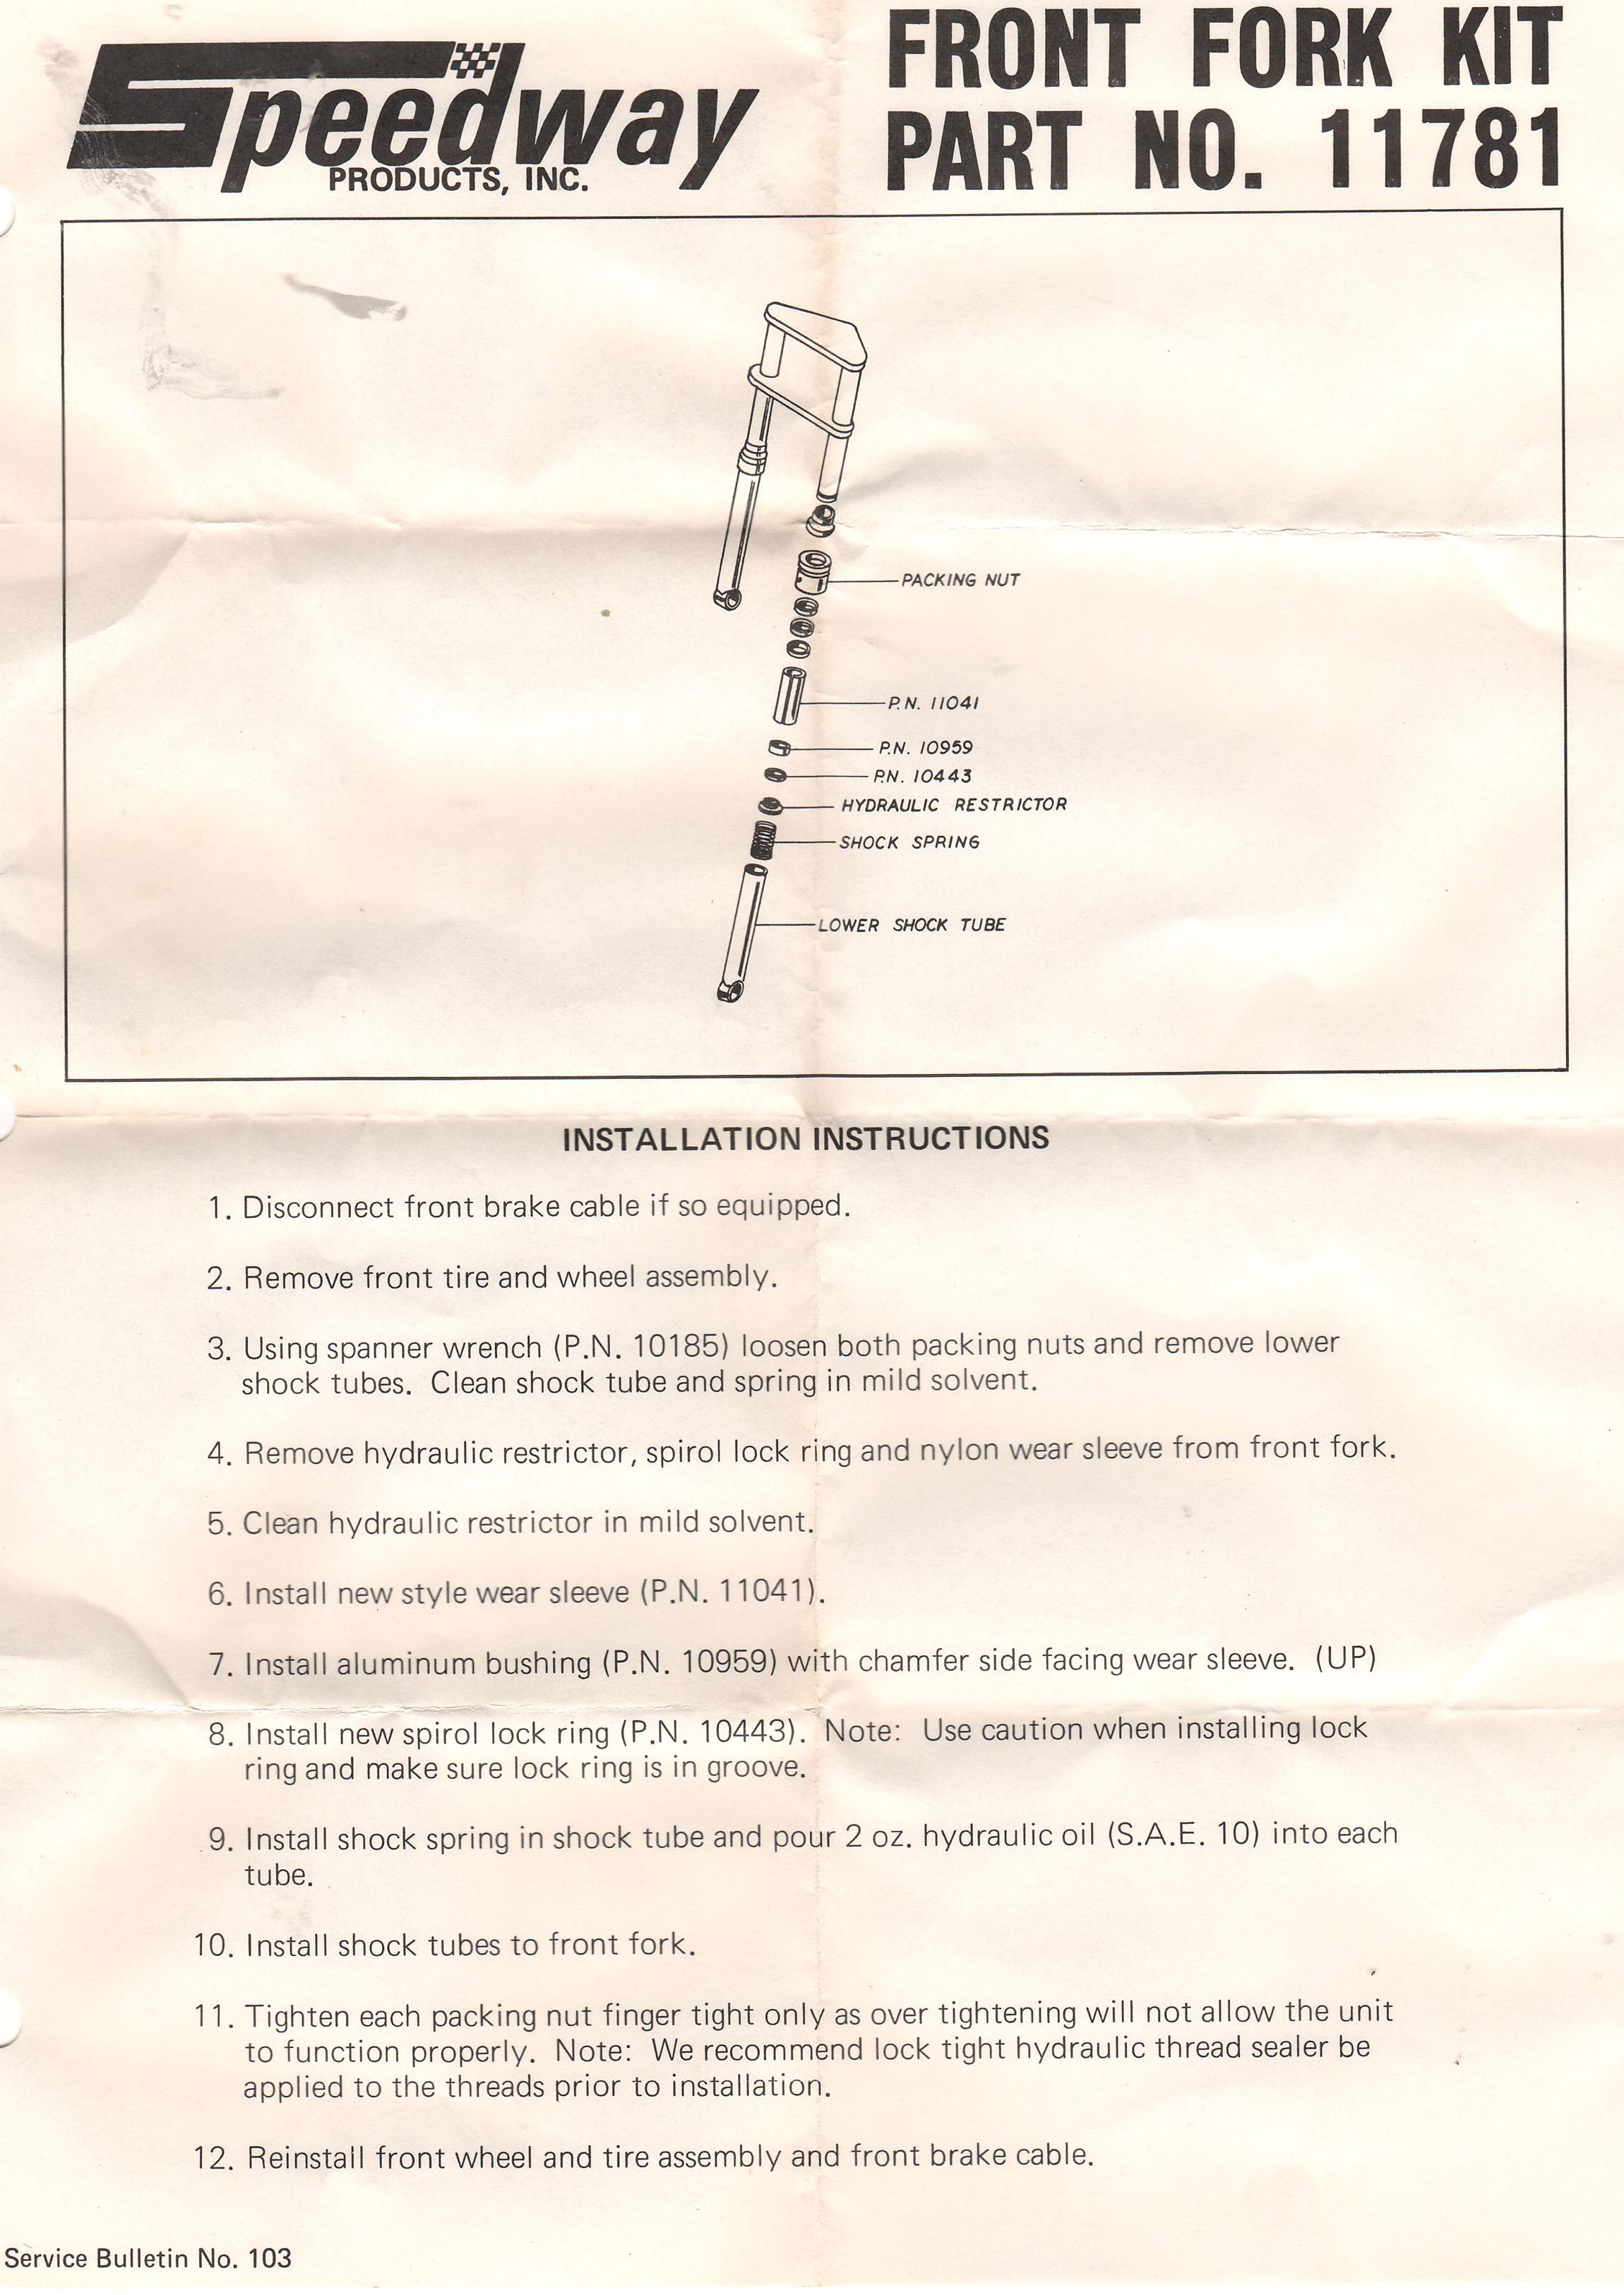
The front forks on Speedways can also be a challenge. Note they do use oil,
specifically two ounces of 10w hydraulic oil per side. So the top seal needs
to be intact or they will 'bleed'. Both the 10" and 14" wheel forks use oil,
and are basically constructed the same. I know the Speedway repair document says
to use 10w oil, but this seem way too light, especially on the 14" wheel bikes.
Personally I use the same oil I used in the engines (30w or 10-30w or 10-40w.)
Video on rebuilding the Speedway front end.
-
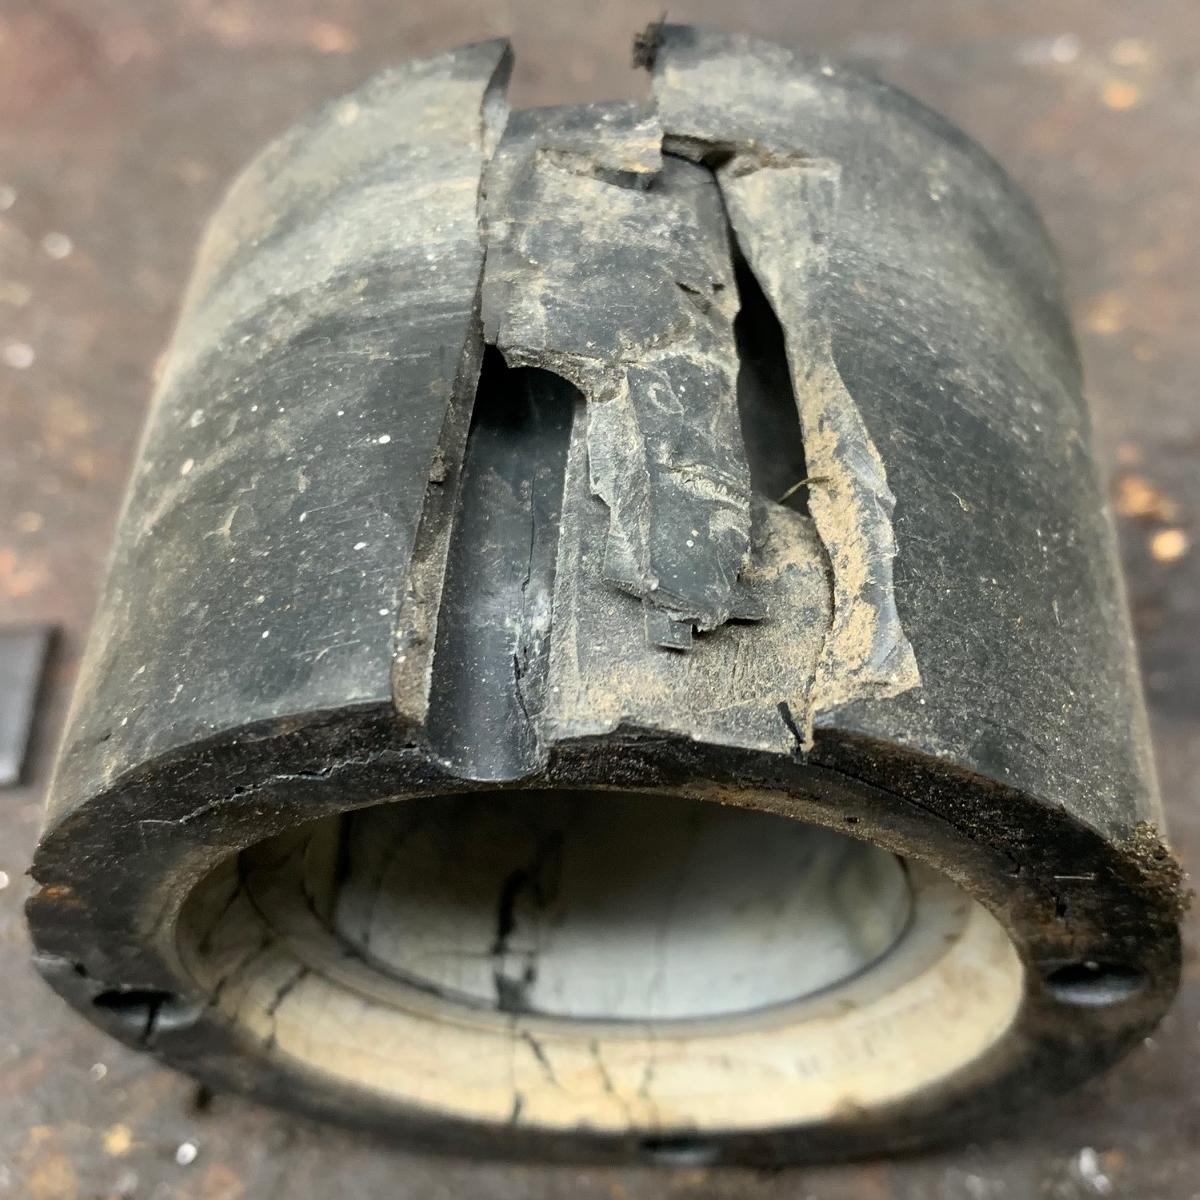
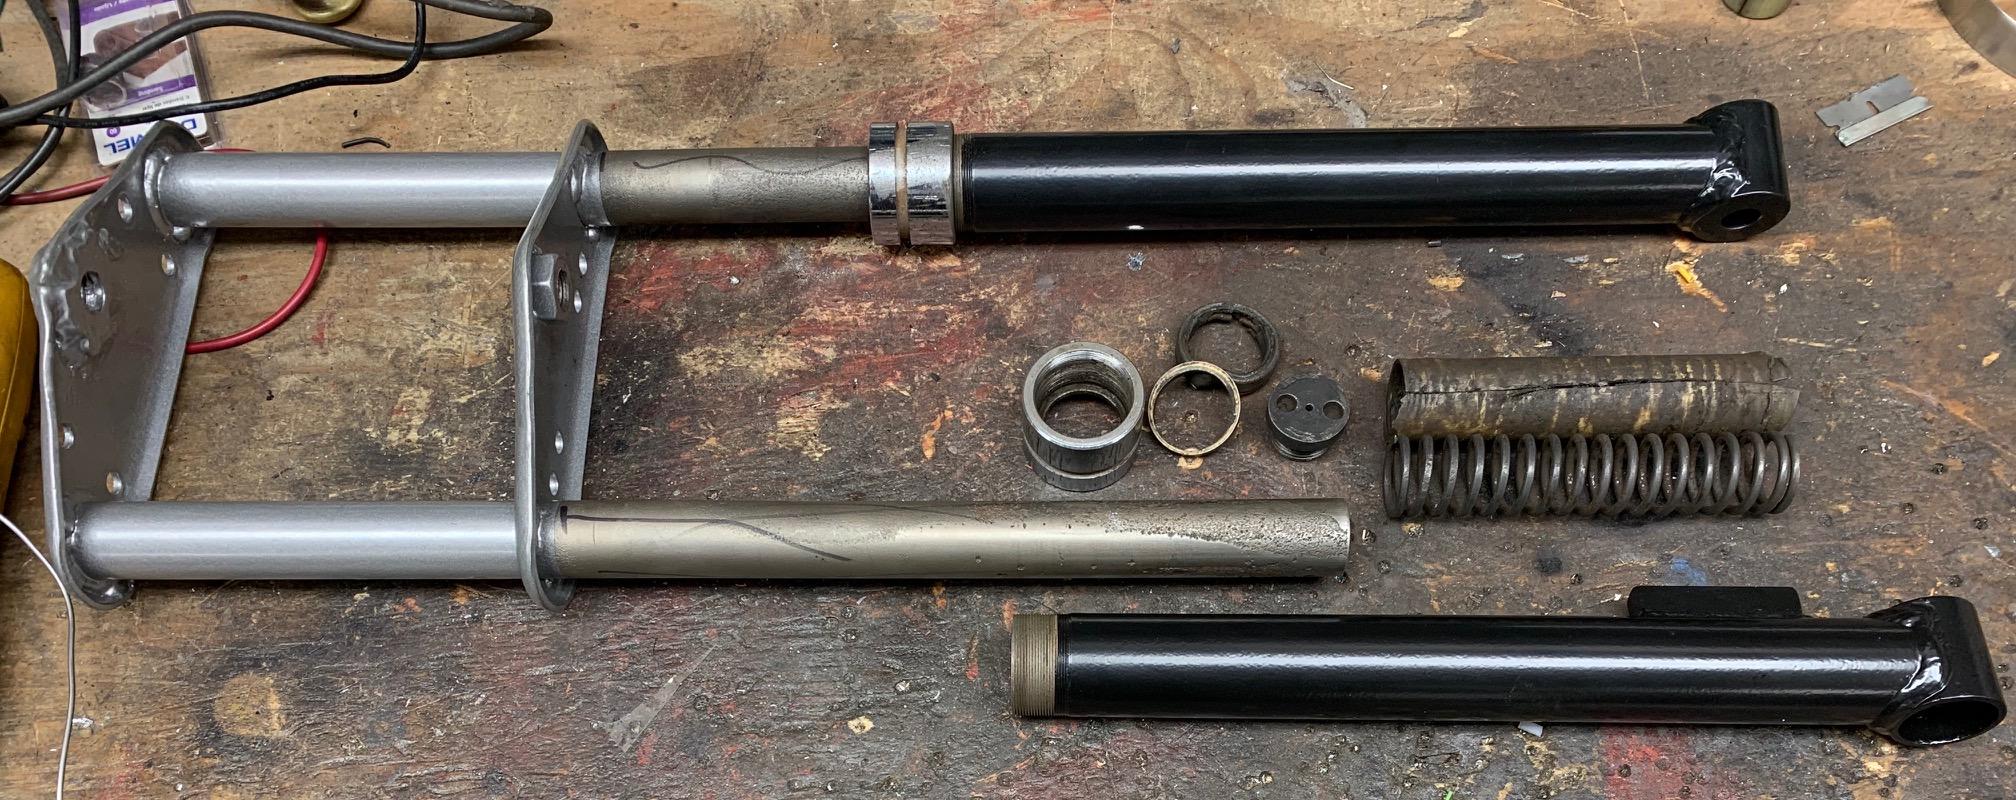
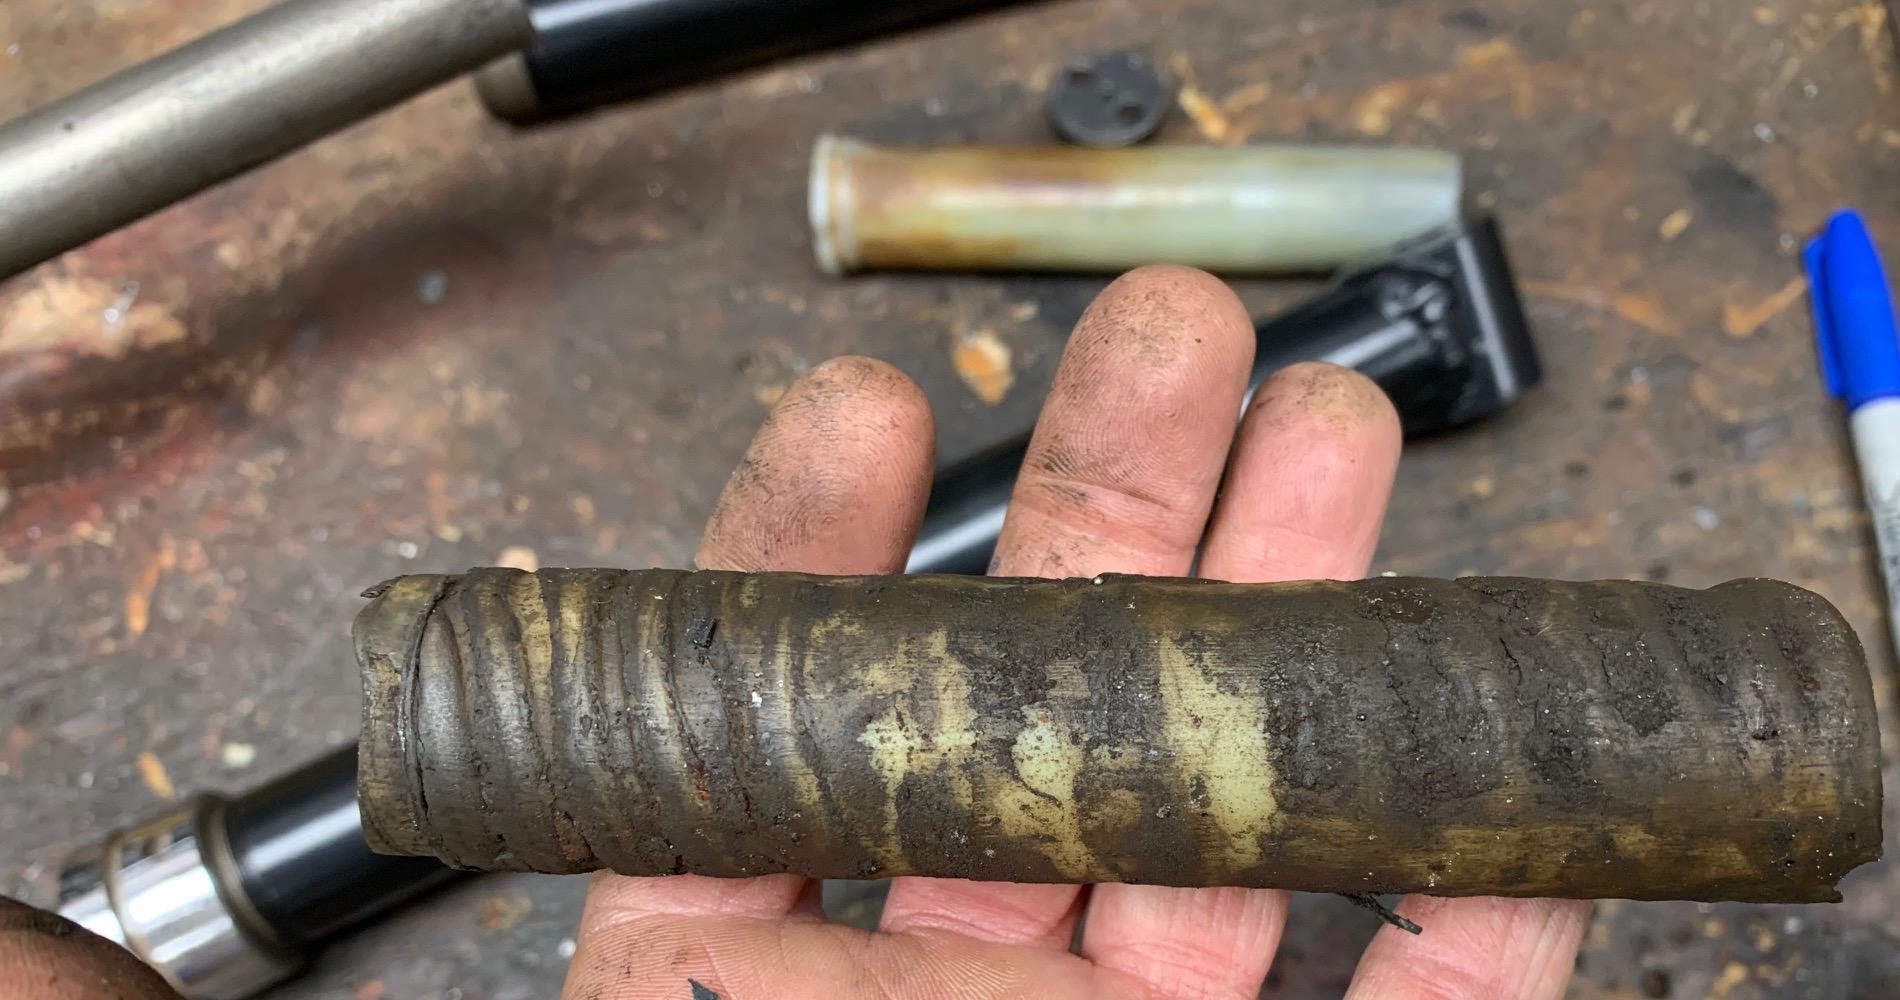
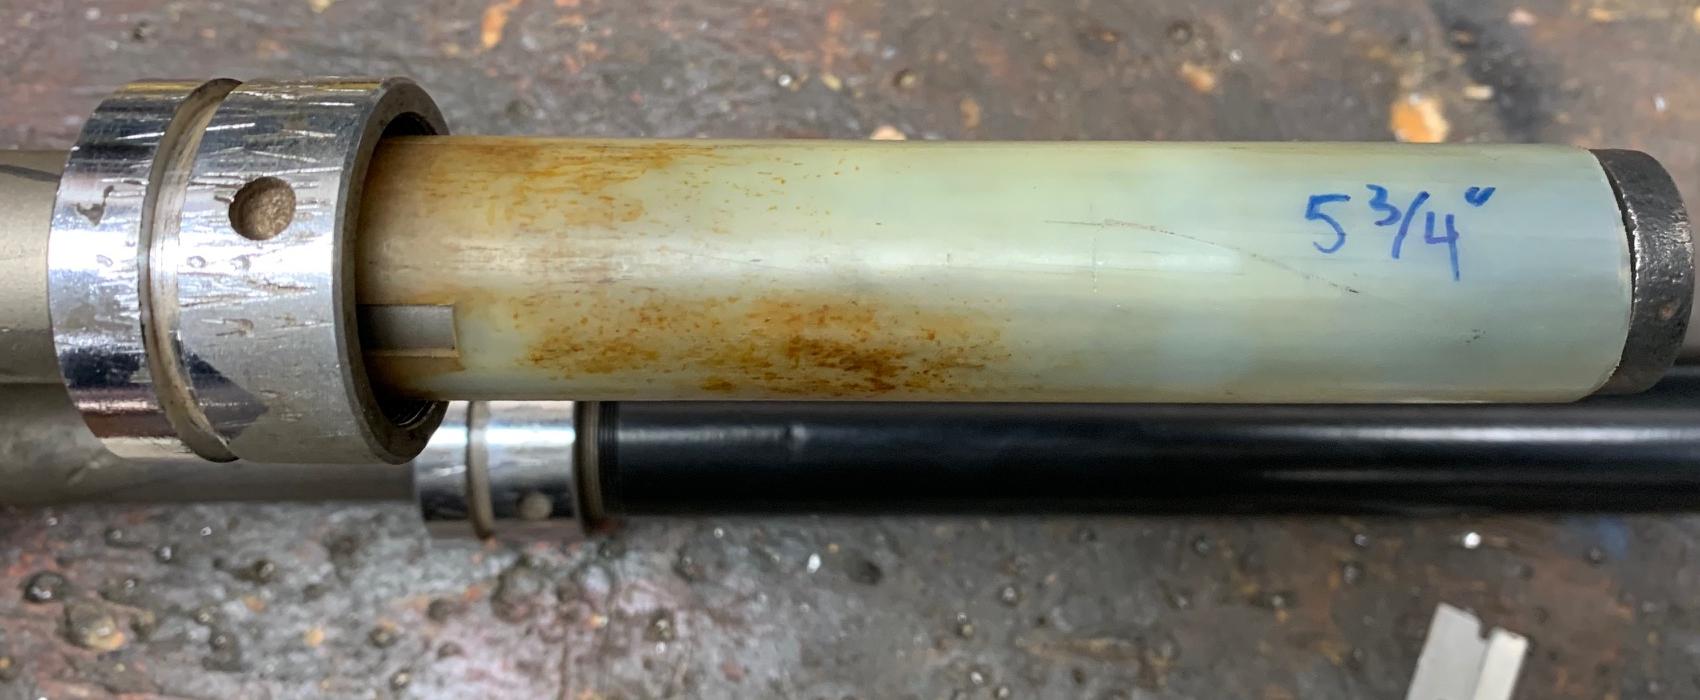
Often the parts are just worn out. For example, the seals and the brass ring
takes a lot of abuse (especially on the heavier 14" wheel bikes.) I haven't
noticed the brass rings to be bad on 10" wheel bikes. But on 14" wheel mini bikes,
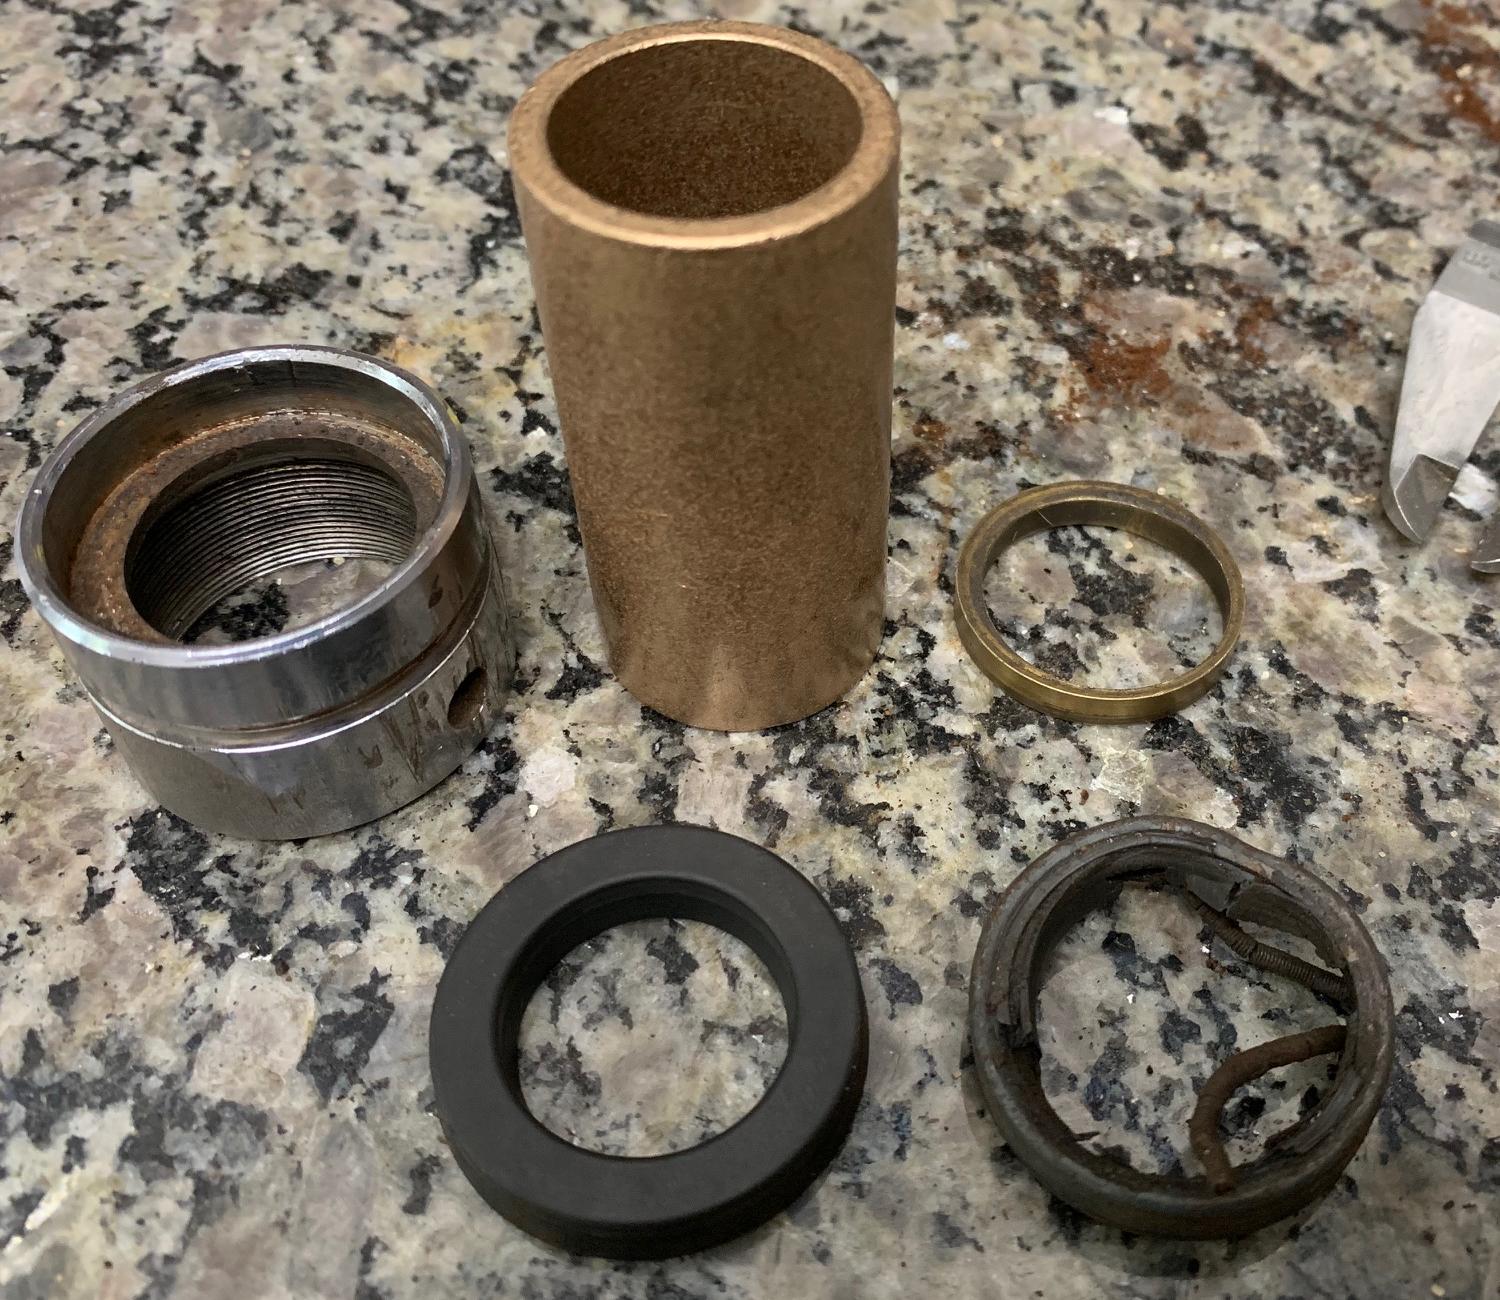
the always seem to be wasted. To rebuild them you'll need some parts (note these
are for the 14" wheel front forks, the 10" wheel fork may require different
seals and brass rings):
- Bronze bushing 1" ID 1.25" OD 2.5" length. Mcmastercar #6391k45
- Buna-N Rubber U-Cup Seal for 0.282" Groove Width, 0.955" ID x 1.545" OD x 0.25" Wide. McMastercar #9691k57
- Old and used Rupp 1971-1975 Front fork strut bushings #17496. The more used, the better. (You can also buy these brand new from Blackwidow Motorsports.)
First need to get the old Speedway forks apart. Mine were tough birds. The original nylon bushing inside was jammed (and destroyed), and made taking the forks apart difficult. In theory unscrew the fork cap (aka packing nut) and slide the fork apart. Then there's a large threaded bushing at the end that allows the parts to come off the upper strut. There should also be a spring in the lower strut.
-
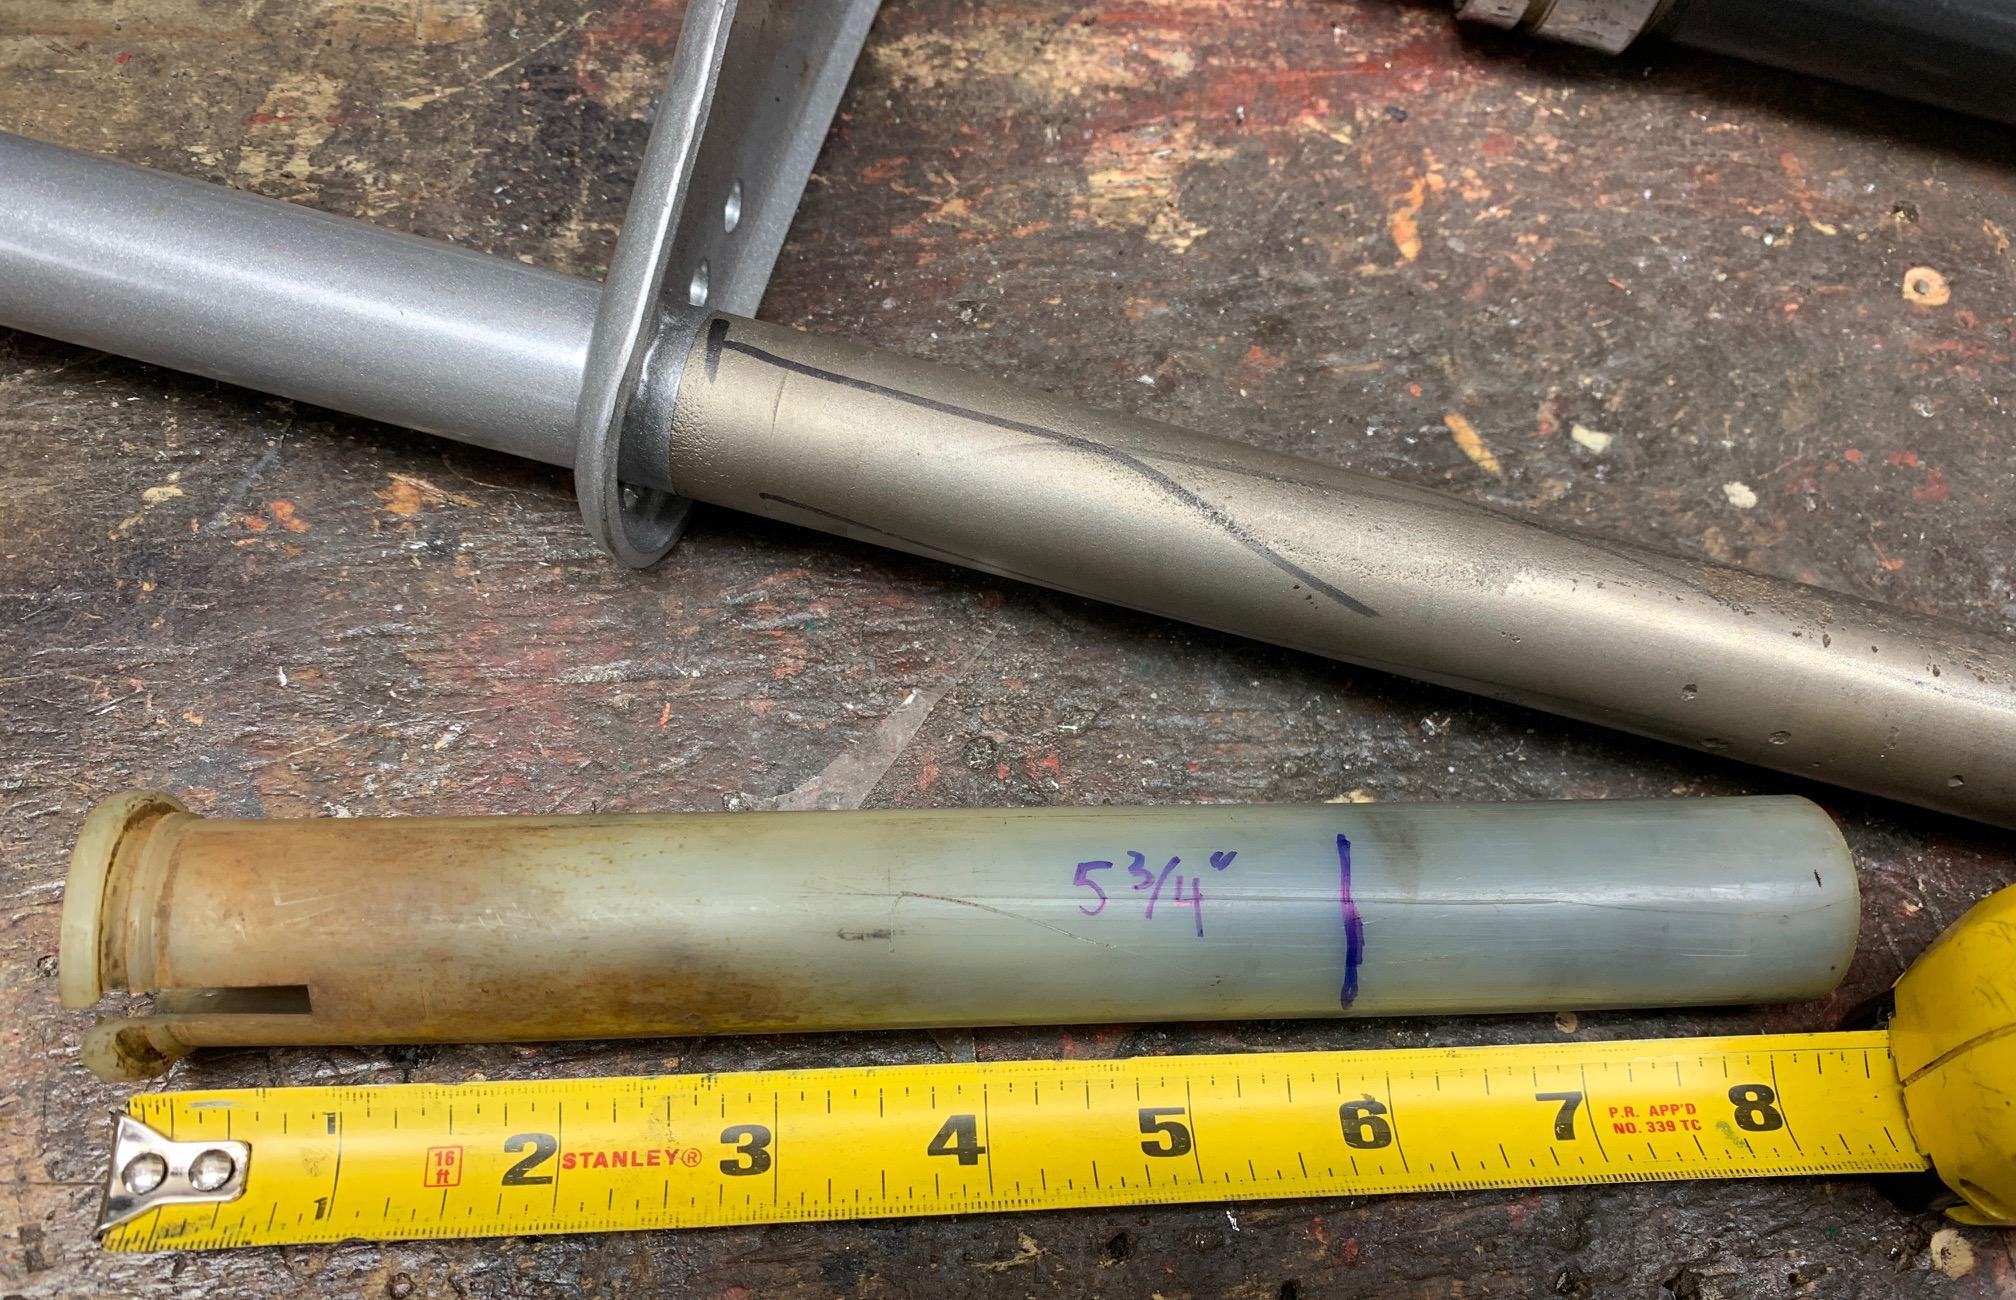
Have to deal with the nylon fork strut bushings. I do not know a source for original Speedway versions,
but we can take some old (used) Rupp 1971-1975 strut bushings and modify them to work
(#17496 Rupp fork strut bushing 1971-1975.)
On this 14" speedway wheel fork, the Rupp version needs to be cut to 5.75" in length.
For 10" wheel bikes, the length is 2.5" (assuming a bronze bushing, early models) or 3 1/8" (no brass ring,
later models.) I used a band saw to cut the nylon tubes to size. On 10" wheel bikes you use the
bottom smooth section. On 14" wheel bikes you need the top "lip" portion.
-
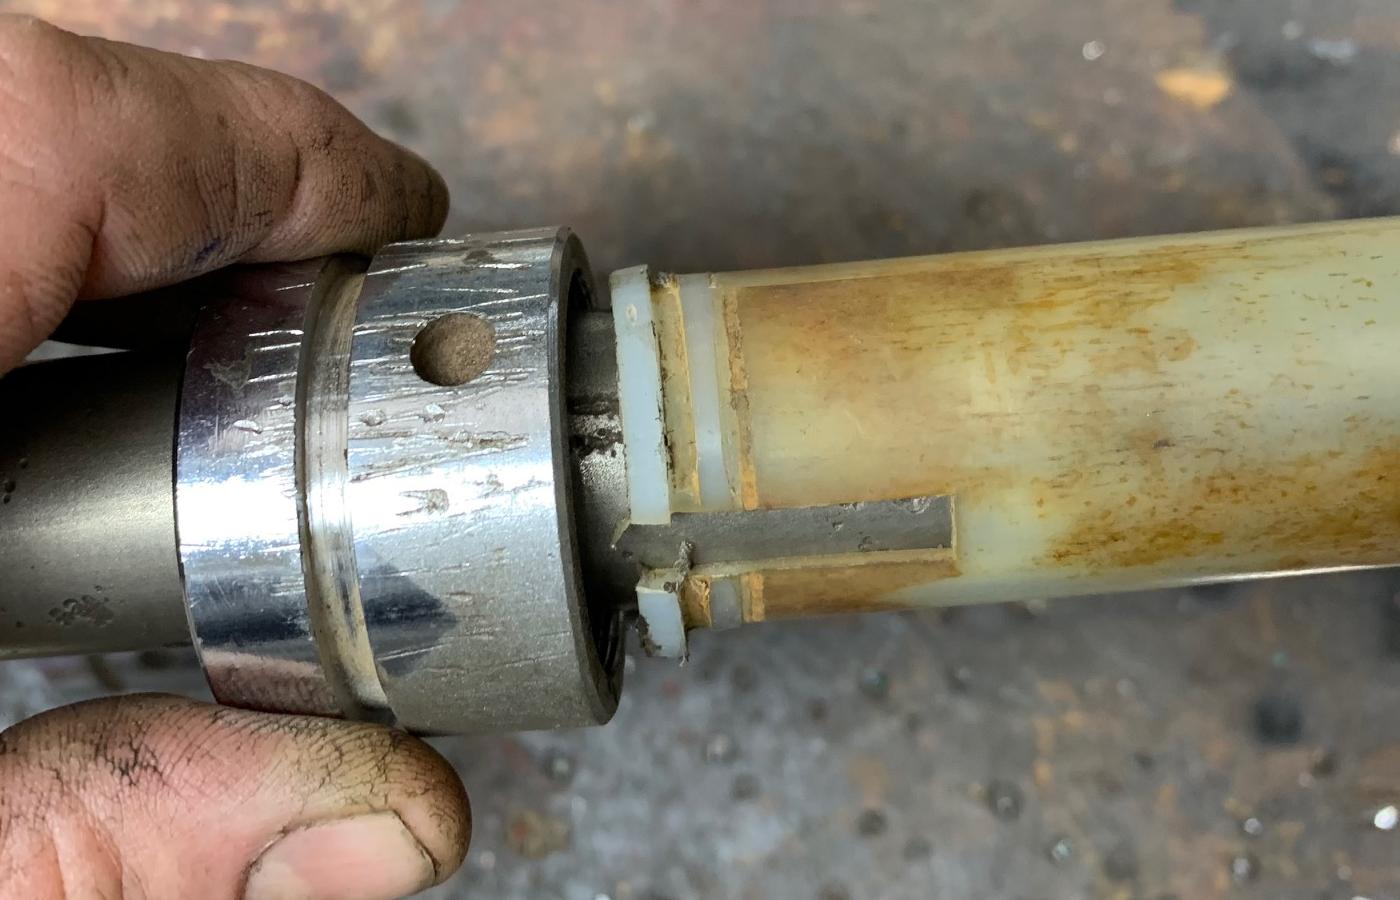
After you have them cut to length, the ends need to be modified.
The rupp version has too big of a lip on the edge. That needs to be sanded to fit
inside the Speedway fork screw-on cups. I used a belt sander to do this. Also the
second (lower) lip needs to be removed. Again I used a belt sander to do this.
Note on 10" wheel bikes the lip arrangement is not used at all. Just cut the
old rupp bushings to 3" (or 2.5" on early models with the brass ring) and you're done.
After the used Rupp fork struts are sanded, the end should fit easily inside the Speedway fork screw-on caps.
-
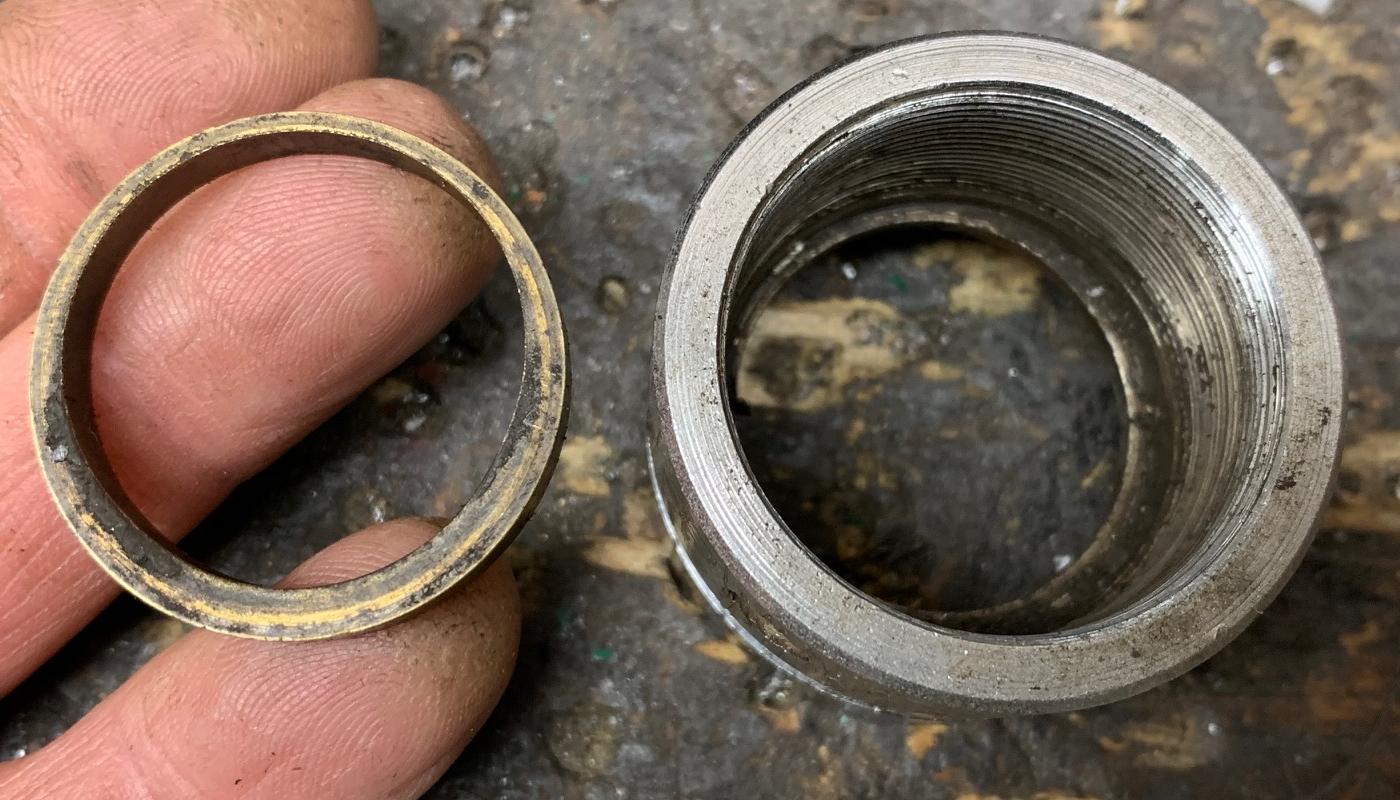
Now comes the tricky part. On the 14" wheel Speedway screw-on caps (packing nuts), there's a bronze bushing inside.
On my forks, this bushing was so worn, it was like a hotdog in a 55 gallon drum.
The wear was also uneven. Check out the picture below. They should be 1" inside diameter,
and 1.25" outside diameter. And .200" tall.
Also the rubber seal inside the screw-on cap was worn to death too.
That will need to be replaced too.
-
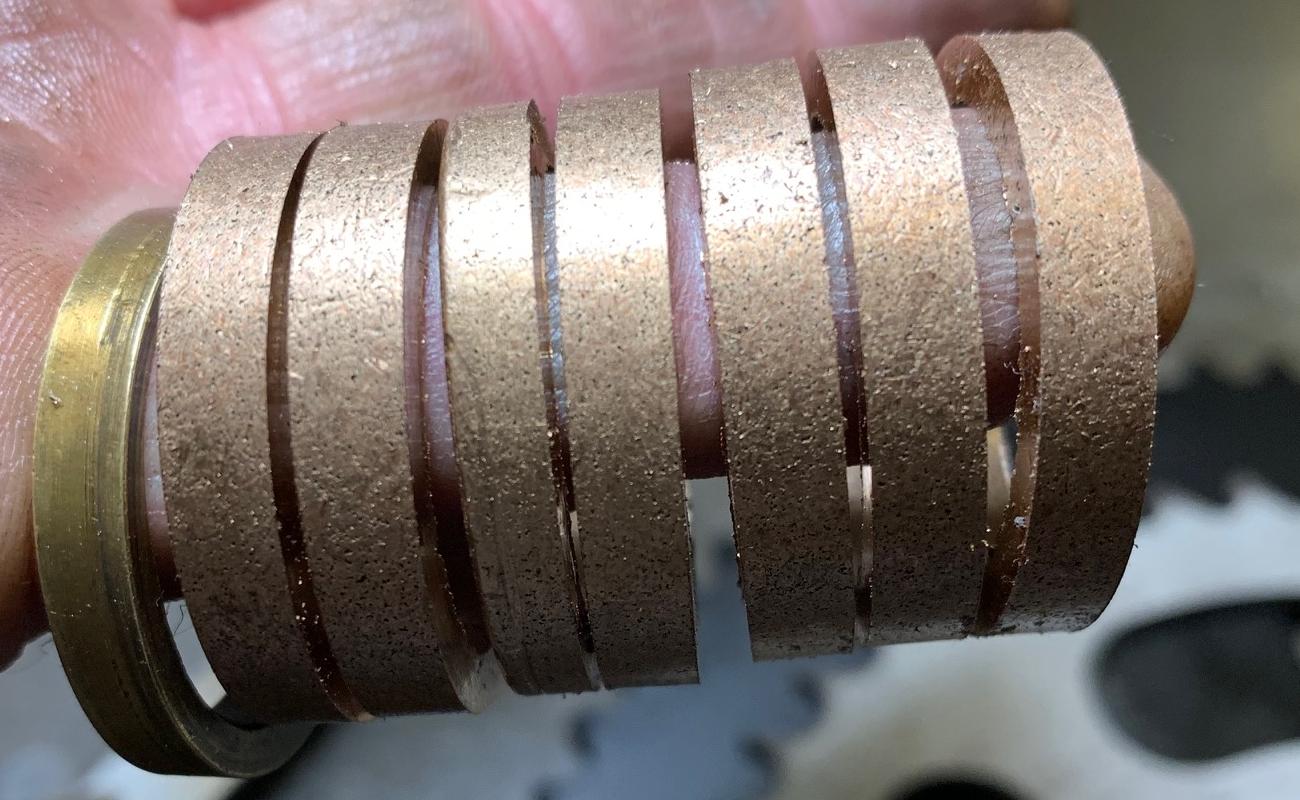
Again these parts probably aren't available anywhere. But Mcmaster Car has some material
that works. I bought their bronze bushing 1" ID and 1.25" OD and 2.5" long. I put this
on a lathe and cut it like a pepperoni to a thickness of approximately .200". I don't think this
thickness is really that critical. If you don't have a lathe, you can cut them with a hacksaw
(and then sand it clean on a belt sander.)
McMaster Car also sold some decent rubber seals. Not perfect replacements, but pretty good. It
will work. And they are cheap, like (5) of them for about $5.
Original brass ring on left, new ones cut and ready for use.
10" wheel forks on a Speedway Scarab. Note the nylon liner is much smaller than
the 14" wheel bikes. Some have that 1/2" brass ring at the bottom, some do not. The length of
the nylon sleeve will vary from 2.5" to 3 1/8" depending on the existence of that 1/2" brass ring.
Front Fork Springs.
-
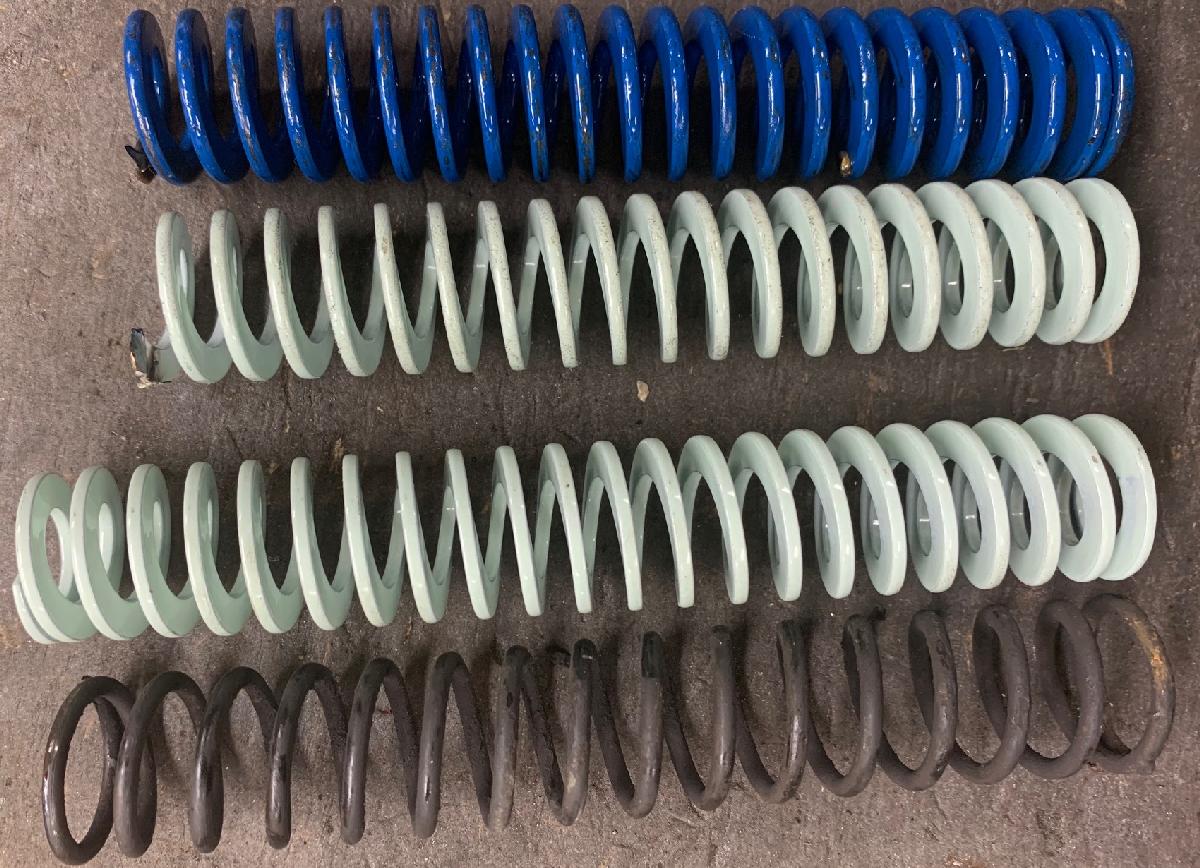
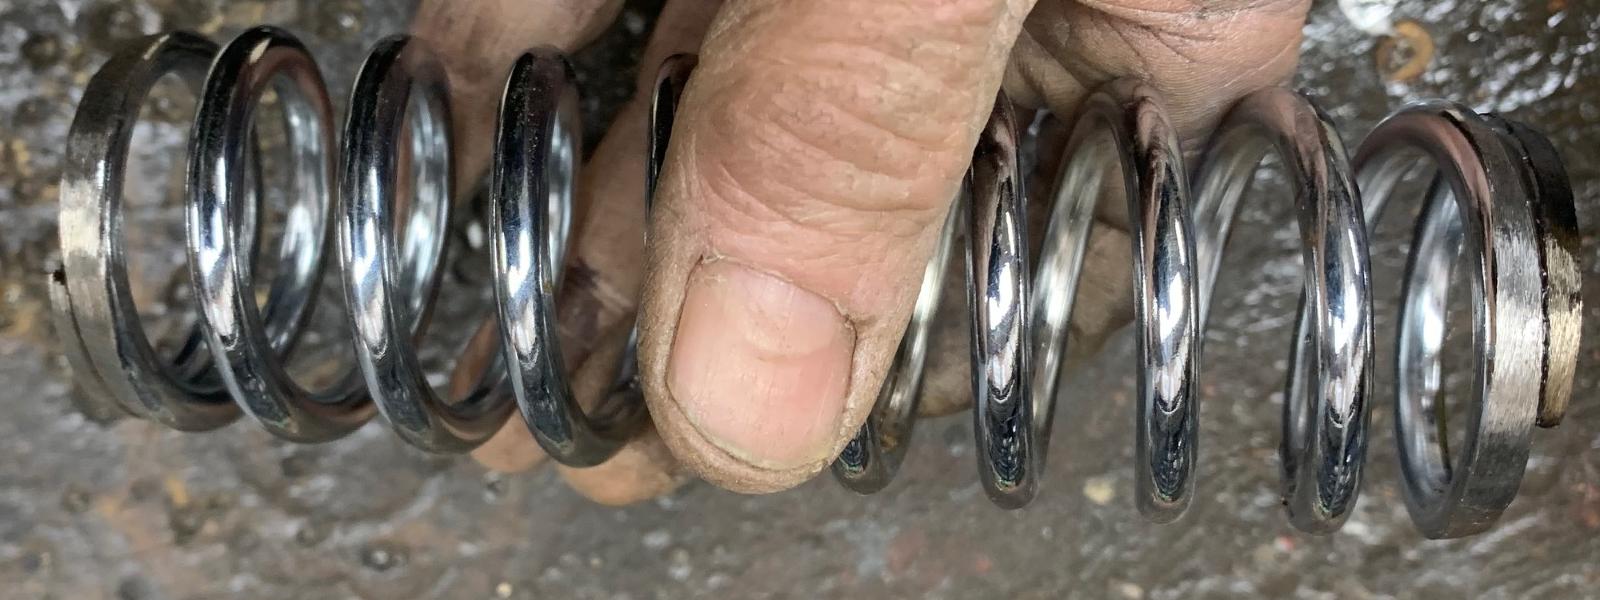
The front fork springs are another issue on both the 10" and 14"
wheel bikes. They were probably too soft from the start, but time never
does well for compression style springs. The original compression springs for
the 10" wheel front forks were 6" long, 1" OD, .775" ID, wire diameter .100" thick.
I've opened a good number of Speedway forks and found these front forks
to be compromised and/or broken. I'm looking for a good suitable replacement.
I have found a spring from Zoro.com the
Raymond green spring #302524,
it seems to be about perfect (at 50 pounds per inch, 25mm x 152mm or 1" x 6"). The disadvantage to this spring is
you need to order in packs of five, and they usually are not in stock. With this
spring I sometimes cut off 1/2" from the length, so there's no pre-load in the fork. I am quite satisfied
with this spring, it's just about the perfect firmness for me. And at about $5 a spring, it's economical.
The downside is you can only order this spring in packs of five (obviously you only need two per bike.)
Another spring from Zoro.com is Raymond blue spring #103524 which works, with some modifications. This spring is rated at 80 pounds per inch and is 6" in length and 1" in outside diameter. They are the right size, but way too firm. On the Zoro page though, you can specify a lower spring tension (60 pounds/inch) for this spring, which is firm but workable. This is a good for a very firm front end. To counteract the firmness, I found cutting off 1/2" from this Zoro spring helps, as this gets rid of the forks springs' pre-load. Note if you get the default 80 pound/inch blue spring, another idea is to run one new blue spring in one fork tube, and a stock spring on the other front fork tube. Not ideal, but it actually works quite well, and is about perfect in overall front end spring tension. The mis-match in spring tension is not noticeable since the two tubes work together in unison.
There is yet another possible spring, Raymond spring #302532d which is 38 pounds per inch, but is 8" long. Obviously you can cut this to 6", so it may be a good solution too (though I have not tried it.) My feeling is 38 pounds is too soft, but if you want a soft front end (again not recommended, as it could bottom out and bend the fork tubes), it may work for you.
-
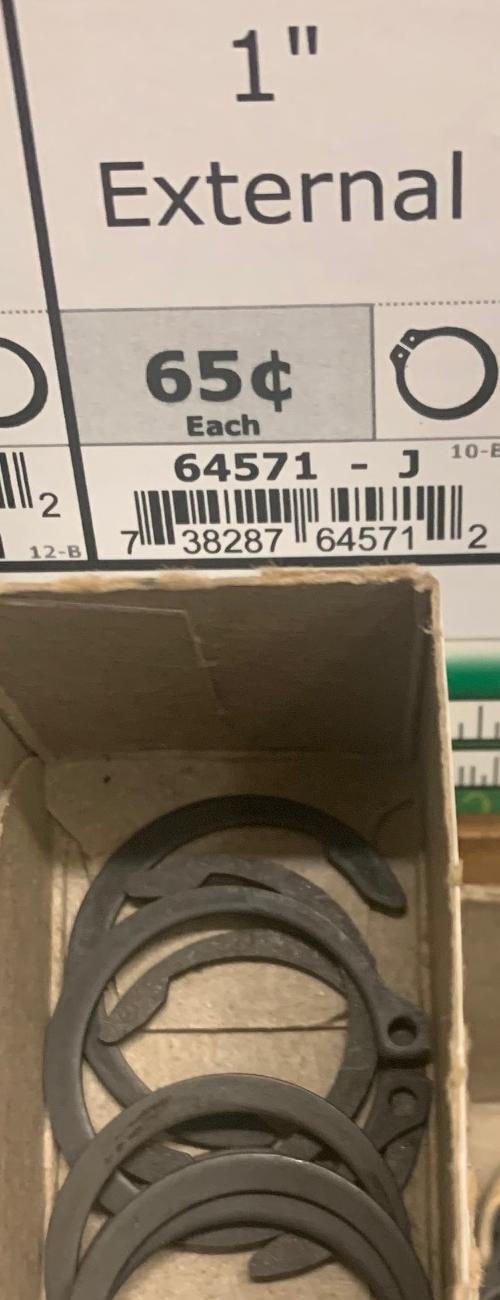
On 10" front forks, Speedway changed their mind on how the bottom of the non-moving
portion is locked in place. At one point the brass keeps was threaded into the
non-moving fork portion. But at some point they changed to a 1" snap ring, and the
brass keeper is just pressed into the bottom. On this variety most often the
1" snap ring is usually junk. You can replace this with a hardware store 1" external
snap ring. Just put this on the end of the fork, and then use a sander to take off
the exterior so it's 1.125" in exterior diamater (yes you will grind off the
snap ring holes.)
on the 10" Speedway front fork bottoms.
-
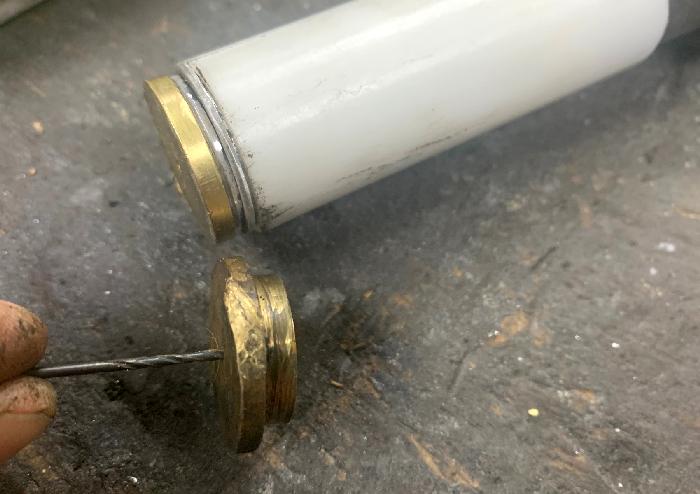
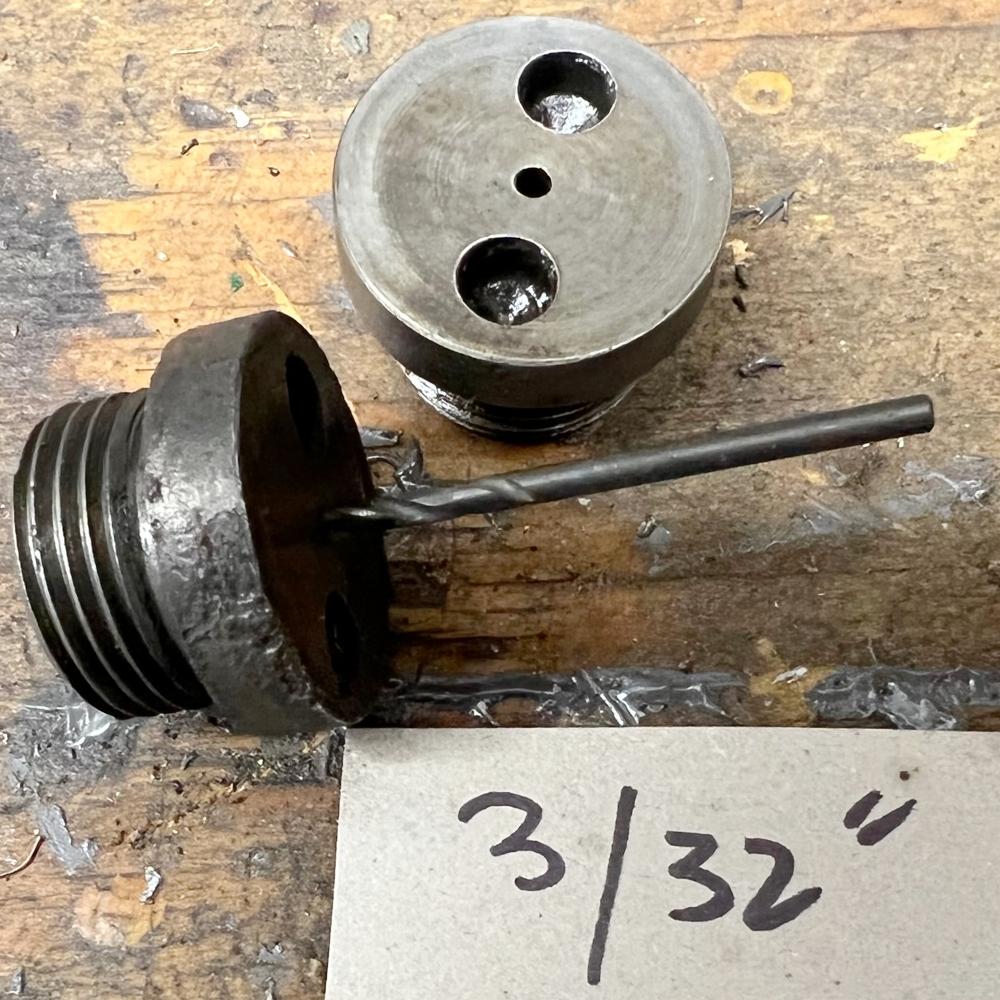
Also make sure you use a 1/16" drill bit and clean out the 10" front fork brass end keeper.
If this hole is blocked, the oil in the front fork can't move through the tube
and the front fork! On 14" wheel bikes with the screw-in style fork keeper, the hole
increased in size to 3/32". Note some late model 10" wheel bikes also use the
screw-in style fork end keeper.
The 14" front fork with screw-in keeper. A 3/32" drill bit is used to clean out the hole in
the end of the steel keeper.
Speeedway fork repair document.
-
Also on the top of the 10" wheel triple tree bikes before 1973 they
used red plastic bolts. If you removed these, you could add oil to
the forks. Unfortunately since prior to 1973 these were red plastic,
they are often broken or missing. You can replace them with short
1/2-20 bolts.
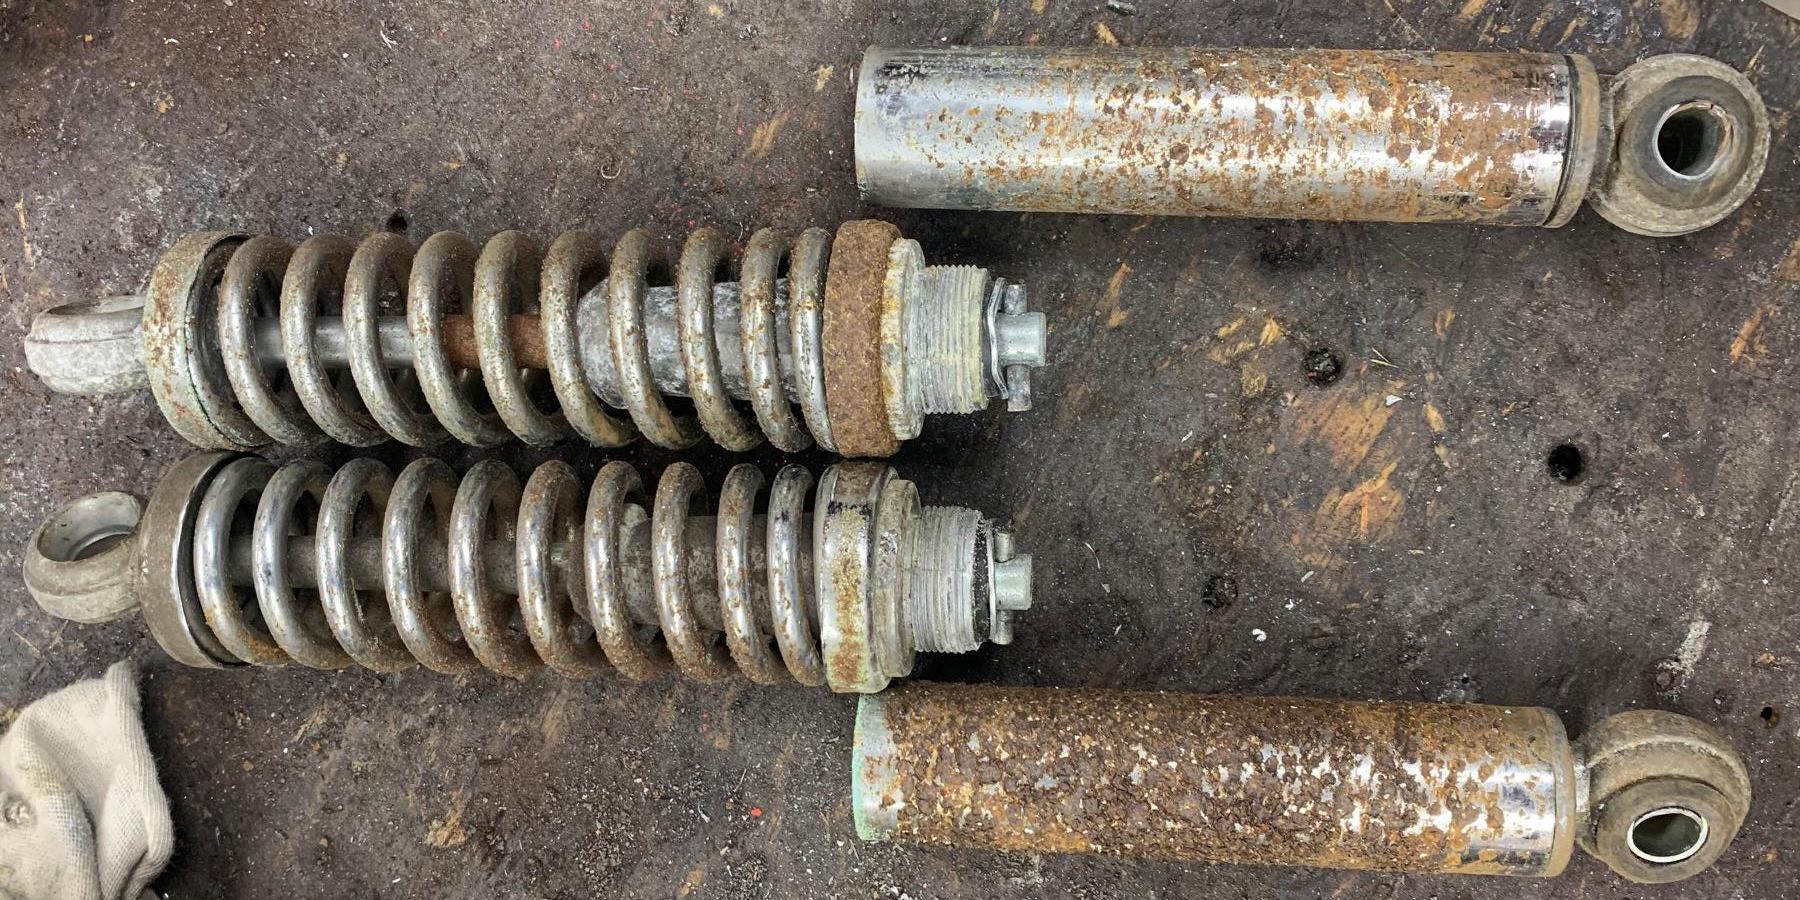
Rear Shocks.
-
Intially Speedway used Sebec (Italy) rear shocks (the eyelets are marked
"Sebec Italy", so look for that.) There's a pretty decent
video about rebuilding those on
Youtube, and I suggest checking it out. Note you can *not* powder coat the lower
black tubes on Sebec shocks, as they have a nylon liner (which would
melt.) Also note Sebec used 1 5/8" O.D. or 1 3/4" O.D. springs.
The later 1 3/4" variety is better, as you can get new springs at
OldSchoolMinibikes.com
for about $10 each. But even if your Sebec uses
1 5/8" springs, they can easily be adapted to use a replacement 1 3/4" spring.
All you need to do is use a bench grinder to thin the top and bottom spring
coils so the spring caps fit on the new springs.
Lower: after the rebuild process, the Betor shock looks nearly new with replacement 1 3/4" OD springs.

-
Starting about 1972 Speedway changed to Betor (Spain) rear shocks. These are
pretty similar to Sebec, except the lower body is symmetric (where Sebec are
usually tapered.) The rebuild on Betor shocks is a bit different than Sebec.
Where on Sebec you have to remove the lower shock eyelet, and use a 6" extension
11mm socket to unbolt the shock body, Betor had a different idea. Instead
the entire lower shock body unscrews from the upper half of the shock. Then a
small metal pin can be removed, which allows the entire shock to come apart.
A modified 1 3/4" replacement spring to fit the 1 5/8" spring caps.
The end spring loops of the replacement spring are ground on the bench grinder
so the smaller spring caps will fit.
Using a chalk gun to compress the Betor shock spring so the release pin can be
removed easily
-
When re-assembling the Betor (or Sebec) shocks, always put a thin layer of
wheel grease on the plunger. Also put some grease on the lower shock body fine threads.
The dis-similar metals of the shock body (steel) and the eyelet (alluminum) like to corrode
and lock up, making future disassembly difficult.
10" Wheel Front Disc Brake Repair (missing caliper.)
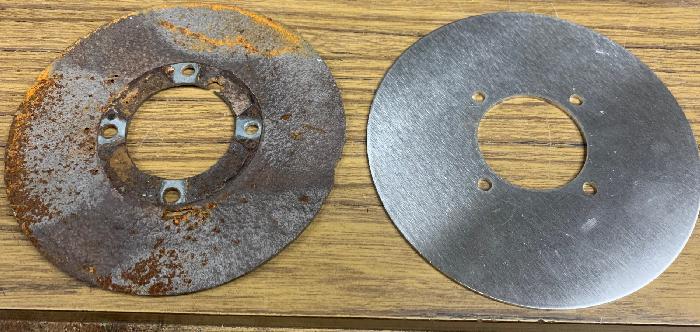
A good number of 10" wheel models had a front disc brake. Unfortunately they are usually missing the caliper portion of the brake. For this discussion we'll assume the disc brake rotor is installed on the front wheel (though you can make a new rotor out of 1/8" thick steel, 6" diameter with a 1 7/8" center hole)... But the big question is, how do you deal with the missing front disc brake caliper?
Speedway brake parts are impossible to find. So is there a way to adapt a different and more common front disc caliper to the Speedway 10" wheel bike? Turns out there is a way, but it involves making a small metal bracket and utilizing a DB30 mini bike disc brake caliper.
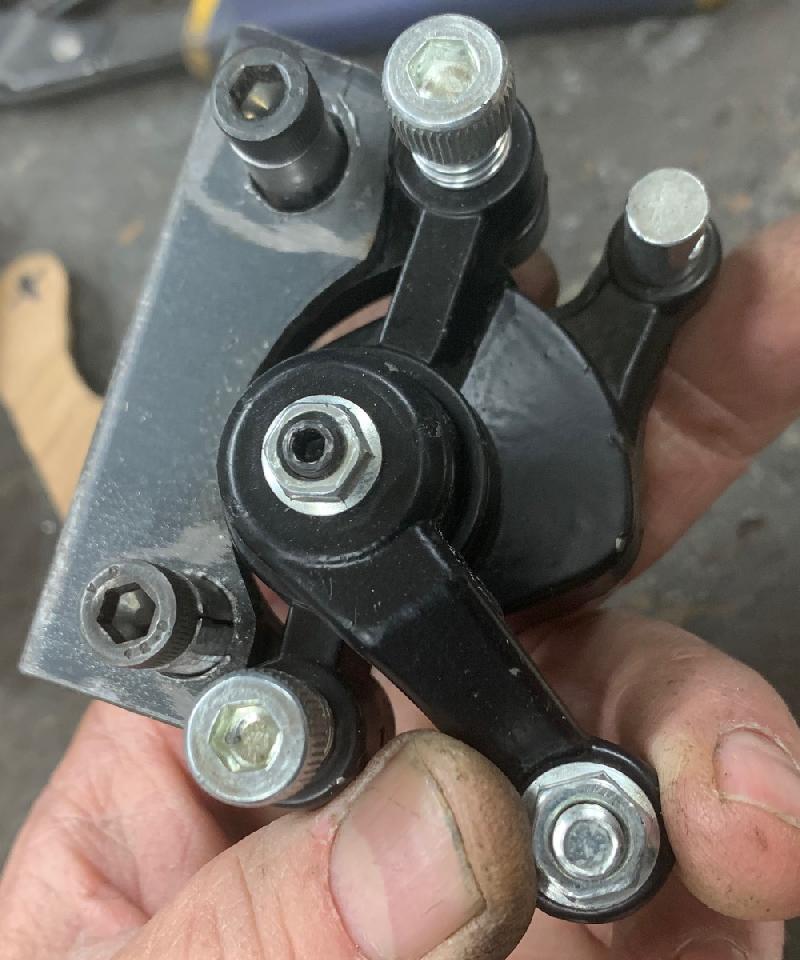
The elusive 10" wheel Speedway front brake caliper assembly. This goes missing for a lot of reasons.
Mostly because other mini bikes of the period also use this assembly, so they are
stolen and transplanted.
Original 10" Speedway front wheel and disc brake rotor. No disc brake caliper though...
-
First step is to get some parts. You'll need some 1/8" thick steel,
a couple 1/4-28 bolts (1" long), and a couple 3/8" OD metal spacer.
That stuff is hardware store material. The actual DB30 disc brake
caliper can be bought on ebay for about $20.
-
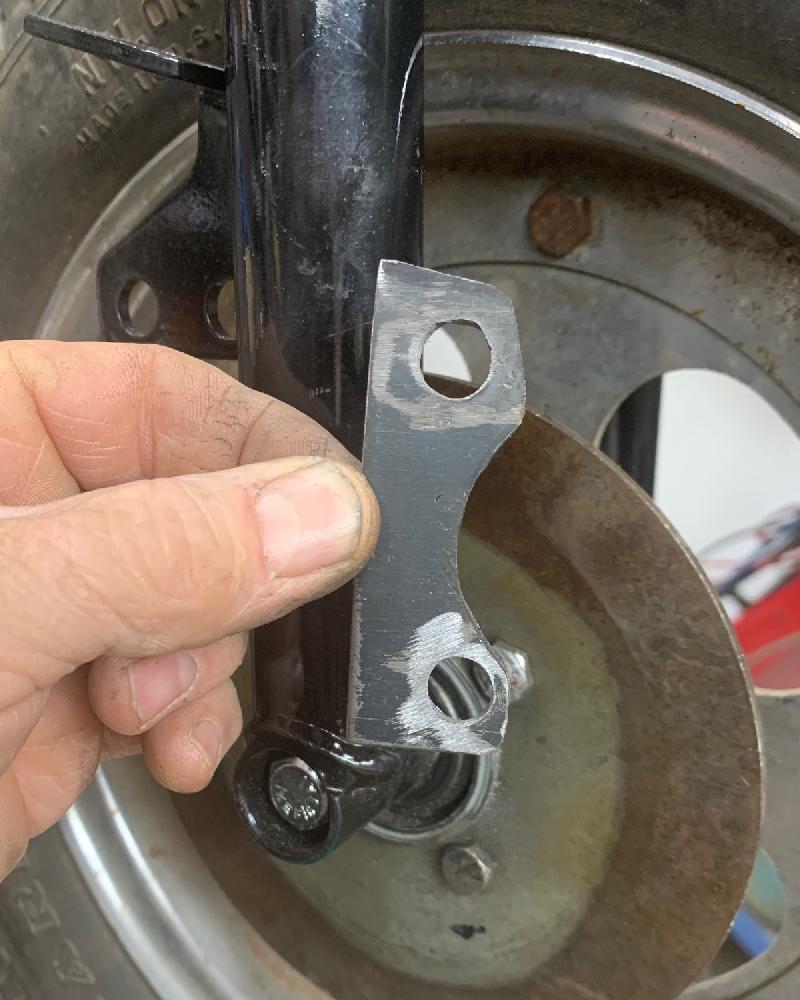
First up is to cut a part from the 1/8" flat steel with two 3/8" holes. It needs to look like the
picture below. Also need those two 1/4-28 bolts and two 3/8" metal spacers (seen above.)
Or if you like you can download the
front brake TIF file and print it on paper to cut the part.
Or better yet download the DXF files below and have them laser cut:
- Front brake disc brake mount for db30 disc brake: front brake mount DXF (inches.)
- Original size Speedway front brake rotor: disc brake rotor DXF (inches.)
- Speedway swing arm chain adjuster (notches): rear swingarm chain adjuster notched DXF (mm.)
- Speedway swing arm chain adjuster (smooth): rear swingarm chain adjuster notched DXF (mm.)
- Speedway clutch guard mount: modified MTD clutch guard mount bracket for Speedways DXF
I use the website sendcutsend.com to upload the DXF files and they cut the parts from those files. This is really convenient and quite inexpensive. The disc rotors I have cut in stainless steel in .100" thickness. The other parts use .125" thickness.
Make your own metal bracket from 1/8" thick steel and drilled with two 3/8" holes so you can
mount a DB30 style disc brake to the Speedway front forks (or use the DXF file above and
have the part laser cut.)
Original front Speedway disc brake rotor (left) and new stainless steel
version made from the above DXF file (right.)
What we will do is weld this metal bracket to the lower front fork tube. The new DB30 brake caliper will float on the bracket. This is important... the caliper must float through the two 3/8" bracket holes and the metal spacers. I tap the DB30 caliper for the 1/4-28 (it's originally a slightly smaller metric size.)
Here's the DB30 brake caliper floating on the bracket.
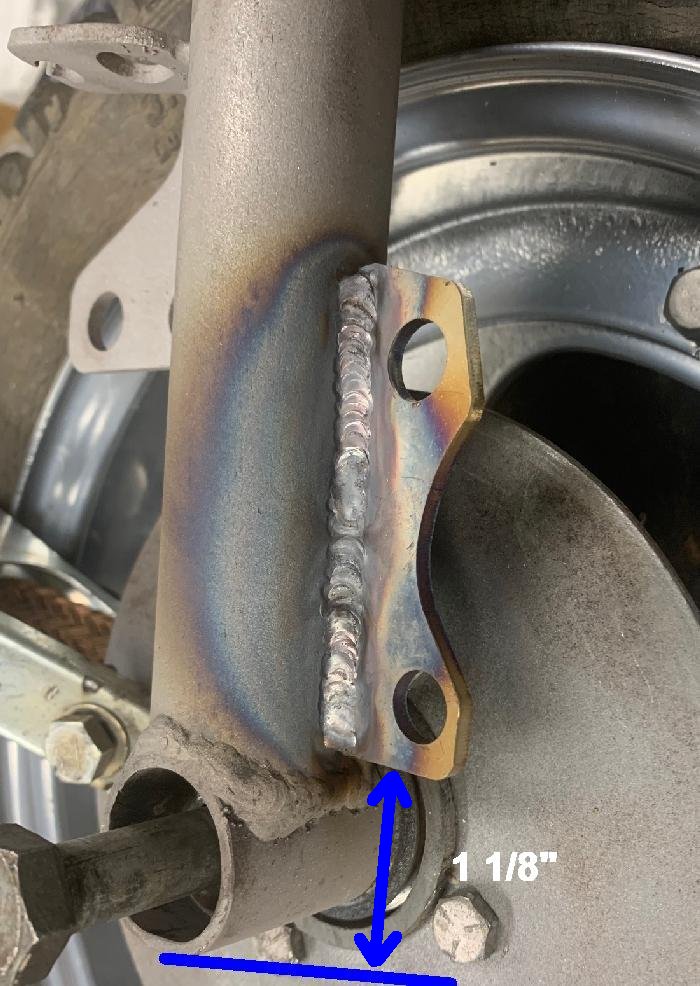
Here's the brake caliper bracket welded to the front fork, and the DB30 caliper installed.
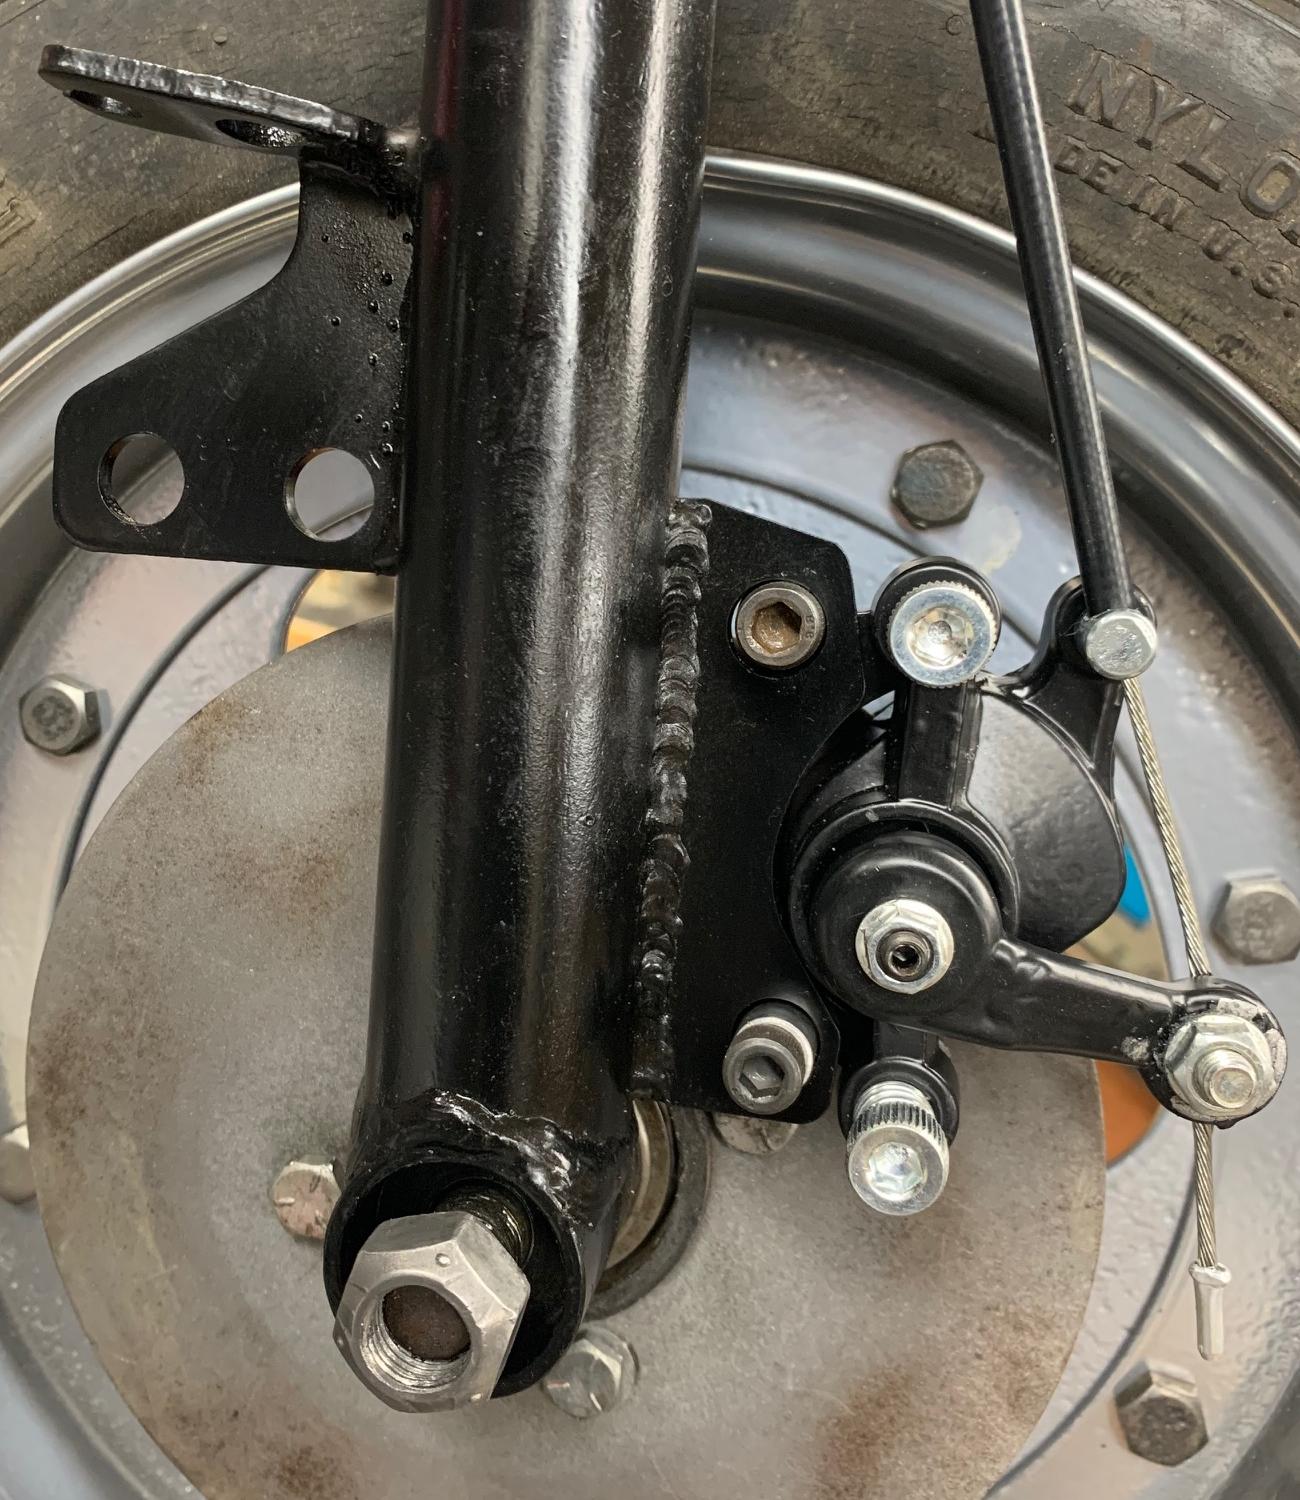
-
So how well does this front brake work? Well pretty darn well!
Though I should mention one more thing... the DB30 caliper is set up for a .100" thick brake rotor.
The original 6" brake rotor on the Speedway front wheel is 1/8" (.125") thick. I used two washers
on the brake caliper to space the stationary disc brake pad out, to accept the additional
thickness of the Speedway brake rotor. This involved removing two allen head bolts and installing
a washer between the stationary pad holder and the caliper for each bolt (super easy.)