2/1/20. Email: cfh@provide.net
Why a Torque Converter?
- Series20 (symmetrical) max 8hp, 13 degrees each side. Drive engagement 2200rpm.
- Series30 (asymmetrical with overdrive) max 8hp, 20.5 degrees one side. Drive engagement 2200rpm with zinc weights.
- Series40 (symmetrical heavy duty high HP)
- Zinc weights (stock): 320 grams
- Aluminum die cast: 147 grams, #202931a
- Mod Aluminum: 90 grams. This is mentioned in documentation, but I have not seen this for sale anywhere! So won't document them...
- Black garter springs #011189a: 1400rpm zinc, 2100rpm alum.
- Orange garter springs #011184a: 1500rpm zinc, 2300rpm alum.
- Pink garter springs #011186a: 1800rpm zinc, 2800rpm alum.
- Purple garter springs #011187a: 2000rpm zinc, 3200rpm alum.
- Blue/silver garter springs #011188a: 2200rpm zinc*, 3300rpm alum.
- White garter springs #011190a: 3100rpm zinc, 4000rpm alum.
- Flor Yellow garter springs #216111a: 3300rpm zinc, 4200rpm alum.
* stock setup. - Green (series30 stock) #215699a
- Yellow (series30) stiffer for more low-end power #216168a
- Blue (series20 stock) #215698a
- Orange (series20) stiffer for more low-end power #216095
- Red (series40 only) #203130a
- Series30 stationary sheave 3/4" bore #219278a
- Series20 stationary sheave 3/4" bore #219573a (replaces 202064a)
If you're running a centrical clutch on your minibike, you are probably missing out on what your mini bike is capable of doing. Centrifical clutch (CC) is a single speed device. It's prone to slipage too. A torque converter (TC) is an automatic speed and load sensing 2 speed transmission. And frankly, a TC is not much more money than a centrifical clutch - an imported series30 TC kit is available on ebay for about $60.
There are a lot of torque converter options though:
There are also several manufacturers of TC over the years. The most common is Comet. And all the imported clone versions you see for cheap on ebay are Comet copies. Comet is still in business and their TC (or their clones) is really the only one available. The only exception is the new Juggernaut, which is a copy of the Salsbury vintage torque converter. It has a 2500rpm engagement with max rpms up to 8500rpm and 3/4" wide asymmetrical belt. But the Juggernaut (GoPowerSports) is only the drive unit. On a stock motor running at 3600 rpm you will not see much difference in performance with a Juggernaut. But running 4000+ rpm is where the Juggernaut shines.
Drive and Driven.
Torque converters have two clutches: the drive (the part on the motor)
and the driven (the part on the jackshaft.) There are lots of different
clutch spring options for these, which change the RPM in which the clutch
engages (or changes gears.)
Drive Comet Springs and Weights.
On the Comet/clone drive, there are different weights which will change engagement.
Note this information applies to both series20 and series30:
There are also Comet drive "garter" spring choices and their engagement RPM (for both series20 and series30) with stock zinc or die cast aluminum. The RPM level of the spring is when the driver just starts. It's the grab rpm on the belt from a stop. Have never been able to find any documentation in regards to how the drive and driven work in concert when using the different springs/weights and shifting from low to high gear. Stock garter springs are Blue springs. With zinc weights and blue garter springs (stock) the drive should engage at 2200 engine rpm.
Driven Comet (jackshaft) Torsion Springs.
There are also spring choices on the jackshaft mounted 'driven' unit.
Note drivens come in 6" and 7" styles. The 6" is typical for minibikes,
and 7" often used on go-karts. Note that series20 and series30 torsion driven springs
are not mixable. That's because the series20 springs are reverse (left hand) wound.
Other Comet Parts:
Interestingly you can convert a Comet series20 (symmetrical) to a series30 (asymmetrical) by just changing the non-moving sheeve.
All the other parts are the same! But just be aware that the non-moving sheave also dictates the size of the belt used
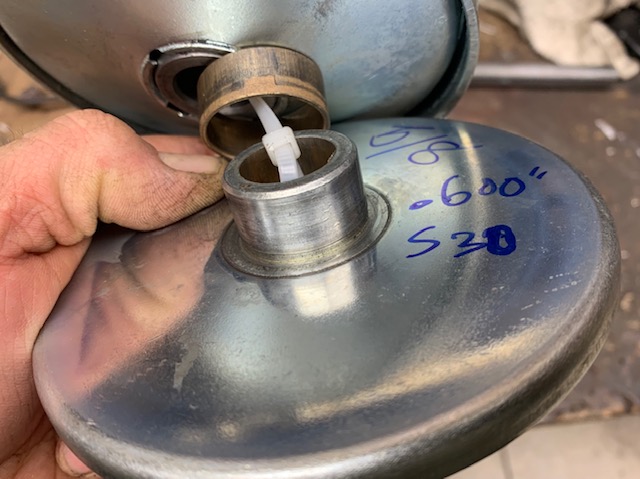
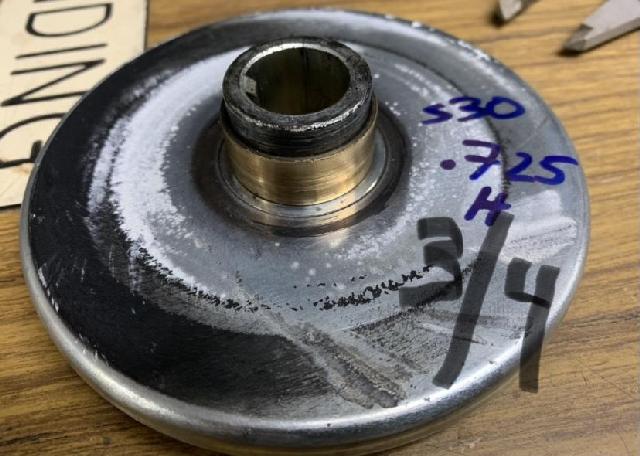
(5/8" or 3/4" wide.) You can't mix belt sizes on the drive and driven! How do you tell if the non-moving sheave is
5/8" or 3/4" belt designed? Well the height
of the center section (that the brass idler ring mounts) is the key. On a 5/8" belt part, the height of the center is .600" inches.
On a 3/4" belt part, the height of the center is .725" inches.
1970-1975 Rupp Torque Converters.
-
The 1970-1975 torque converter TC1 system used on most of the Rupp mini bikes
during this era works really well. But one problem with the original
Rupp TC1 is they wear. Especially at issue is the 'drive' portion
(the part attached to the motor.) The #15105 TC1 driver inner flange
is particularly troublesome. It's made of cast aluminum with a
pressed steel keyed sleeve. With time the angled aluminum area that touches
the TC1 belt wears to the point where the casting is is no longer
angled. When this happens the belt slips, and the whole point of a
torque converter is lost. So how do you fix this?
The following process assumes you are using the stock Rupp "driven" unit (the part attached to the jackshaft.) If you are replacing that too (with a non-Rupp part), this procedure probably does not apply. Could you replace the driven too with a Comet series20? Sure, but that would probably require making a new jackshaft, and doing a lot of spacing and measuring to get everything lined up.
The Comet 219559a (or at OMB warehouse) driver with 3/4" bore is the series20 Comet part that, in theory, should be a direct replacement for the Rupp TC1 drive unit. There are clone versions of this driver available too. Which in this document is what I will be dealing with.
Unfortunately the inner (and outer) aluminum flange of the Rupp TC1 drive portion are no longer available. So really the only choice is to replace the entire drive unit. The good news is that Comet (and their Chinese clones) are available. Important! You must get a "series20" style drive unit. Most of the ones you see for sale are "series30", which won't work here. What's the difference? The series30 variety only has only one side angled, and one side flat (asymmetrical). The series20 has both sides angled (symmetrical) at 13 degrees. So they use a completely different style belt. The driven side of the TC1 (the part on the jackshaft) requires a belt with angles on both sides, so you must use a series20 Comet style drive unit to match. The two different types work differently too. The series20 driven moves inward (toward the center of the bike), where the series30 driven moves outward (away from the center of the bike). You can't mix series20 and series30 parts, they are not compatible with each other. And the Rupp is designed for a series20, so you must stay with that format.
-
The problem with all the new style Comet and clone series20 torque converters
are the belt they use - they use a 3/4" wide belt. The original Rupp
used a 5/8" wide Gates 6061 belt. Again, you can't use the newer 3/4" belt
(assuming you're keeping the original driven jackshaft side of the torque converter.)
But the good news is you can modify the clone/Comet drive unit to use a 5/8" belt.
-
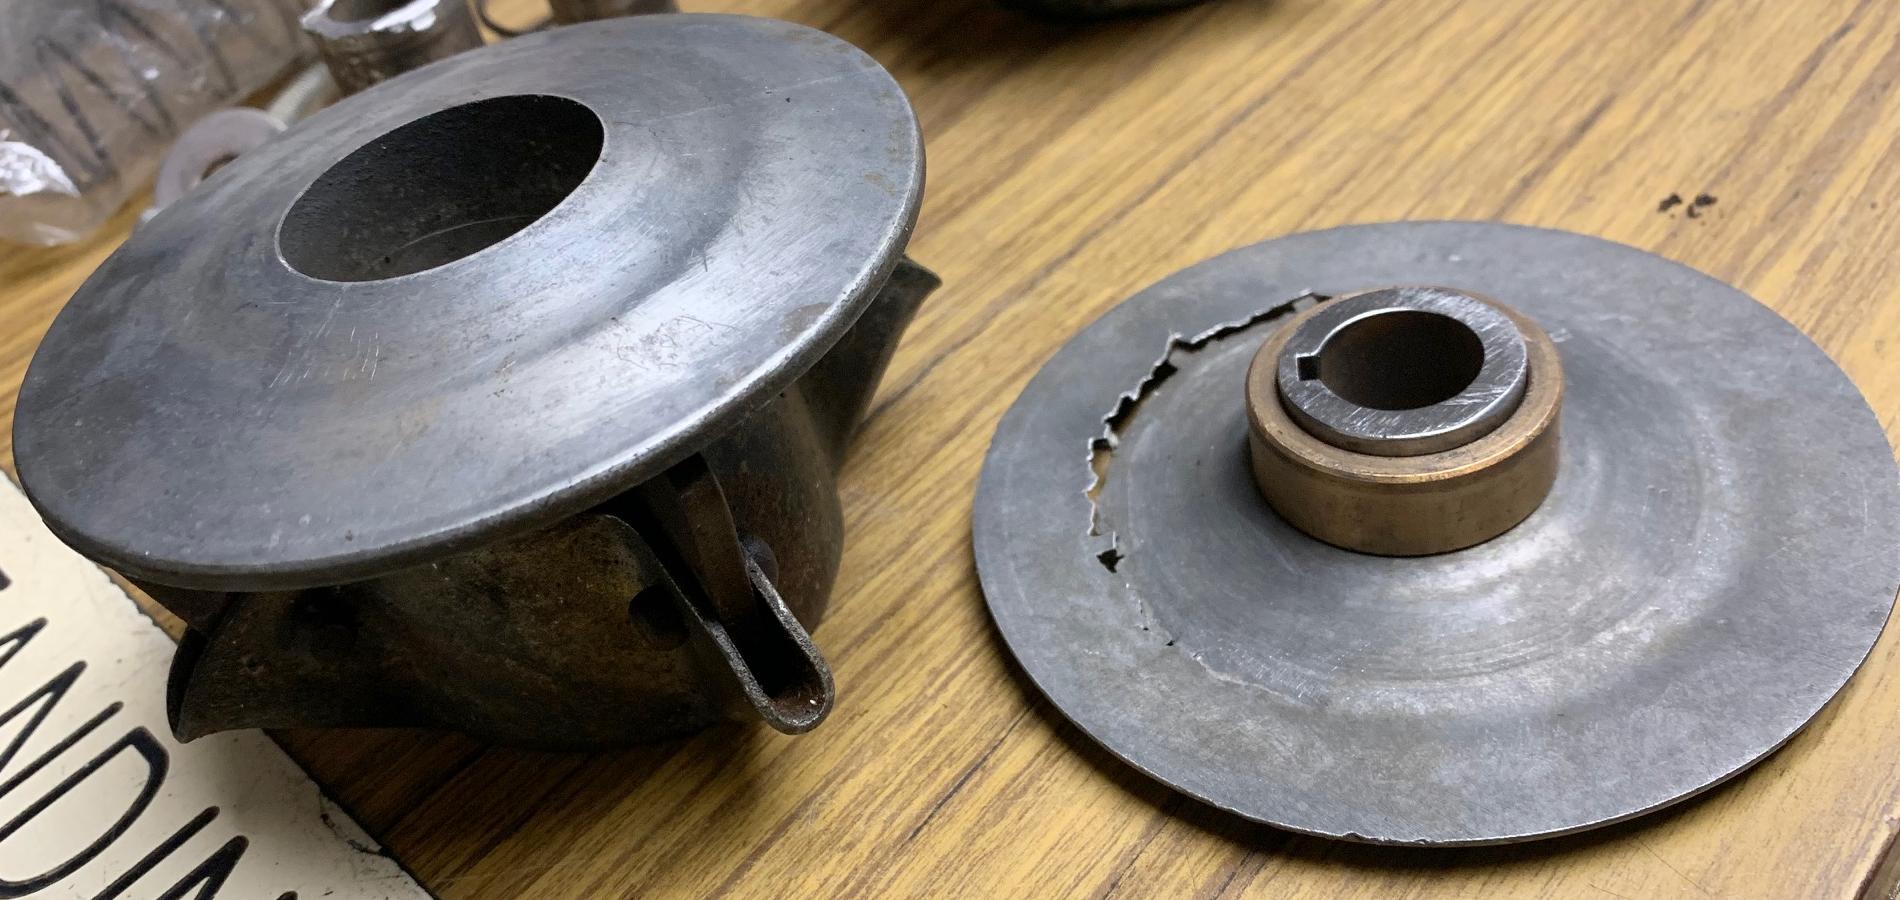
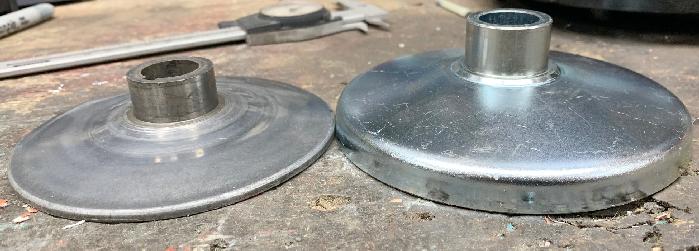
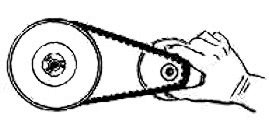
Examine the picture below and you'll see the inner flange of the Rupp drive
and the inner flange ('engine side sheave' or 'fixed face and post') of a clone series20, also
know as Comet 219573A
(also available from OMB warehouse).
This is not be be confused with the Comet 219572A
(movable face with splined hub.)
Anyway, notice the difference in height between the Clone series20 and Rupp TC1 fixed face? It's huge! The Rupp inner flange is much lower profile. This is a problem on the clone series20. If you install the inner flange (it goes closest to the motor case), the belt just will not line up. And since the jackshaft isn't long enough, you can space out the driven side the torque converter to match the clone drive unit.
Right: Clone series20 inner flange.
Notice the profile difference? The clone is much "taller" than the original Rupp assembly. Also notice how worn this Rupp flange is (it should have the same 13 degree angled profile as the clone series20 assembly on the right.)
-
Now if you're using a genuine Comet series20 driver, this problem
is far less of an issue. The genuie Comet fixed sheave does not
have this huge lip. So it lines up a lot better (though it may
need some adjustment work.) But the clone series20, the one
that is seen at most shops and ebay, that's another story.
Using a lathe, you can turn the Comet/clone inner flange. First you have to turn the front of the inner flange (where the belt rides.) The 3/4" belt wants a .625" long barrel, where the 5/8" belt wants a .500" long barrel. So that needs to be turned down to accommodate the thinner 5/8" belt. Note the brass idler that rides on the Comet/clone is .480" thick. So at .500" long, you have .020" of play, which is what you want.
Right: modified clone series20 inner flange.
Notice the barrel length (where the bronze bushing rides) has been shorted from .625" to .500".
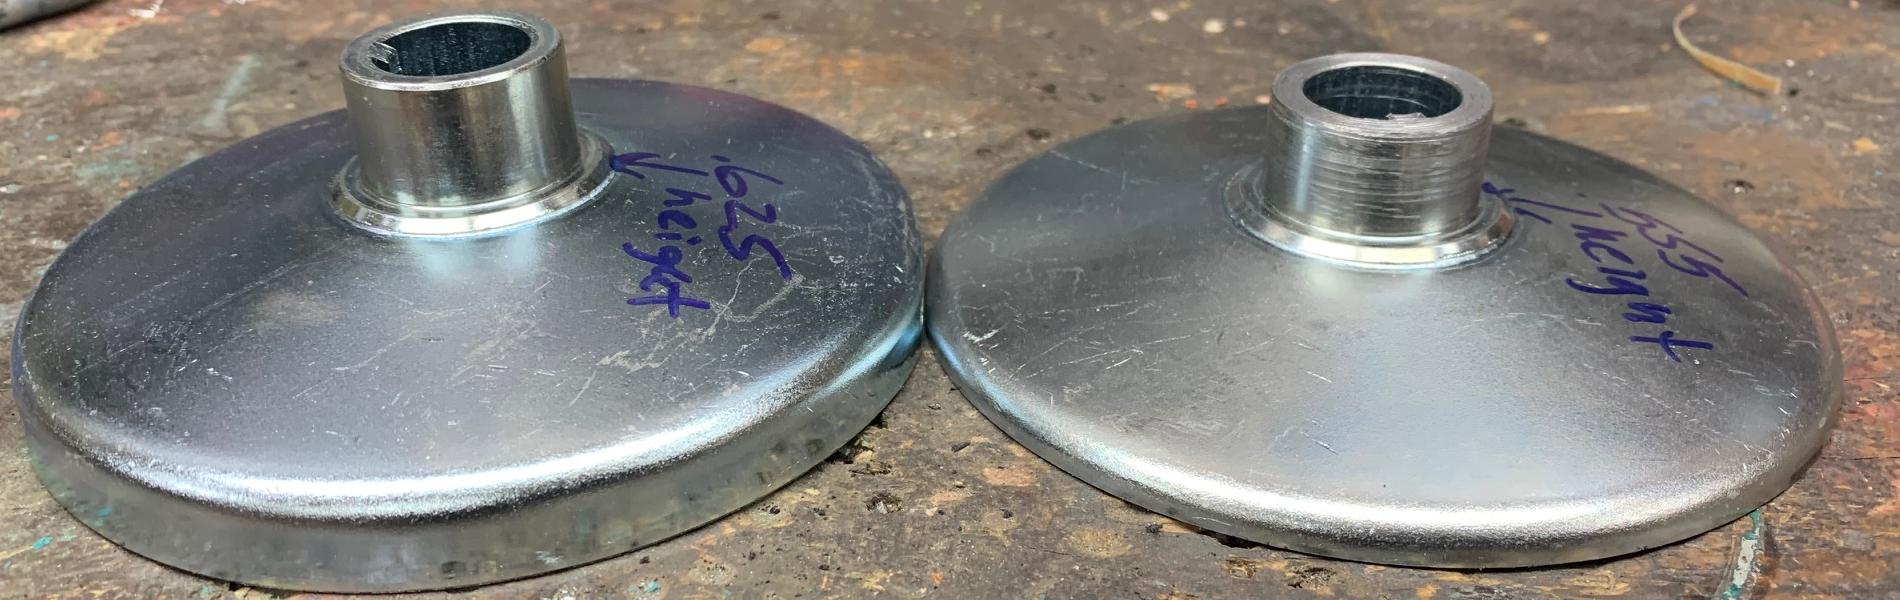
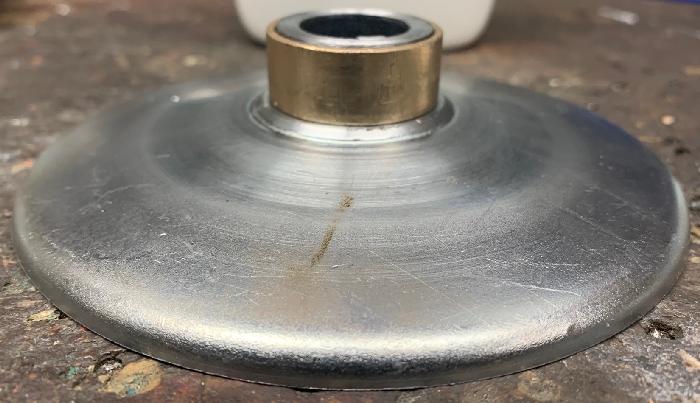
Coment/clone with the shortened core (to .500") and the
brass idler installed.
-
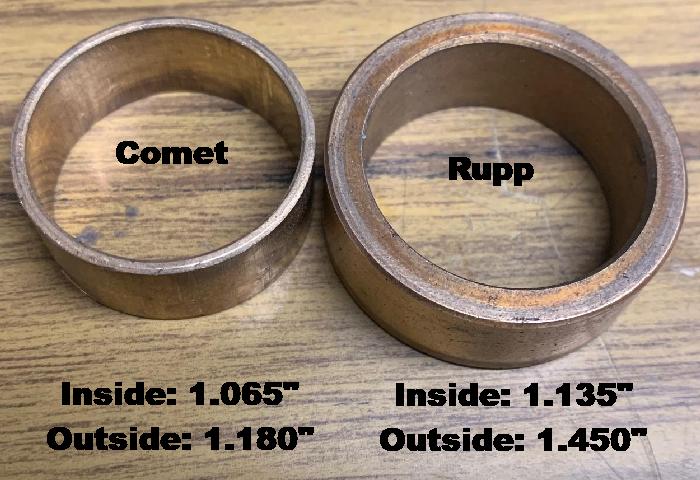
Another consideration is the brass idler itself. On the Comet/clone it
has an inside/outside dimension of 1.065"/1.180". The original Rupp
brass idler has an inside/outside dimension of 1.135"/1.450". Basically
the outside diameter is the difference, as the Rupp is thicker/bigger.
This takes up more space and makes the 6061 Gates belt a bit tigher.
This does make a difference. This will have to be addressed at some point,
because you can't get belt smaller than the Gates 6061. More on that later...
-
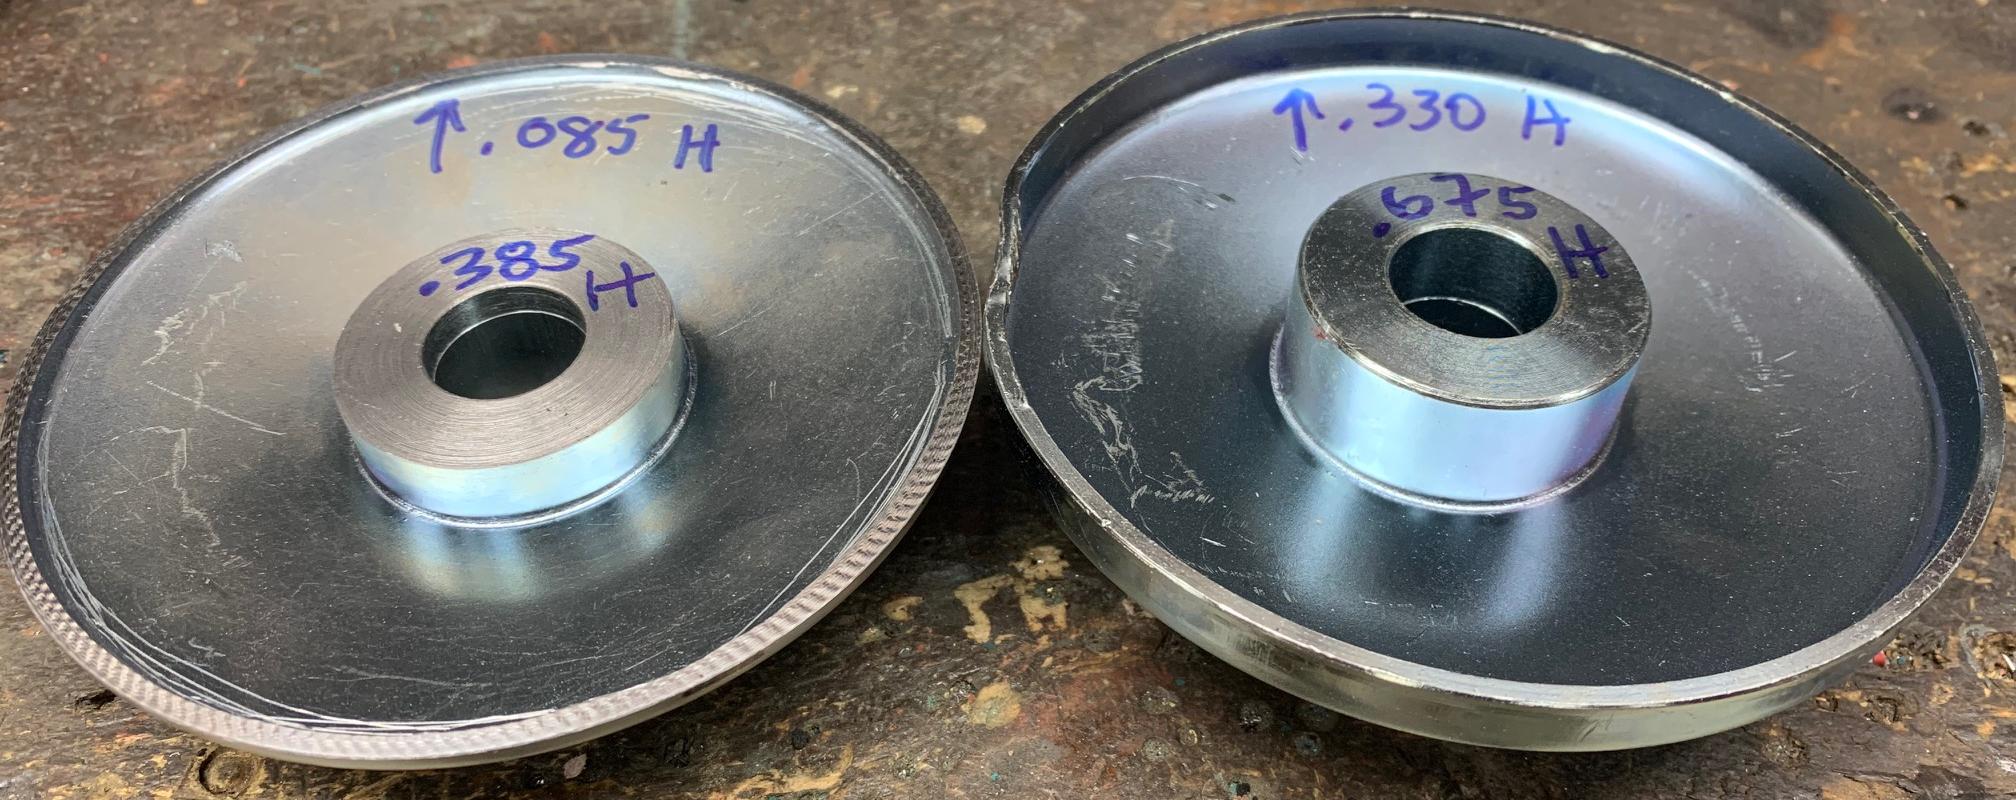
After the face of the Comet/clone inner flange is turned, the backside
of the inner flange also needs to be turned. First the outside of the
bell needs to be reduced in size from .330" tall to .085" tall. And the
inside flange also needs to be reduced from .675" high to .385" high.
With this modification the new Comet/clone series20 drive inner flange
is now the same height profile as the Rupp inner flange.
Right: stock clone series20 inner flange.
Notice the profile difference after the inner flange is cut on the lathe.
-
Make sure you install a 3/4" hole washer on the PTO shaft before installing
the Comet/clone sheave. Also put either some oil or grease on the engine PTO.
This will make removal of the Comet/clone inner sheave easier,
as it can't get jammed against the end of the PTO shaft.
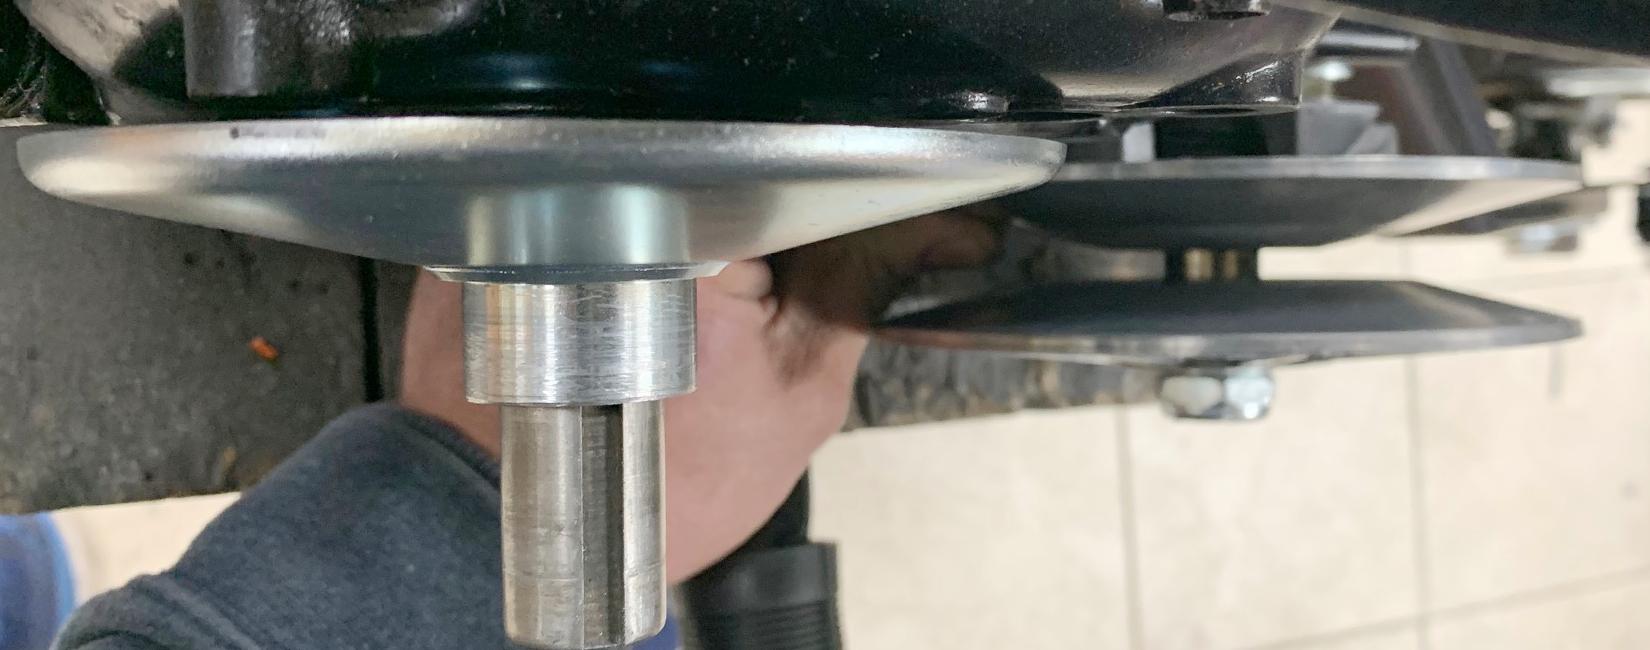
Check out the pictures below. They show the stock Comet/clone series20 inner flange driver on a Rupp Roadster2. You can clearly see the unmodified inner flange does not line up the belt with the jackshaft Rupp driven unit. But the modified clone series20 inner flange does line up the belt with the jackshaft Rupp driven unit perfectly.
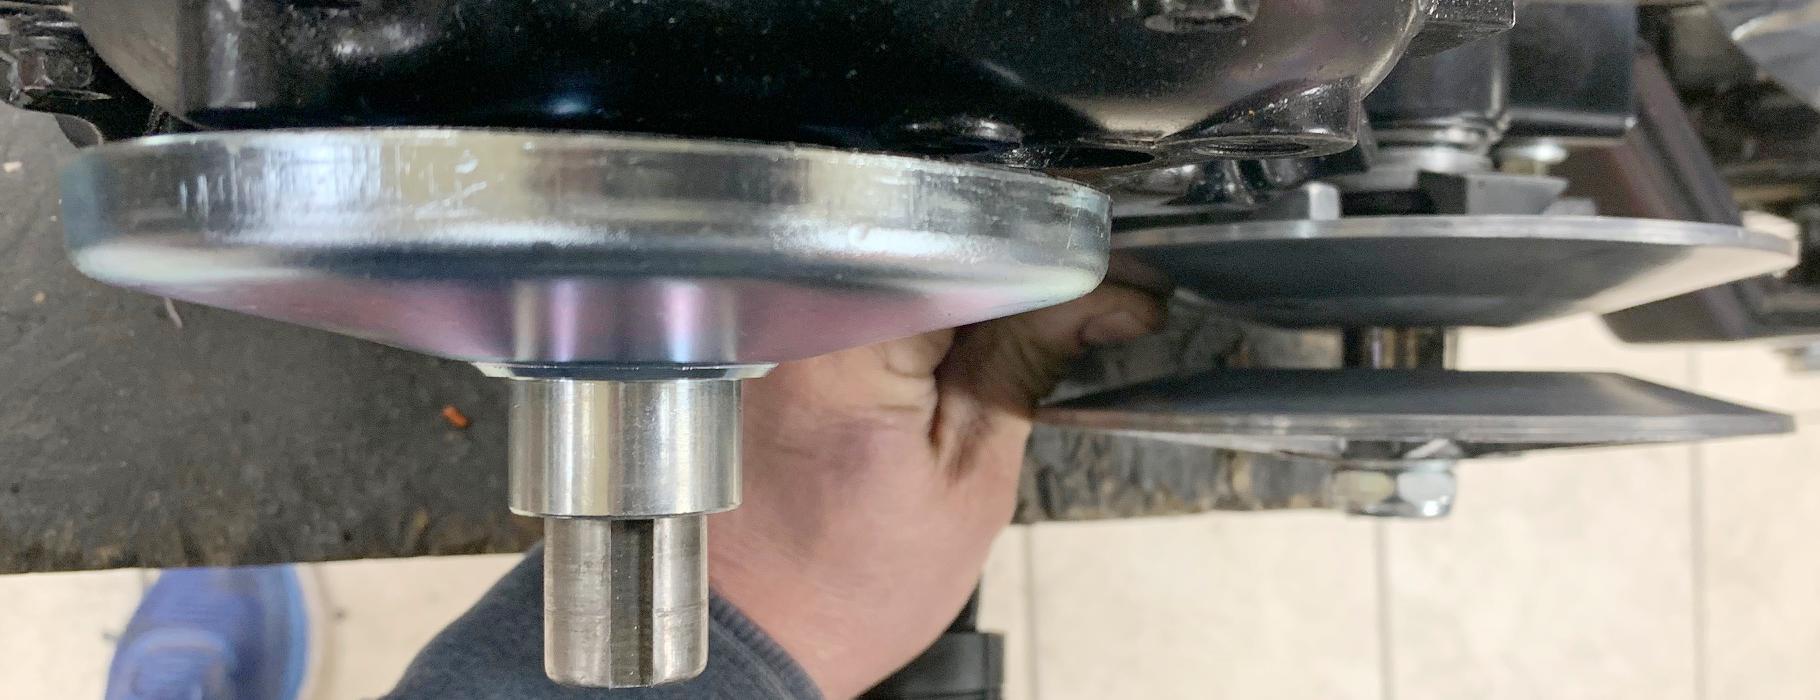
Modified (cut) clone series20 inner flange. Belt will now line up with the jackshaft
Rupp driven unit perfectly.
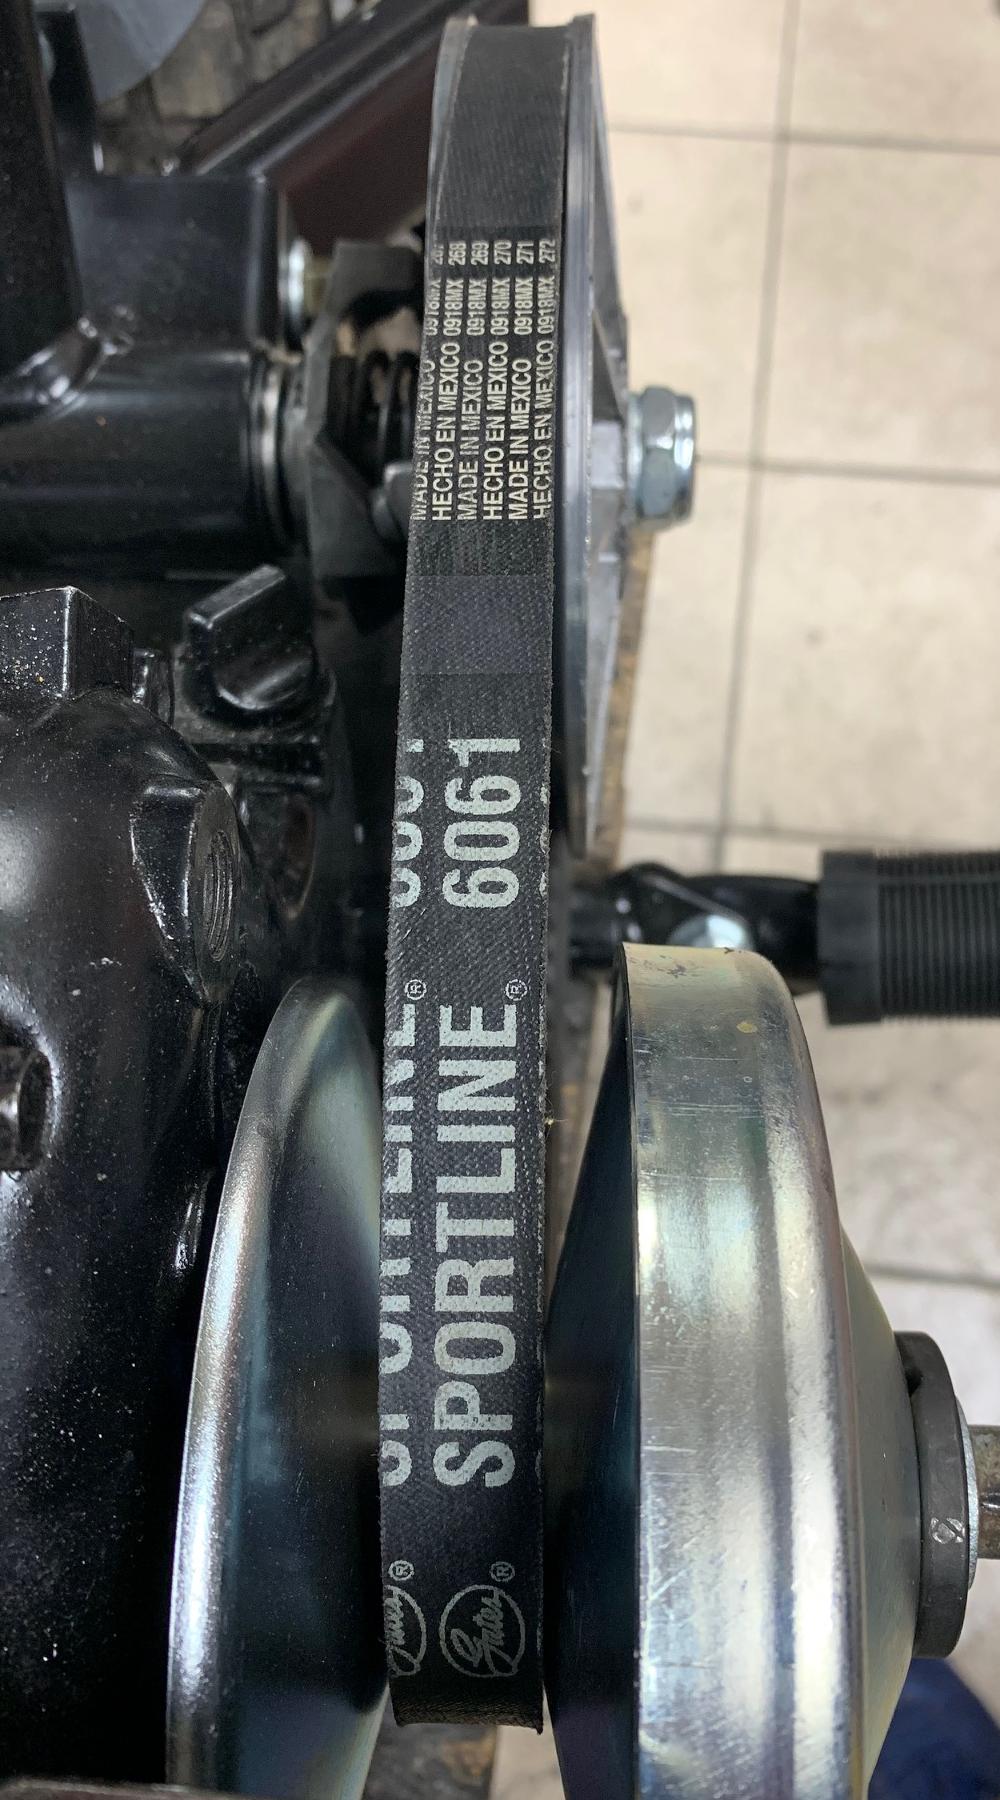
Here's the belt installed on the modified (cut) clone series20 inner flange.
Belt lines up nicely.
-
Remember above I talked about the drive's brass idler, and how the Rupp and Comet
outside diameters are different? That has an influence here. With the Comet/clone
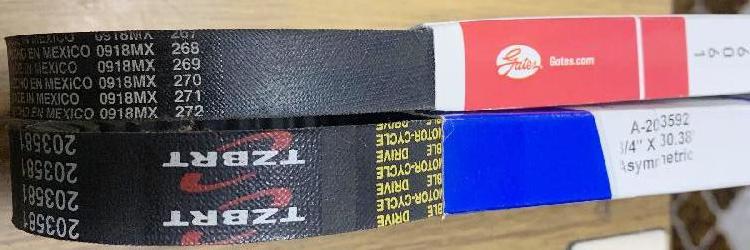
brass idler, the Rupp 17617 or Gates 6061 or Dayco GTS407 or Goodyear 70003
belt is too big (because the Comet idler is smaller than the Rupp.)
You can't change the idler size either, because
the outside portion of the torque converter driver unit has to pass over
the brass idler. Increasing the diameter will prevent this, and the torque
converter will never engage.
- code: TC88
- type: variable speed
- outside circumference: 27.21" (691mm), though Dayco says 27.5" (698.5mm) and Comet says 27.00"
- top width: 5/8" (0.625" or 16mm)
- belt side angles: 30 to 33 degrees symmetric (usually 15 + 15 degrees, same angle both sides)
- notched: yes
- angle code: G
- construction: polyester (or kevlar)
- The belt should be at it's highest point in the driven (jackshaft) pulley flanges. Remove the outer half of the driver clutch (the part on the motor). Squeeze the belt down and pull it forward (towards the front of the mini bike). The belt should show 1/8" to 3/16" of clearance between the inside of the belt, and the outside of the brass idler on the torque converter drive.
So what is the answer? Well a smaller belt would be ideal. Here's the specs for a Gates 6061 (the stock Rupp belt):
I have tried a Comet belt #200419 (27.25" outside diameter), but that works worse than the Gates 6061. The 200419 belt is not smaller (it fits looser.) My feeling is we need a 26" or 26.5" belt to really make this work optimally. The best way to check this is as follows:
I have an idea on how to fix this belt length problem. More on that soon...